Mastering Turn Play in 3-Bet Pots OOP
Playing the flop OOP in a 3-bet pot can be challenging. Turn play, however, is what gets the heart pumping. As the pot gets bigger, mistakes become more costly. But don’t worry; this article covers everything you need to start crushing your opponents in 3-bet pots OOP on the turn as the preflop aggressor (PFA). Once you understand how to approach the turn, you’ll become much tougher to play against. Let us dive right into it!
Impact of Flop Play
What drives turn decisions? One factor is SPR. How much is still in your stack compared to what has been relinquished to the pot can dictate:
- Bet sizing
- Betting frequency
- Which hand classes we want to bet
A second factor, this time of the exploitative kind is our opponent’s tendencies. These can be categorized, for example, as too aggressive or too passive, and they can take different forms in game, like raising too much or calling too much respectively. The resulting changes can have dramatic effects in the construction of our turn approach.
However, one factor that many players seem to forget is the impact of flop strategy.
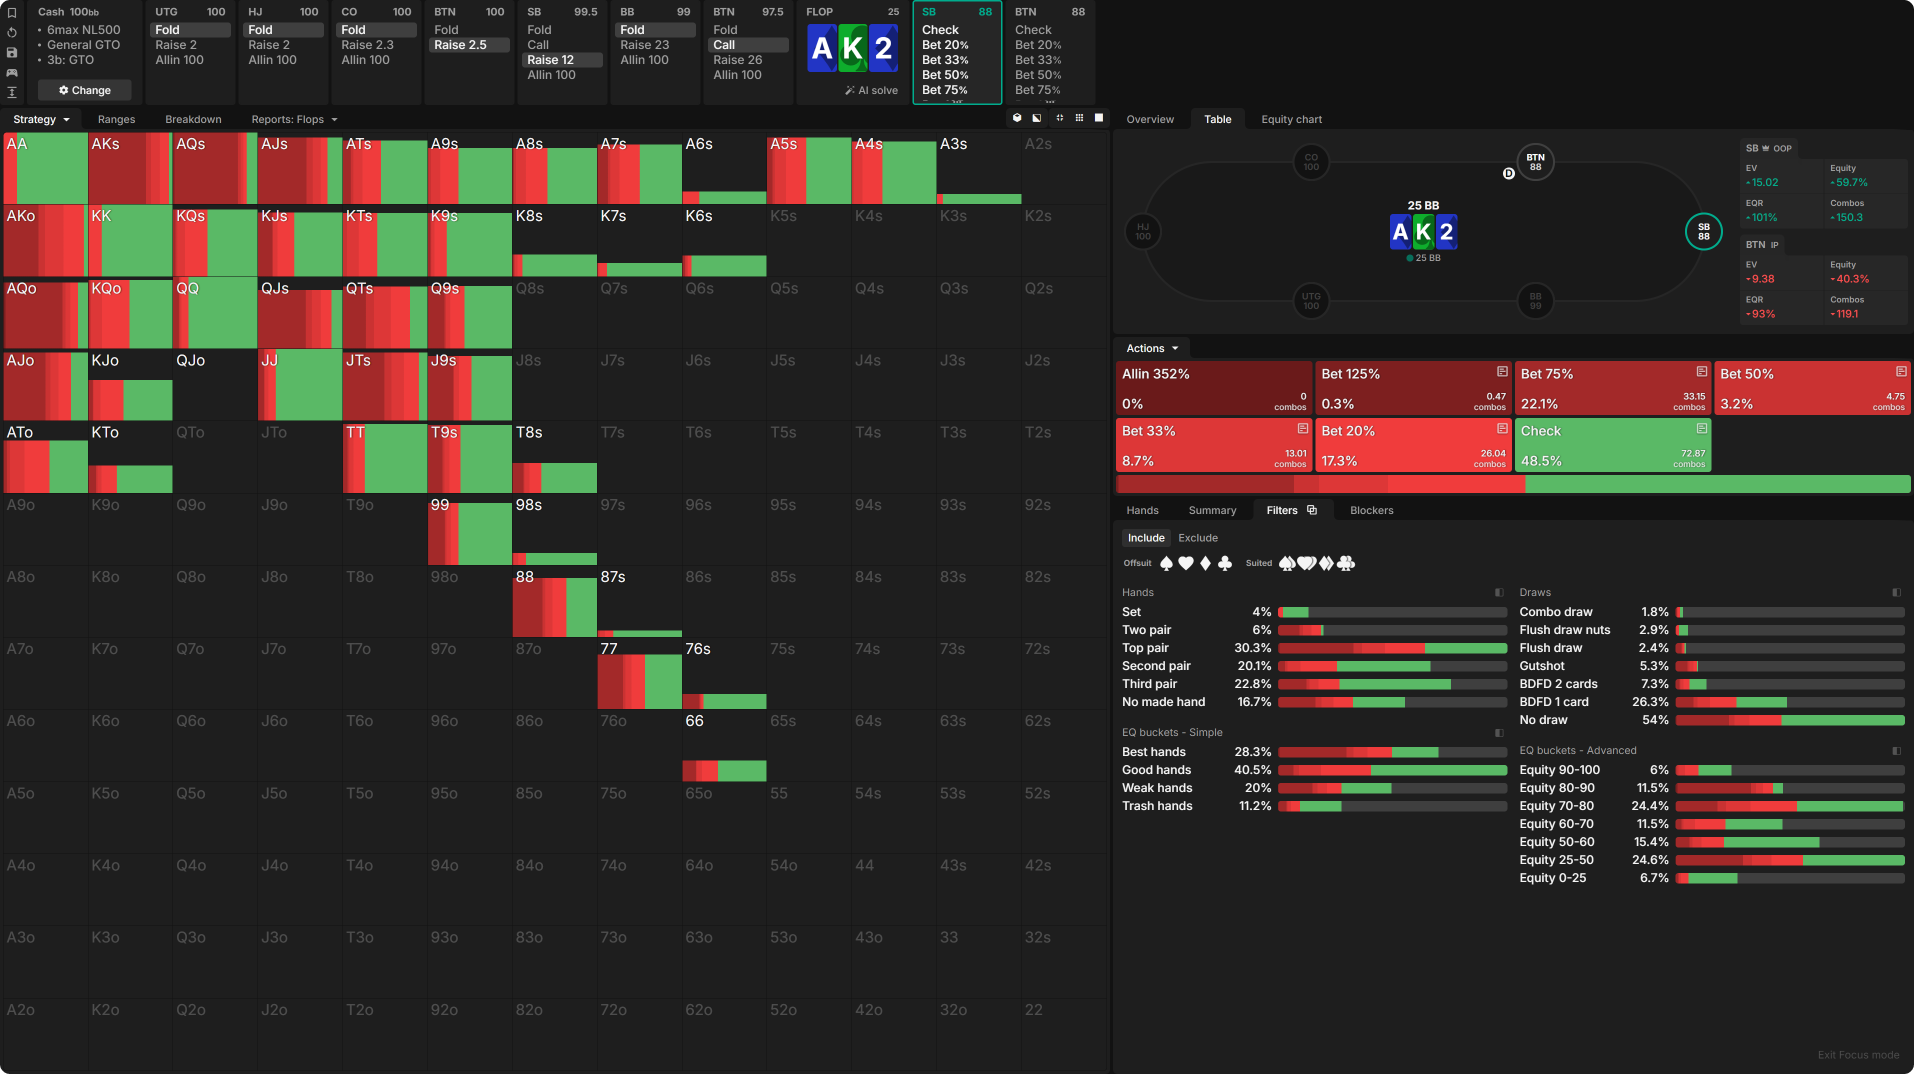
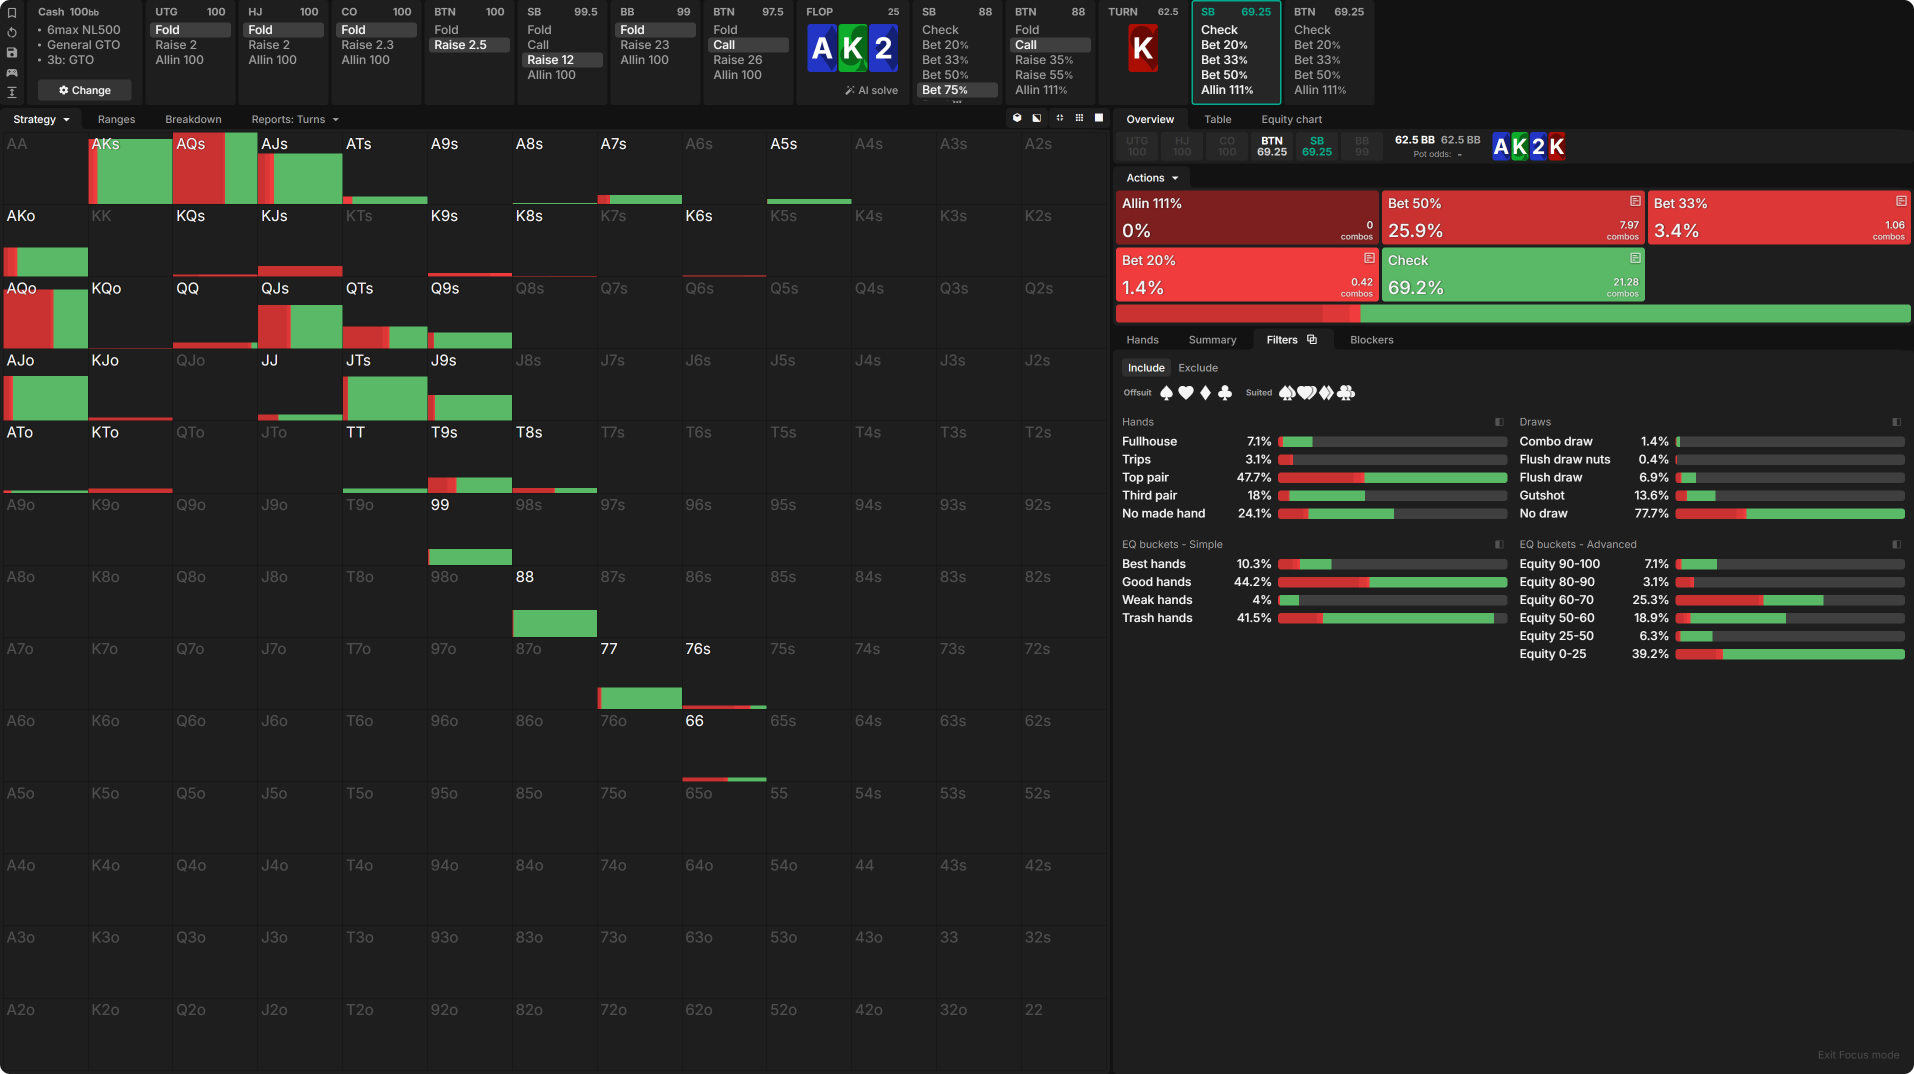
To illustrate that, let’s take a look at the following 3-bet cash game spot between SB and BTN with 100bb starting stacks:
As we can see, the SB prefers a smaller sizing with hands like weaker Ace-x, second pairs, AA/KK. And a larger one with strong top pairs and our lowest pocket pairs (to fold out higher pocket pairs very frequently and deny equity more effectively).
The implication of sizing hand classes differently on the current street is that we arrive with different ranges on the next street depending on the chosen bet size.
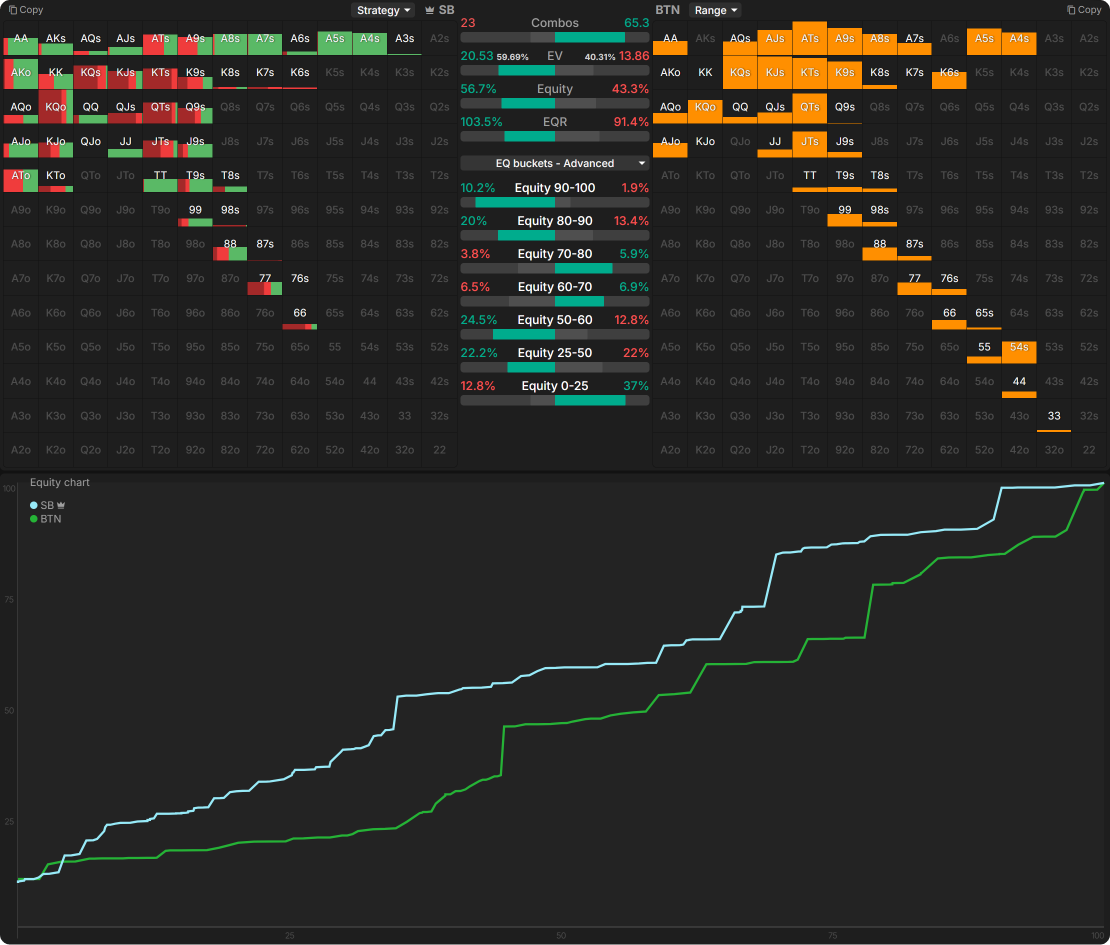
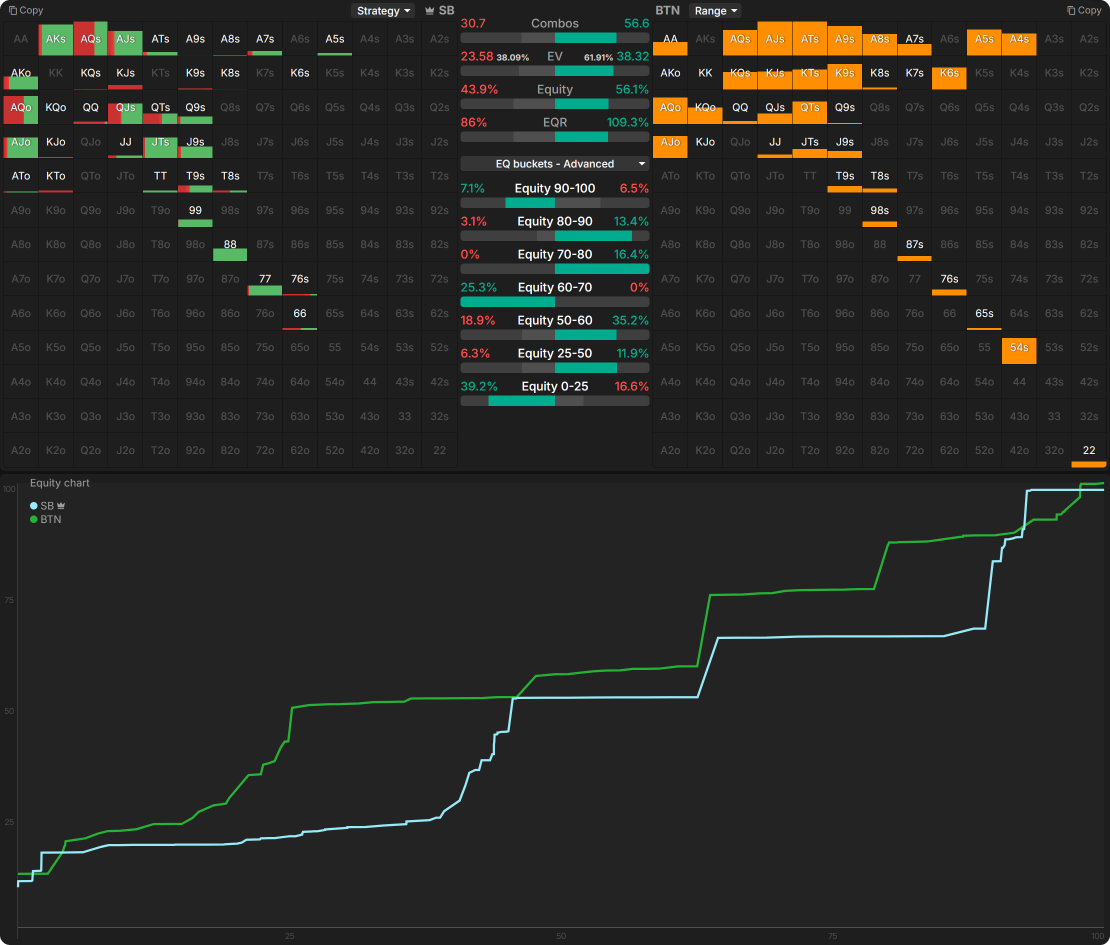
In this case, the ranges will look differently depending on whether we bet small (20% pot) or larger (75% pot) on the flop. On a more detailed level, there are two consequences:
- Different ratios of certain hand classes in lines when we arrive on the turn. Sometimes, there could even be a complete lack.
- Different responses by Villain and turn arriving ranges versus both sizes.
Let’s compare both turn strategies on a rainbow King to clarify how vital our flop strategy is to understand the approach to the next street.
One thing stands out immediately:
- We retain the equity and nut advantage after betting 20% on the flop, while we lost both after betting 75%. The reason is simple: We are not sizing up with any King-x, Aces, or Kings while our opponent is always pure calling all AA and King-x.
Various elements stand out. Let us jump into the turn-betting strategy on a King for both sizes to find out what it is!
Turn Brick
In this spot specifically, when splitting our range on the flop into multiple sizes, we bet more frequently on average after using the bigger size because our range is simply much stronger and keeps the advantage on bricks. Across all turns, we bet 63.4% on average after the larger flop bet and only 46.7% after the smaller flop bet. One element that contributes to the frequency drop is the SB not wanting to bet worse than top pair in the small bet line on the turn because there is no merit in betting King-x on a brick due to no relevant equity denial, and we don’t get enough calls from worse.
Turn Pairs the Middle Flop Card
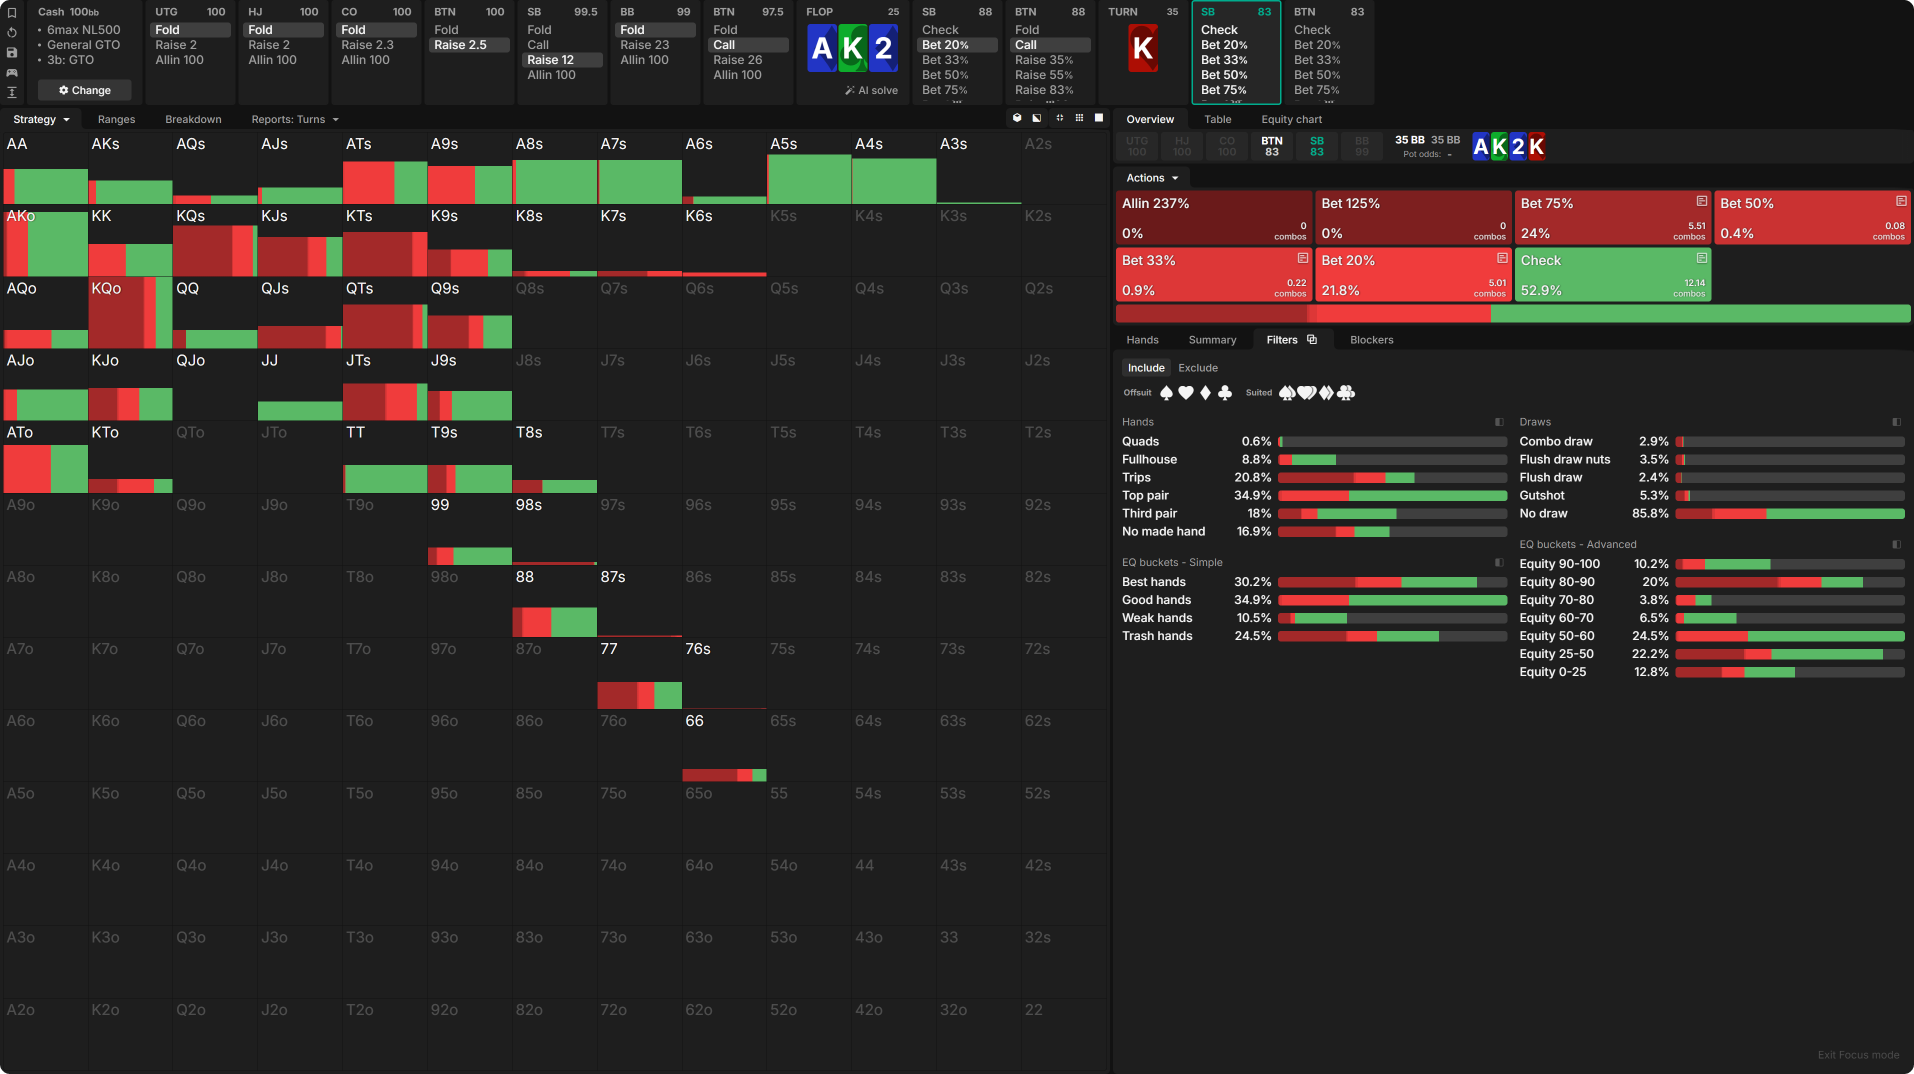
On a King, however, our barreling frequency after c-betting 20% on the flop is much higher than after betting 75%.
As mentioned, we are arriving with way fewer trips and AA on the turn than our opponent, which means a King is a much better card for the BTN when c-betting flop for 75%.
The second point is that we size multiple hand classes differently on the turned King after c-betting flop for 20%. Stronger Ace-x has enough equity after betting small (e.g., A9s still has 56.8% equity) and gets called by all worse Ace-x, some pocket pairs, and most draws. Trips, generally, want to see the pot grow bigger and so prefer a more extensive sizing.
However, after betting more polarized on the flop, we mainly just use one medium sizing. AT and worse Ace-x don’t even have 45% equity anymore. The turn is a much worse card for us, as the SB, after using a large flop size, which results in us wanting to avoid betting more frequently. We also heavily filtered Villain’s range on the flop because they had to fold more versus the larger sizing (75%). We can’t use a large sizing on the turn anymore because we lost the nut advantage for the mentioned reasons.
All of the above precisely shows why our flop strategy significantly impacts our turn approach and how important it is to grasp how the ranges look after arriving on the turn.
About the Practicality of These Theoretical Concepts
So far, we learned how different flop strategies can impact our turn approach. However, playing a multi-size strategy will massively increase your game plan’s complexity. Even some high-stakes regulars use a one-size strategy before the river. In most cases, you can simplify your strategy to a great extent without significant EV loss by sticking to only one size before the river. When doing so, finding a fitting turn size can be tricky, but don’t worry. I will show you how to do that in the following examples.
If you want to learn more about this complexity vs simplicity tradeoff, we have this video that covers the topic.
Tackling the Turn
Turn Arrival After Flop C-bet
As we just saw how important it is to really master the flop before having a chance to understand the turn, you may feel like revisiting OOP flop play in 3-bet pots first. If so, enter through this portal to backtrack your steps to the flop before exploring the deeper waters of turn strategy.
When we consider all the possible flops followed by different turns, organizing our thoughts and building a solid strategy may seem impossible. That’s why we must simplify our game plan by focusing on spotting patterns and building strong heuristics.
Creating groups that summarize different turn cards is an effective method. The most basic turn grouping is splitting all turn cards into two categories:
- Brick – doesn’t shift the nut advantage
- Nut changing – shifts the nut advantage
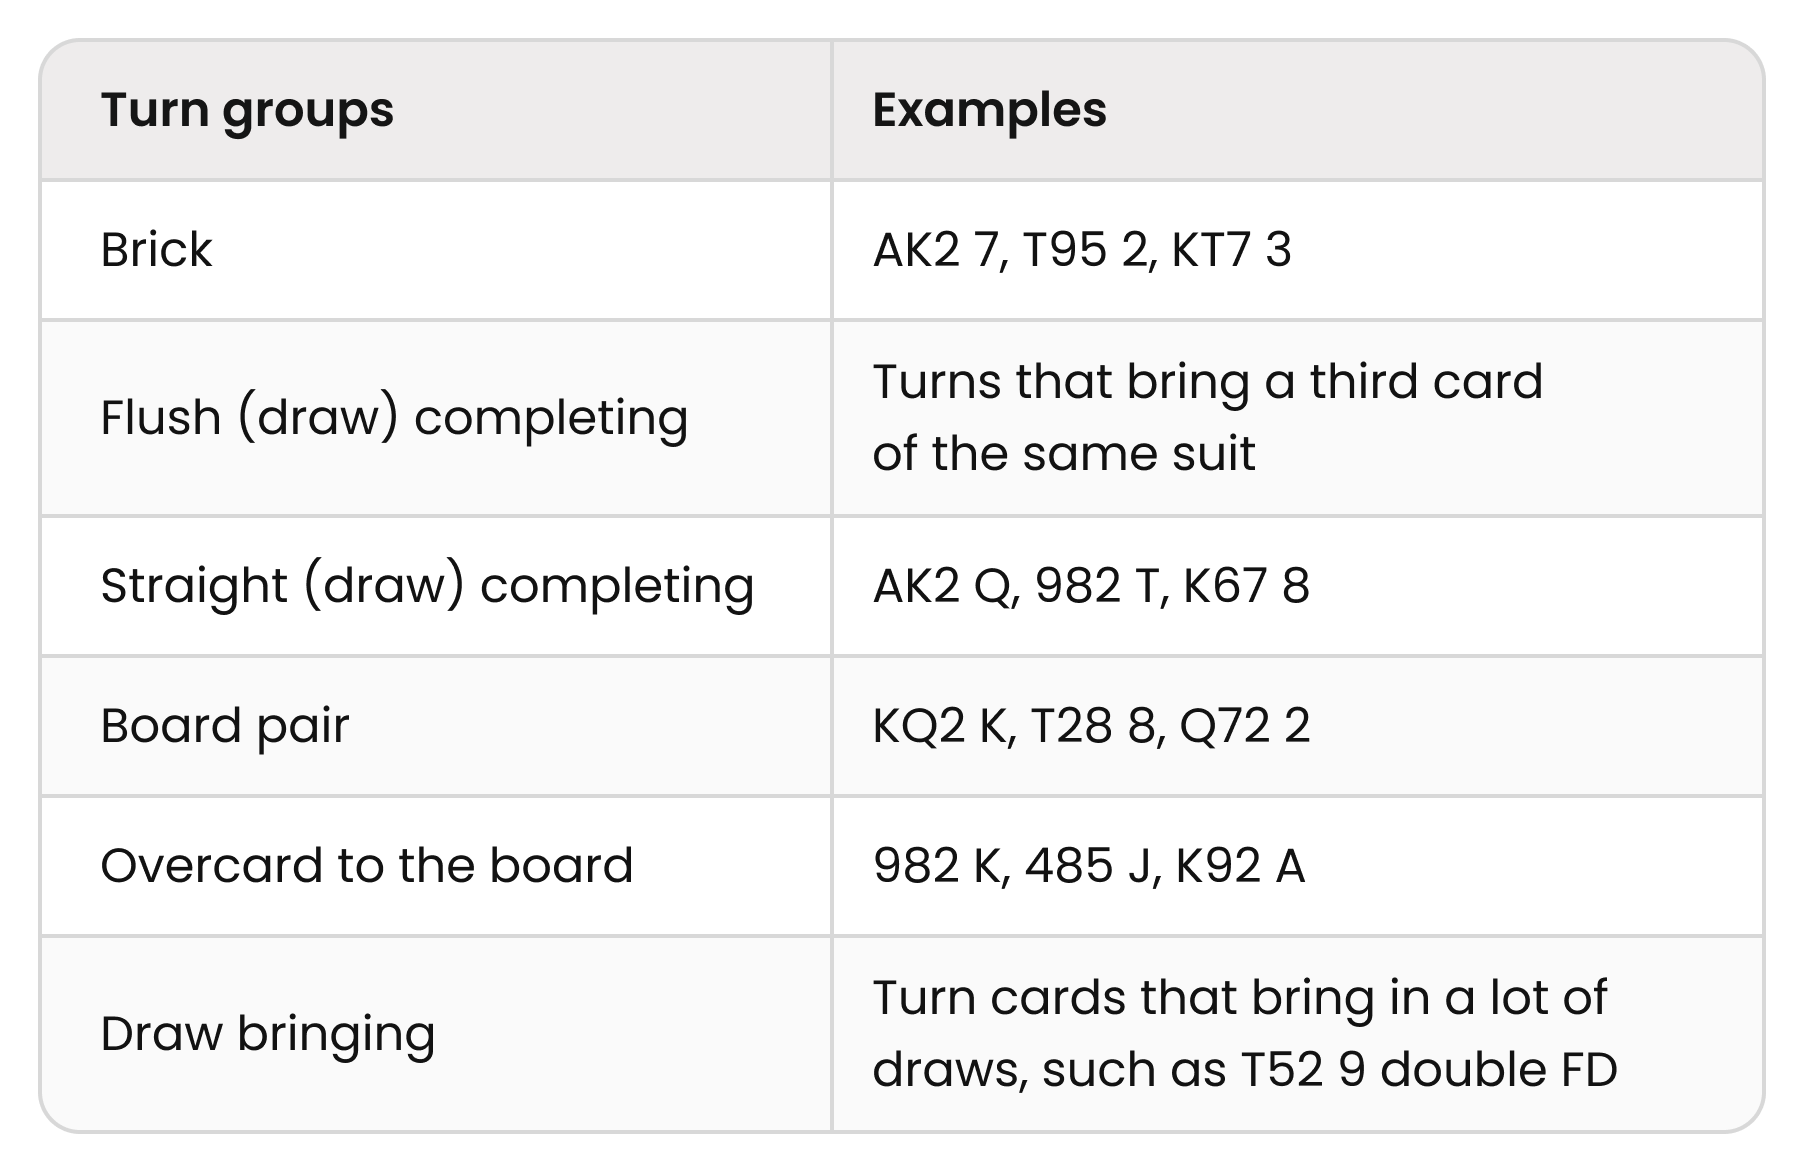
We need to go further, though, as this is abstracting too much nuance away. The following turn groups represent a good overview:
When you become more experienced, you can build subgroups to get progressively more detailed. For example, different pairing turn groups, such as paired top cards, paired middling cards, and paired low cards. But the above has more than enough meat on it to sink your teeth in.
To get familiar with analyzing turn play as the OOP 3-bettor, we will dive into two specific turn groups from the perspective of the SB 3-bettor versus BTN caller after c-betting the flop.
Group 1) When the Turn Bricks
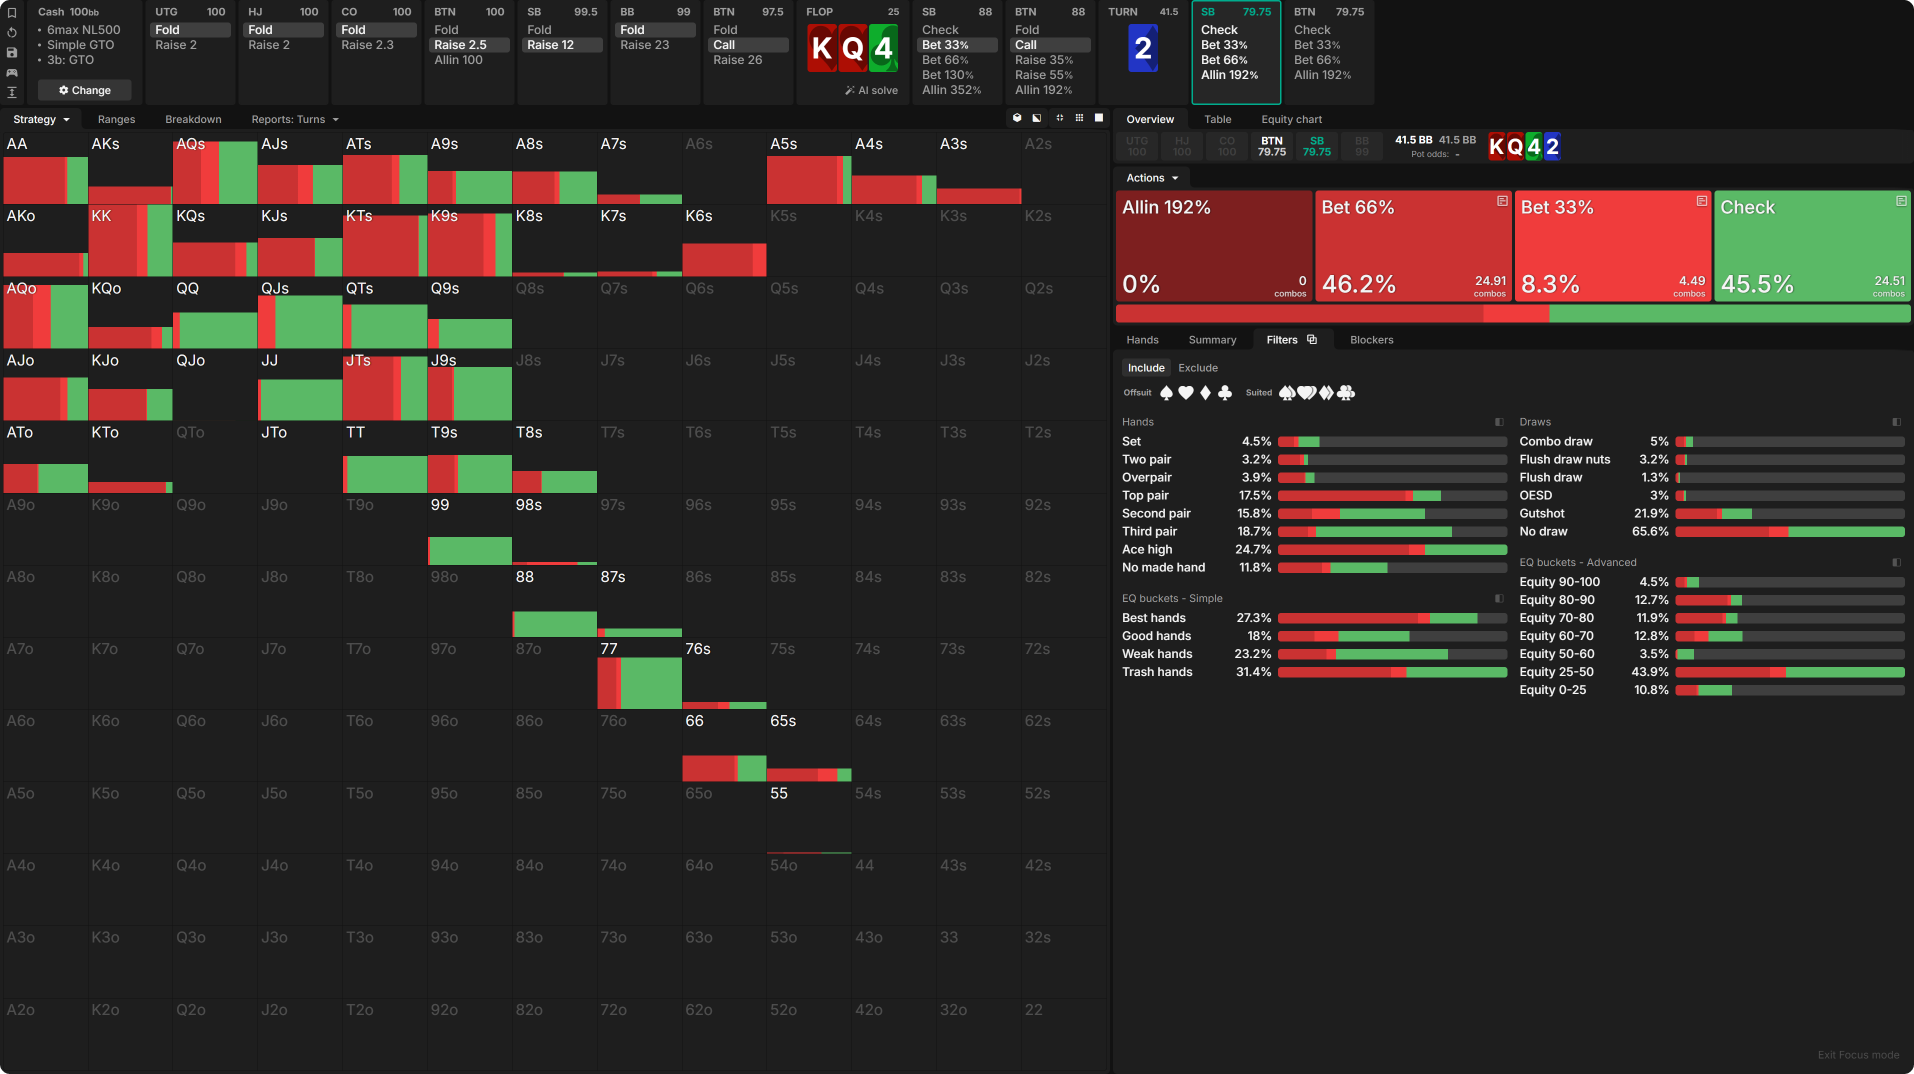
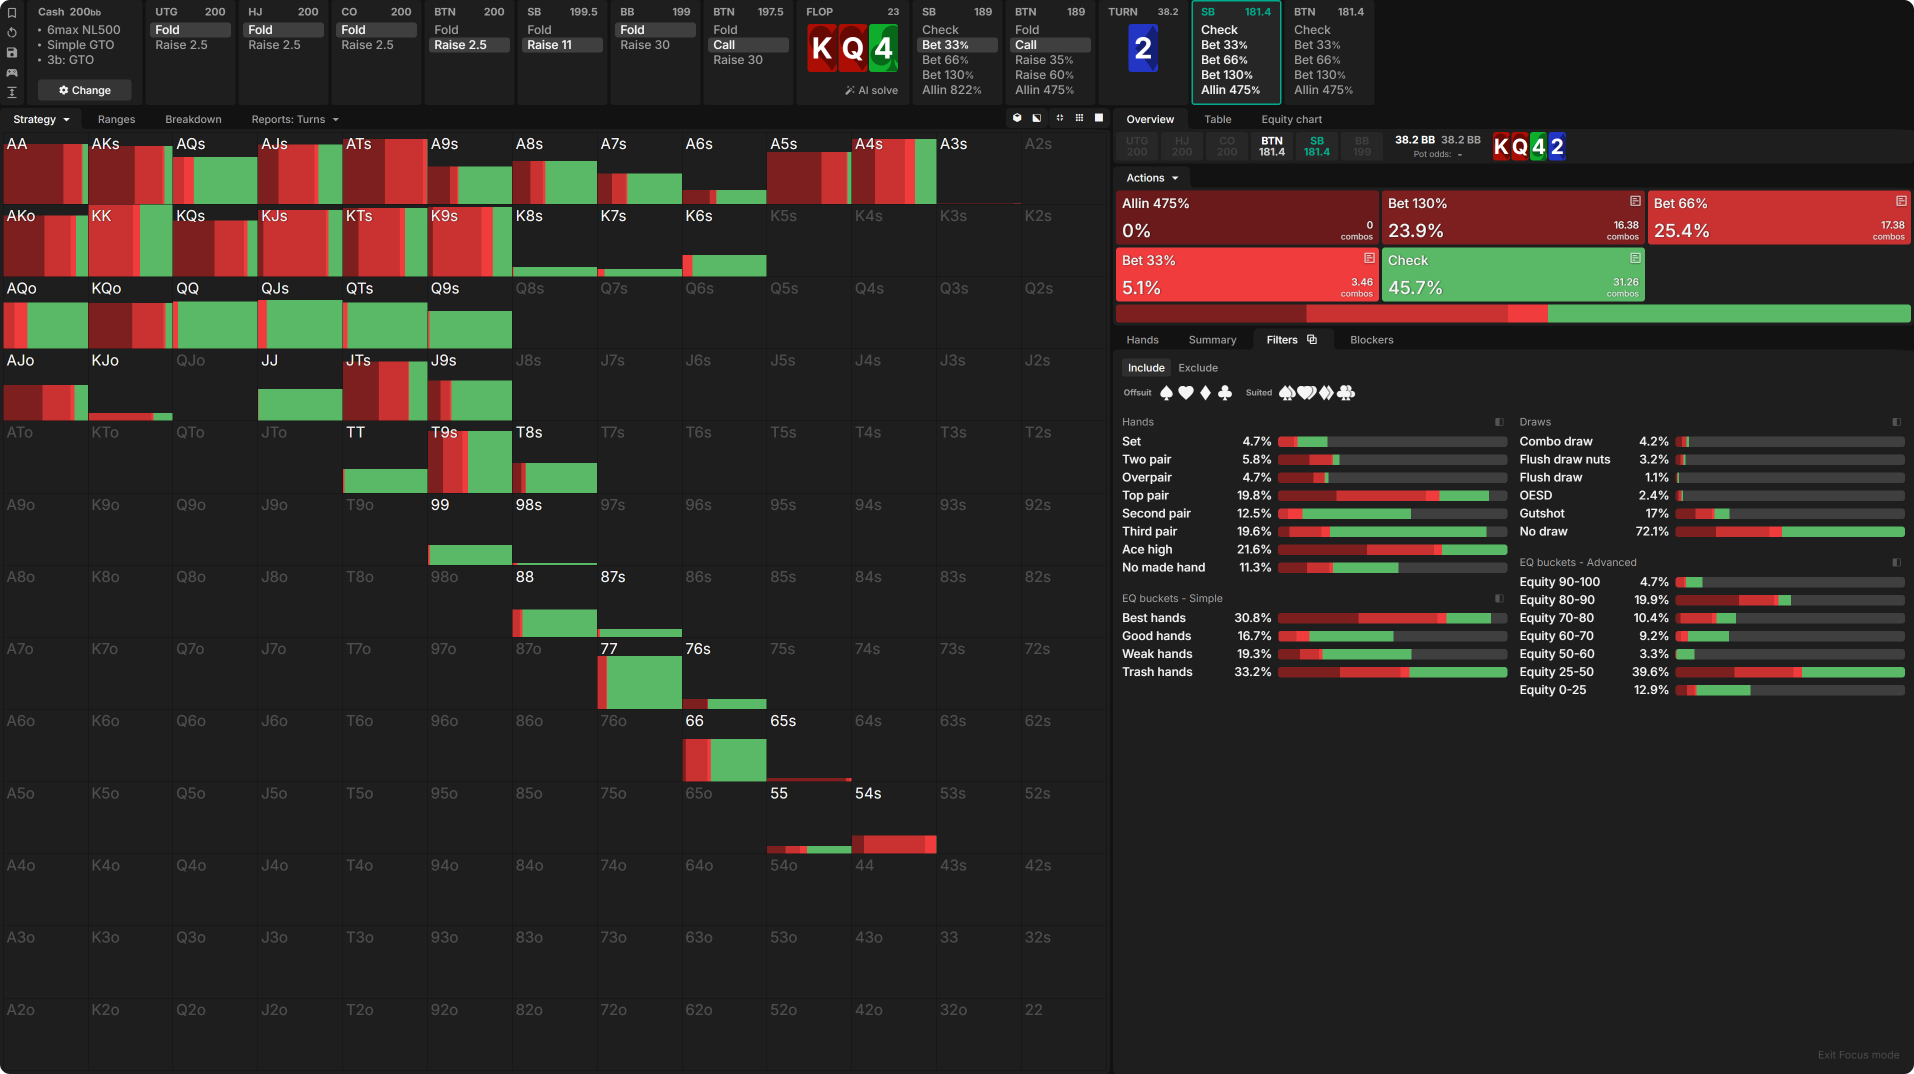
For simplicity’s sake, we will use the simple solution. The first significant turn group is “bricks,” turn cards that don’t significantly change the board texture or shift the nut advantage. To illustrate that group, we will look closely at K♥Q♥4♣ 2♦.
Looking closely, two things stand out instantly:
- We mainly use one larger sizing.
- We check almost half of our range.
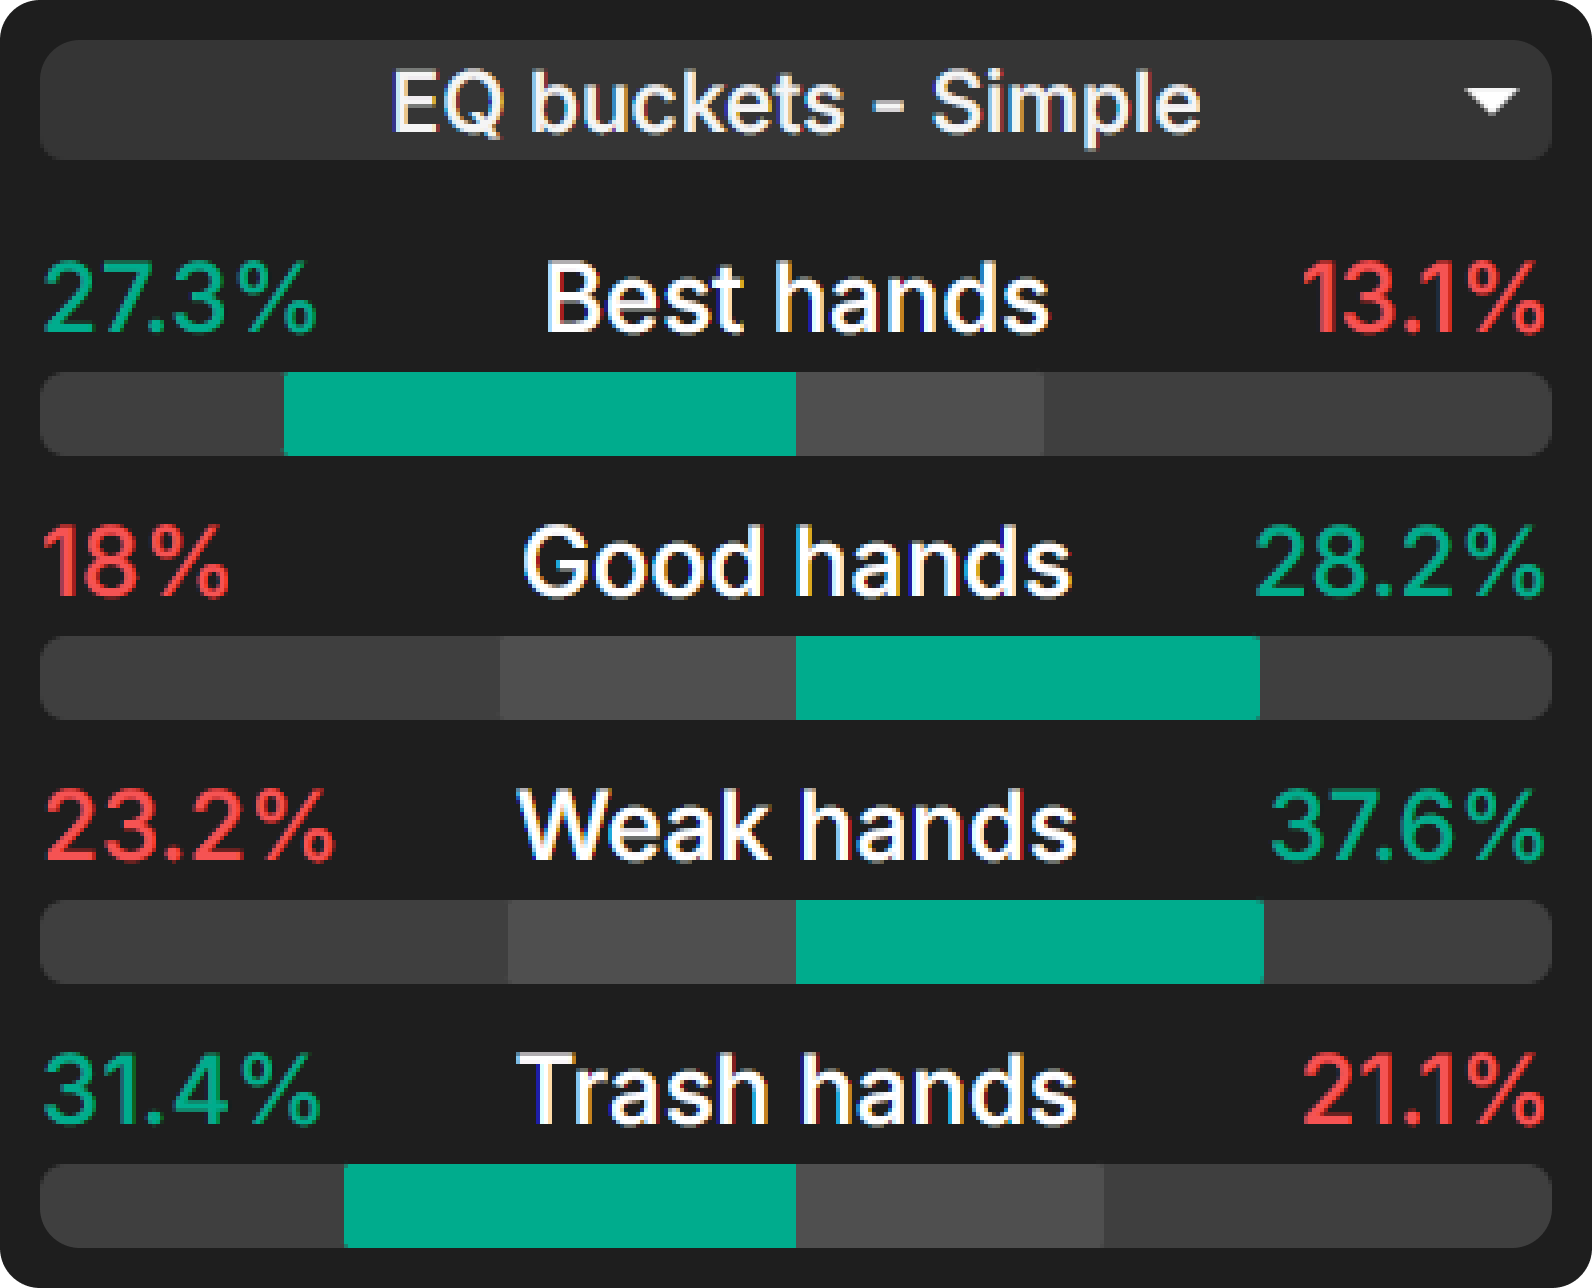
But why is that? To understand the strategy, we will dissect the turn on a more detailed level with the help of the EQ buckets.
Again, two things stand out:
- Best and worst hands – The SB has proportionally more best hands (at least 75% EQ), but the same goes for trash hands (at most 33% EQ).
- Good and weak hands – The BTN has an advantage in good and weak hands (33–75% EQ).
The SB has a massive advantage at the top of the range but is dominated when we compare the mediocre range part. This illustrates why the SB wants to use one larger size on the turn.
Due to the nut advantage, the SB is allowed to polarize.
OOP intends to build the pot as efficiently as possible. A geometric bet sizeGeometric bet size
Betting the same size (as a percentage of the pot) on each street such that chips are all-in on the river bet. This is the optimal bet size if one player is perfectly polarized relative to their opponent, as it generates the widest overall minimum defense frequency (MDF) that gets stacks in by the river. is often the solution or close to it. Betting geometrically maximizes the EV because it generates the most comprehensive minimum defense frequencyMinimum Defense Frequency (MDF)
The minimum percentage of your range that must be defended against a bet to prevent the opponent from profitably bluffing a 0% equity hand. Inversely related to alpha; MDF = 1 – alpha. MDF = 1/(s+1) where ‘s’ is the percentage of the pot that is bet. For example, if villain bets half-pot, hero needs to defend 1/(0.5+1) = 66% of their range in order to remain unexploitable against a pure bluff. whilst getting stacks in by the river. A geometric bet size occurs as 3e (betting roughly the same fraction of the pot on all three streets to get stacks in on the river) or 2e (after two streets, usually on the turn and river).
Same Spot, Twice as Deep (200bb)
To clarify the geometric sizing even more, let’s examine the same spot but at a depth of 200bb deep.
Instead of the 66% pot sizing, we now want to overbet to get the money in smoothly by the river. We do not need to match the turn and river sizing exactly, but by using roughly the same % pot size on the turn as on the river, we ensure we get stacks in as effectively as possible.
There are boards where we would benefit from two sizes. For instance, on K65 2, we have an advantage in the middle region because we have more 99–QQ. One behavior seems to be persistent, though. After retaining the nut advantage on the turn, at least one part of the range always wants to polarize. To avoid overcomplicating our strategy, we can stick to one large turn size on bricks, as long as it doesn’t lose a significant amount of EV. The better you become and the more formidable your opponents, the more important it is to split your range in certain spots because small potential EV losses are far more likely to become actual losses, and giving up these “marginal” gains will be more critical versus an excellent opponent.
2) Playing Nut-Shifting Turns
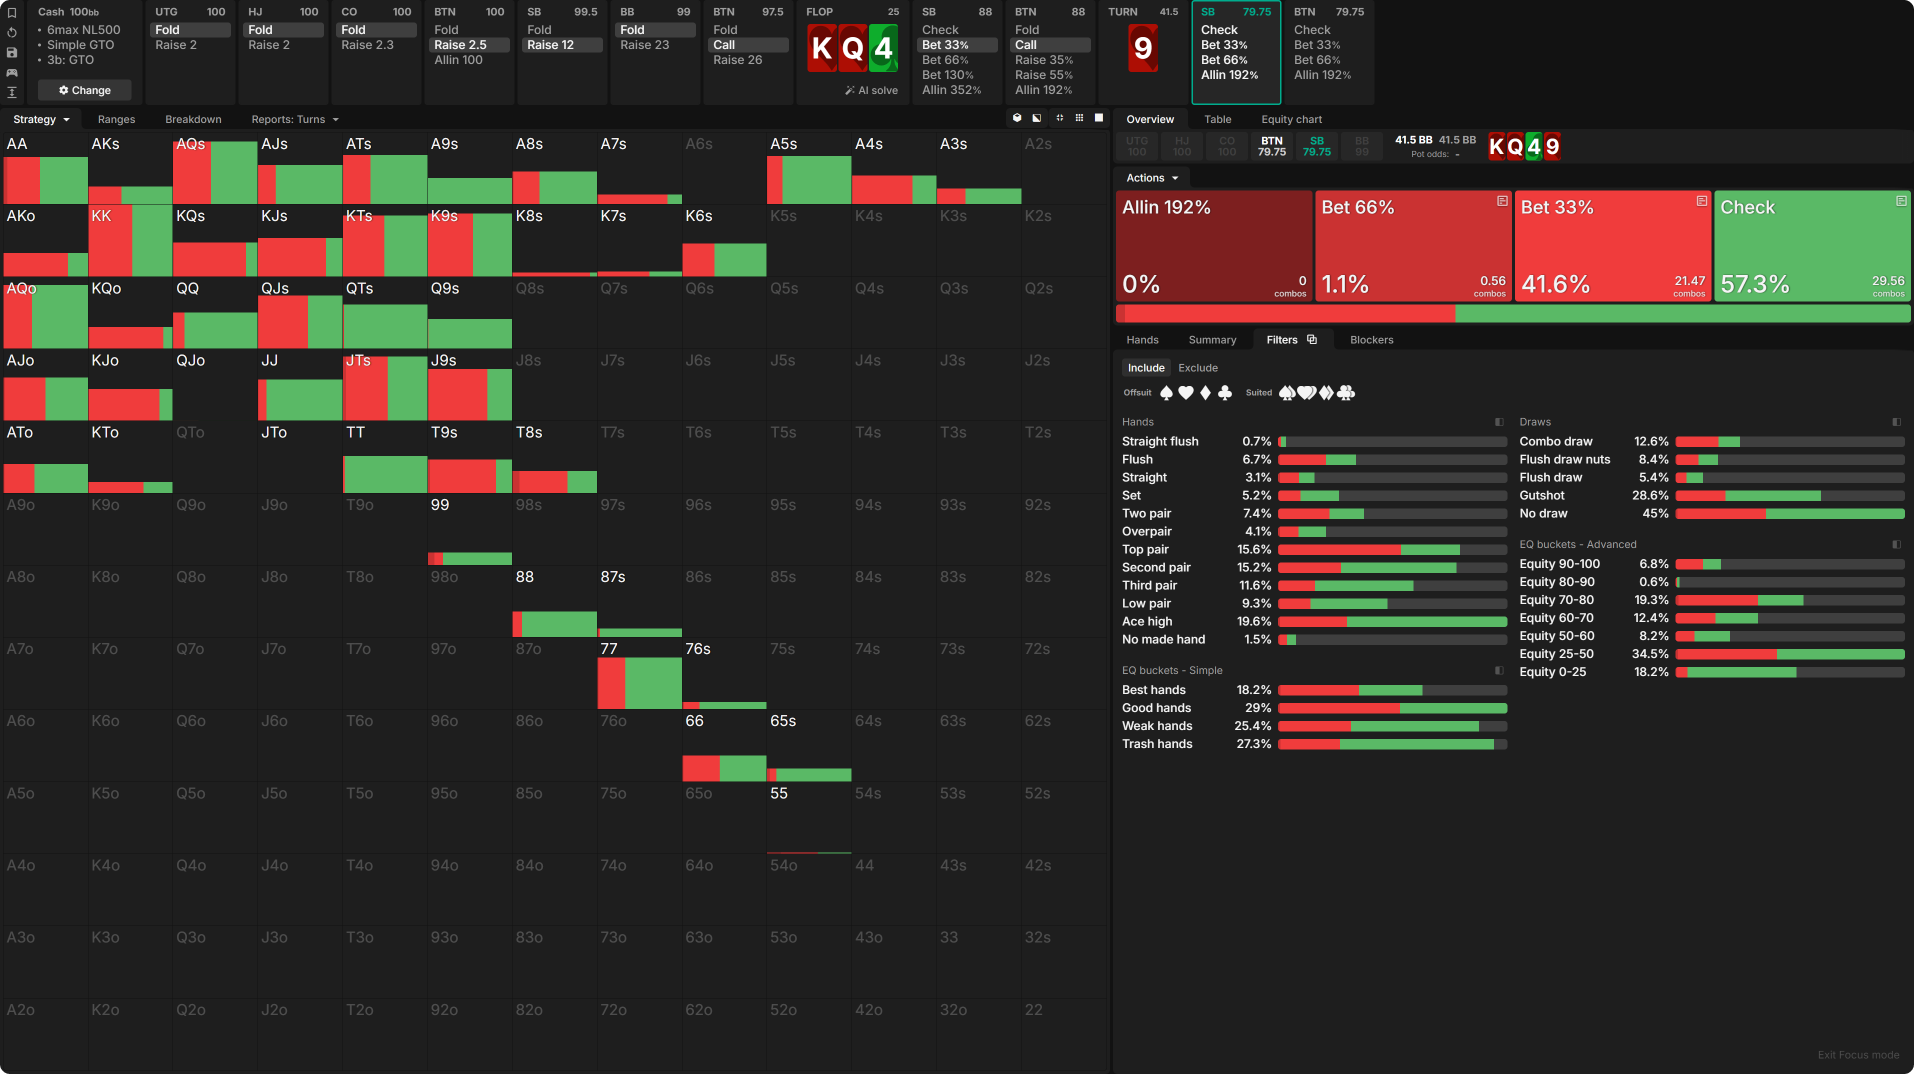
The PFA does not always retain the nut advantage on the turn, though. When it shifts toward the preflop defender, exciting things happen. Let’s check that out on K♥Q♥4♣ 9♥ flush (and straight) completion.
We can notice what changed on a wet turn compared to the previous brick turn when we look closer. We want to use a small size only. But why is that? The equity buckets will help us figure that out!
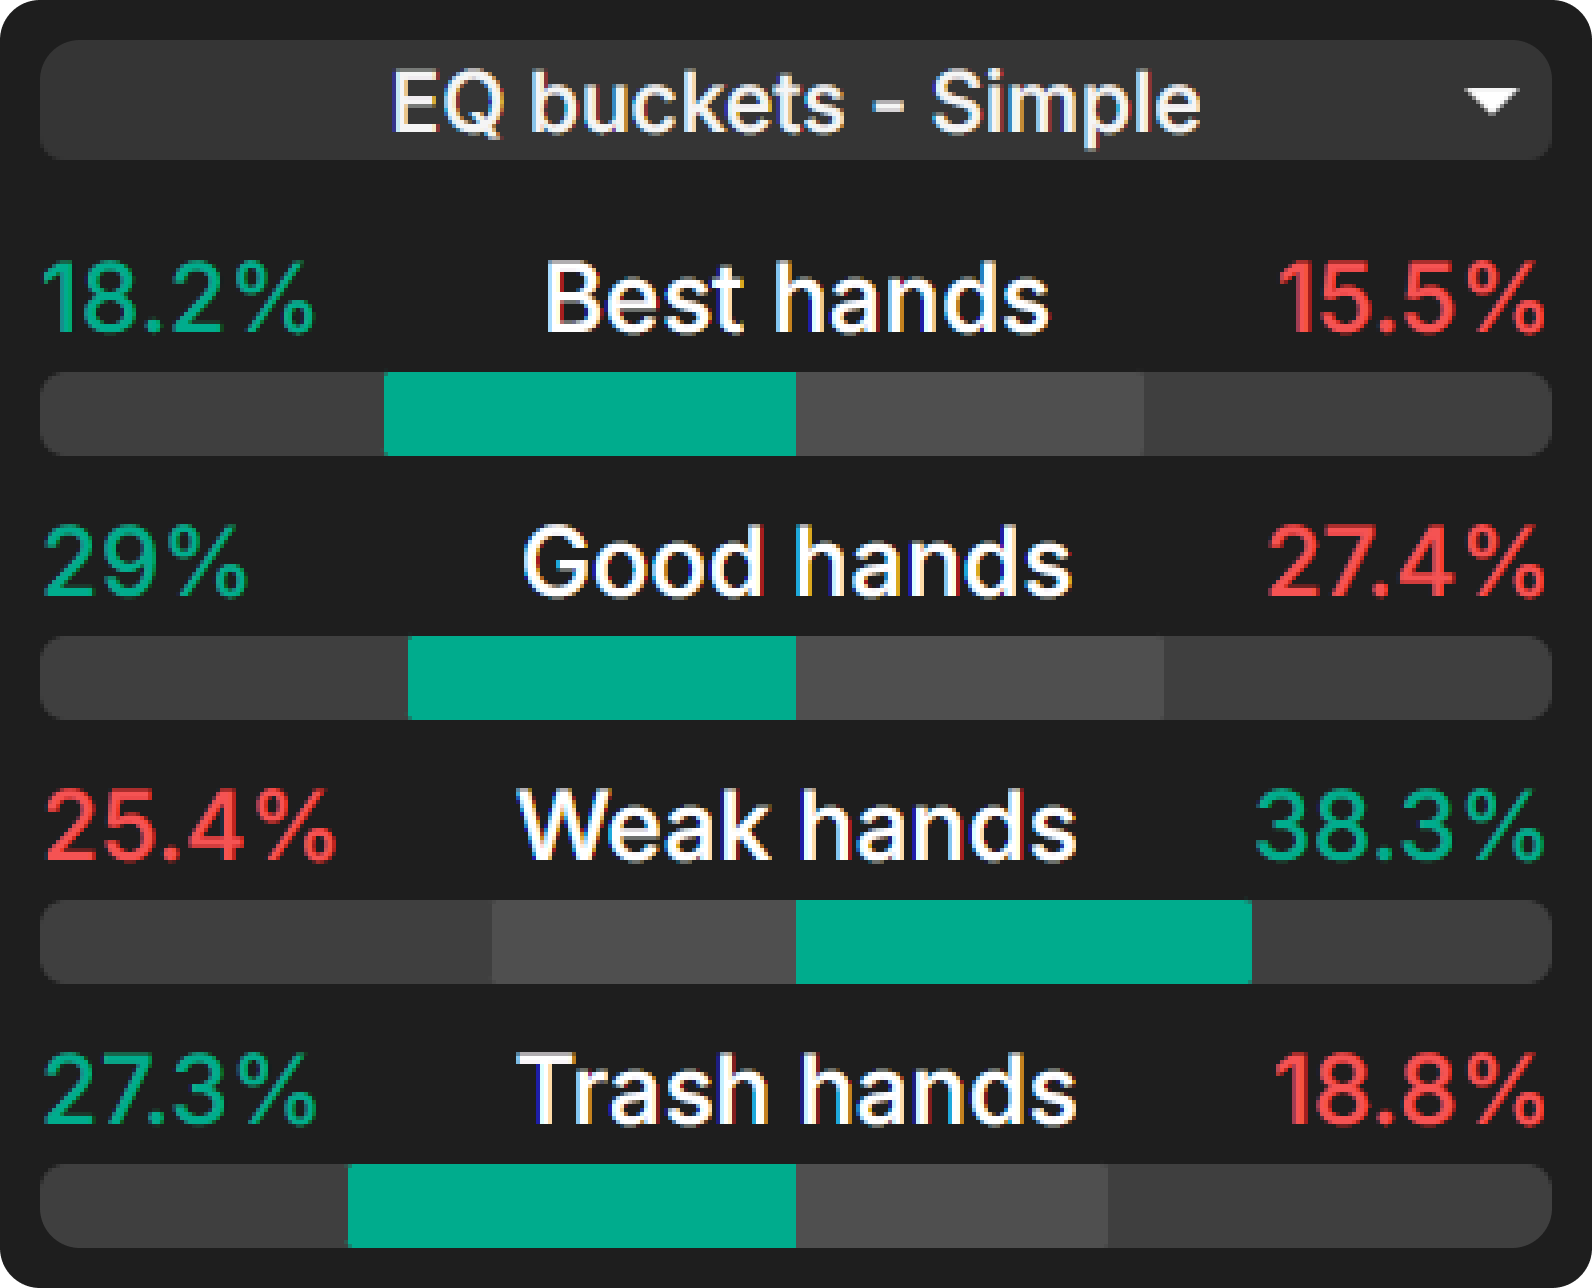
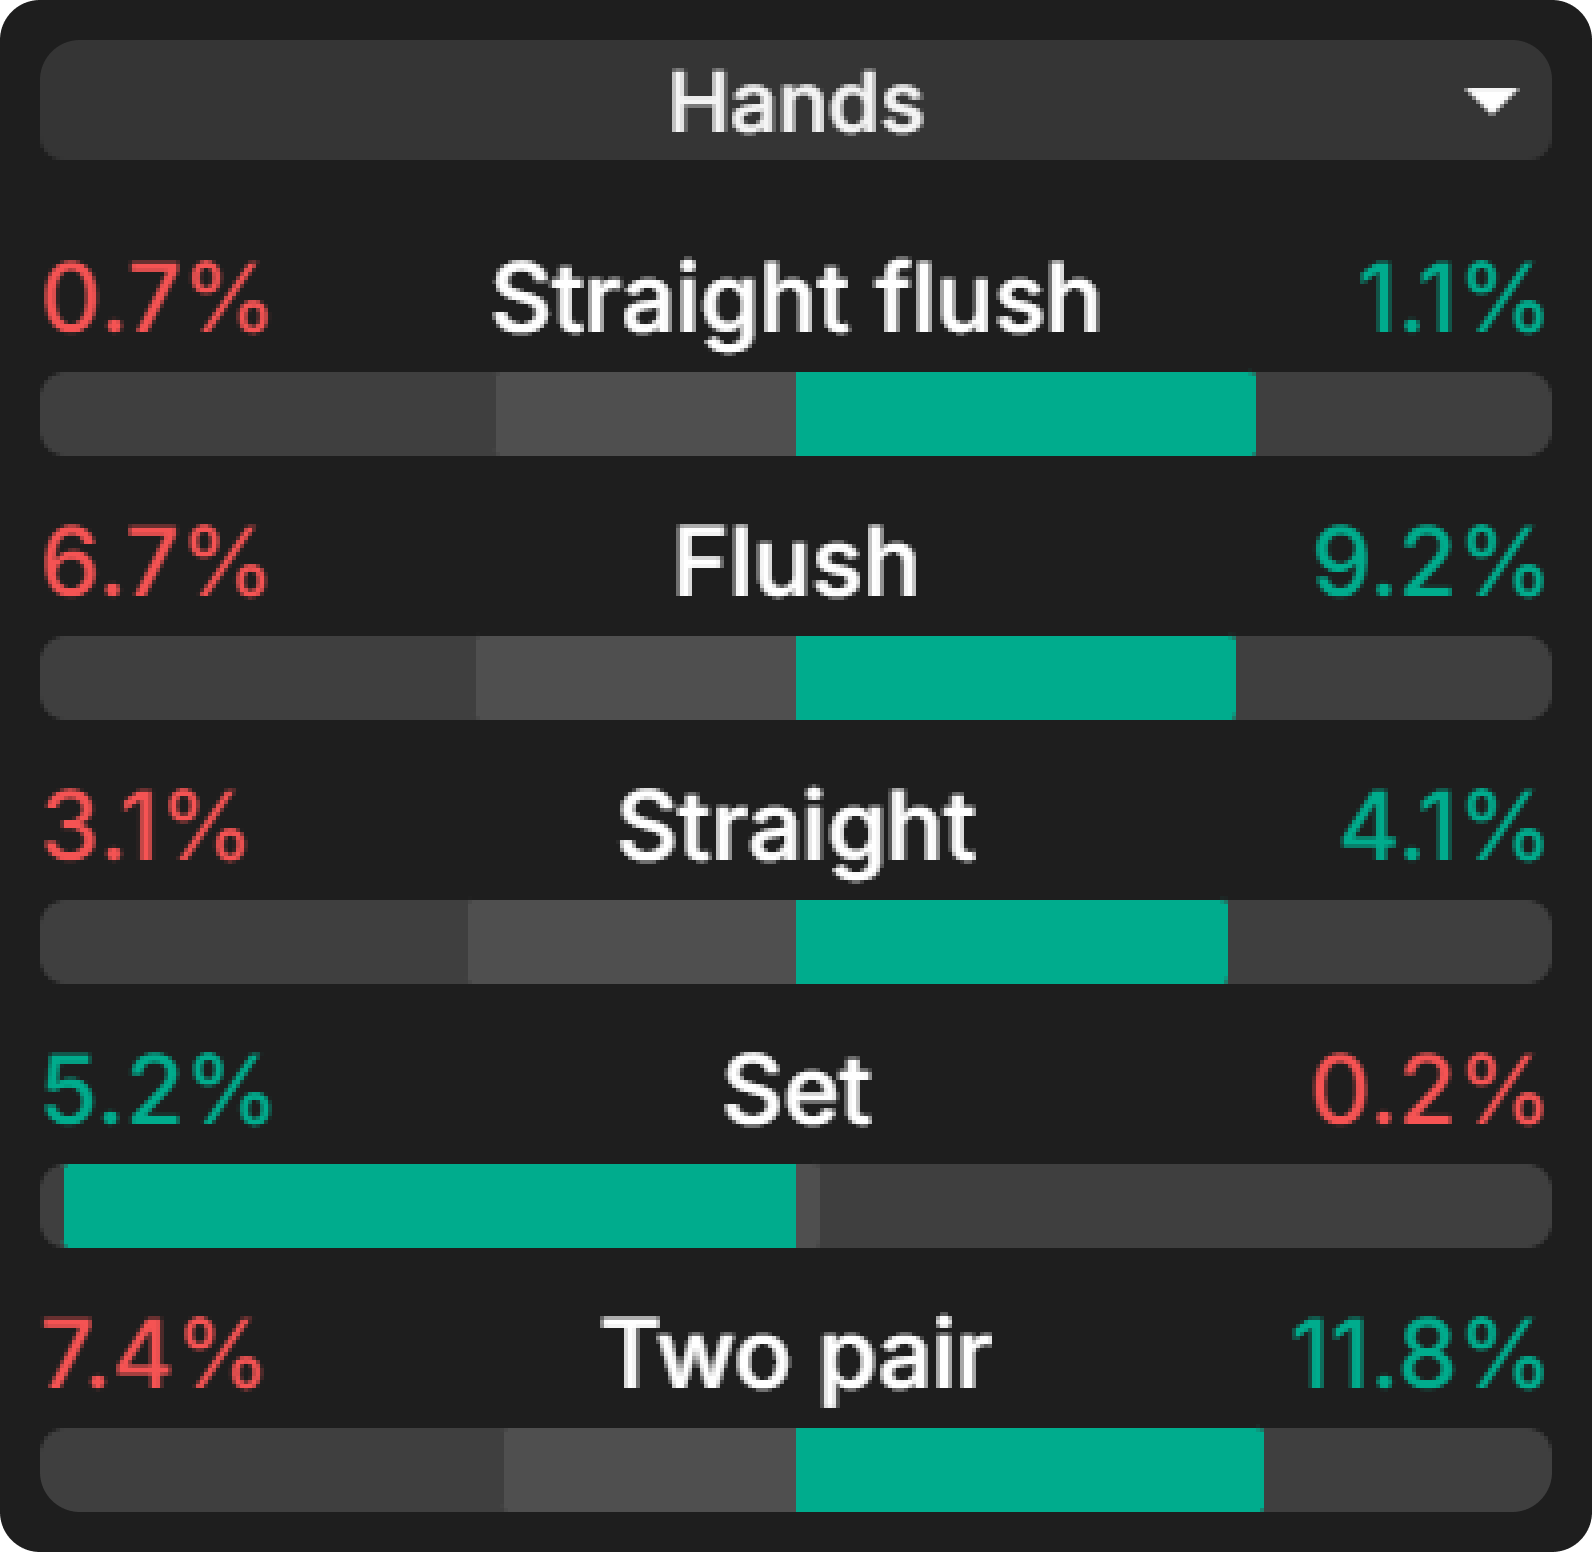
The EQ buckets show us how massively the SB’s advantage faded away. There is no more asymmetry in the nutted region. Both players have roughly the same amount of good and best hands. The BTN even has an advantage in flushes and straights. This means the SB can’t polarize its range due to the lack of nut advantage. The SB must be cautious and no longer seek to build a big pot. The result is a slight increase in checking and only using a small sizing because they still would like to bet hands worse than flushes and not build the pot versus a range that contains a lot of nuts. When there is still a decent amount of the stack behind relative to the pot (2x or more) and strong hands are equally distributed, we can simplify our turn strategy to a small size only or even check our entire range when the nut advantage clearly shifts in BTN’s favor.
What if the Flop Checked Through?
While c-betting the flop is the most common line, we also want to prepare for other scenarios. We will examine three common turn situations after the flop got checked through.
1) Nuts Unchanged → Pure Polarization
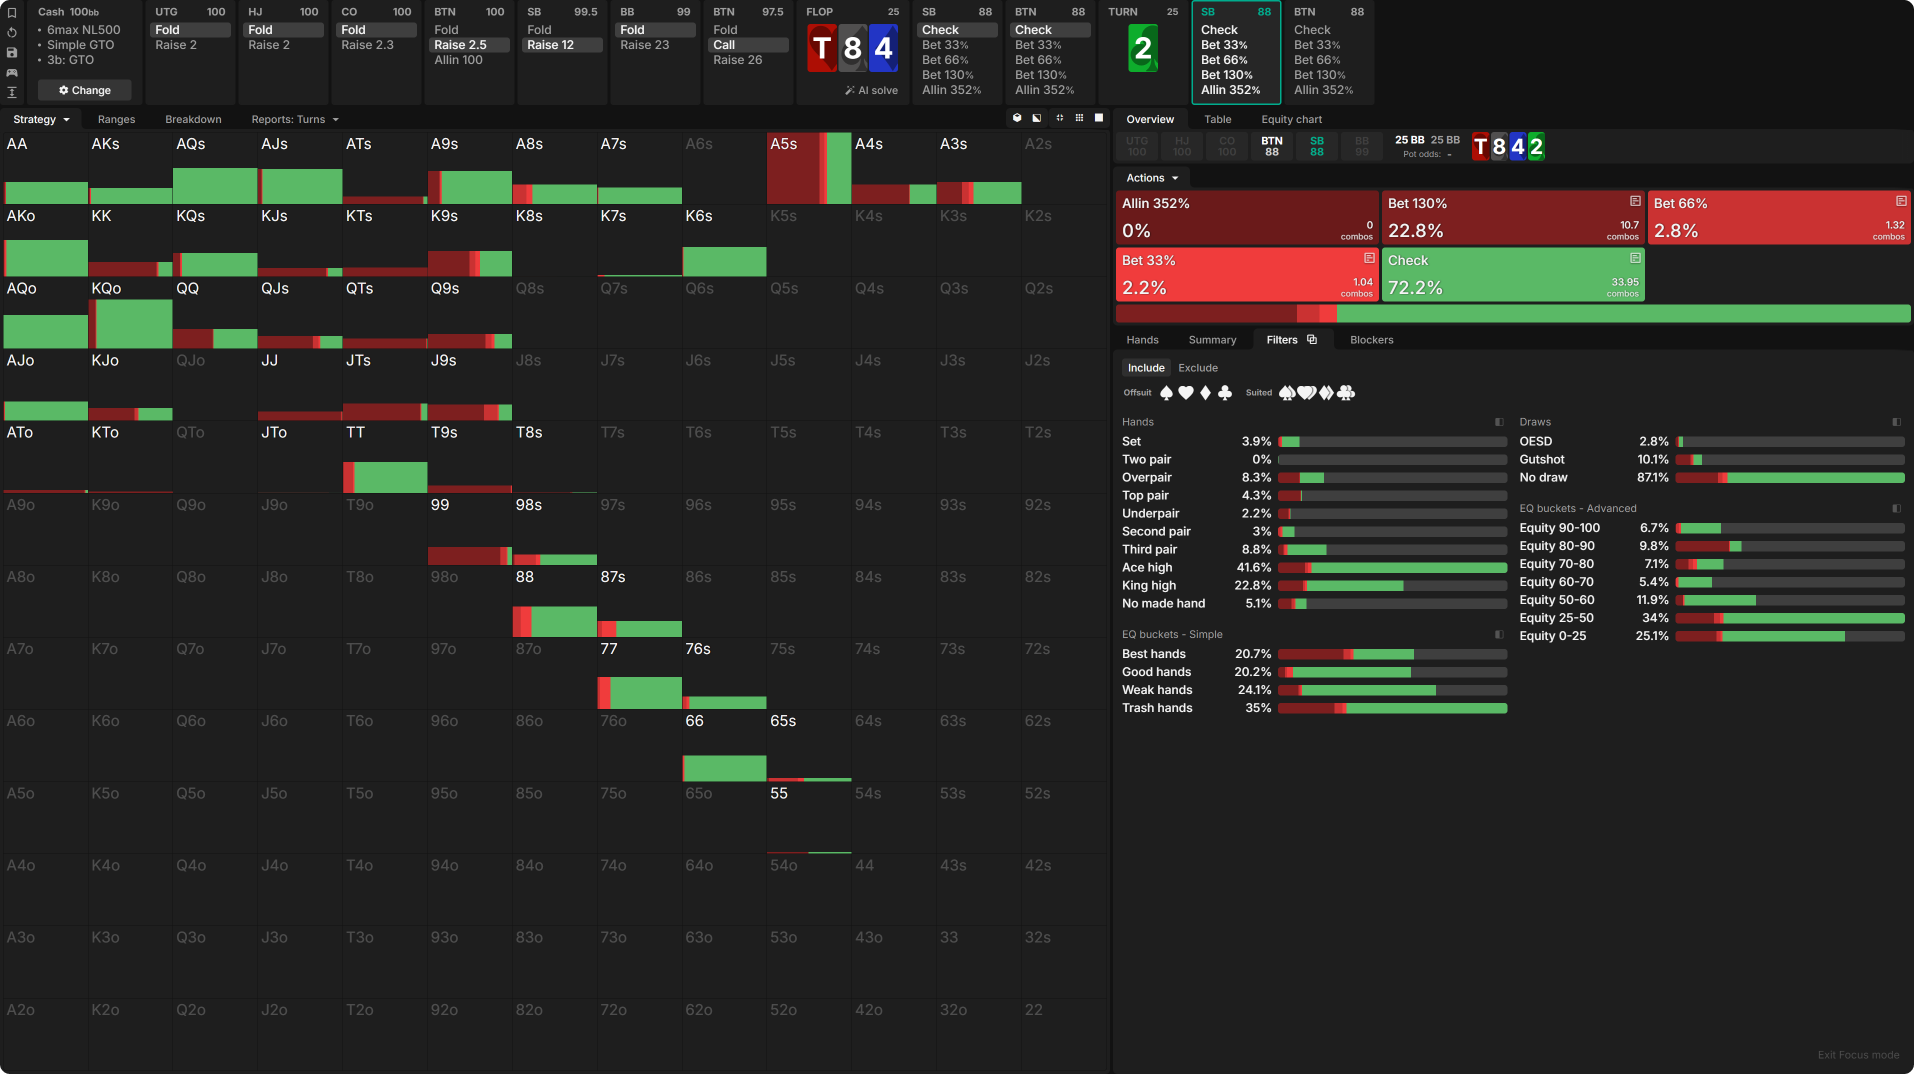
To illustrate the first scenario, we take a closer look at T♥8♠4♦ 2♣.
What do you notice?
- We very clearly only want to use one sizing here.
- We quite frequently use an overbet.
- All hands with more than 79% EQ are strong enough to overbet for value. Even 99 (79.8% EQ), an underpair to the Ten, can overbet. The BTN frequently stabs with top pairs and better on the flop, resulting in 99 being ahead of over 90% of the Villain´s range on the turn.
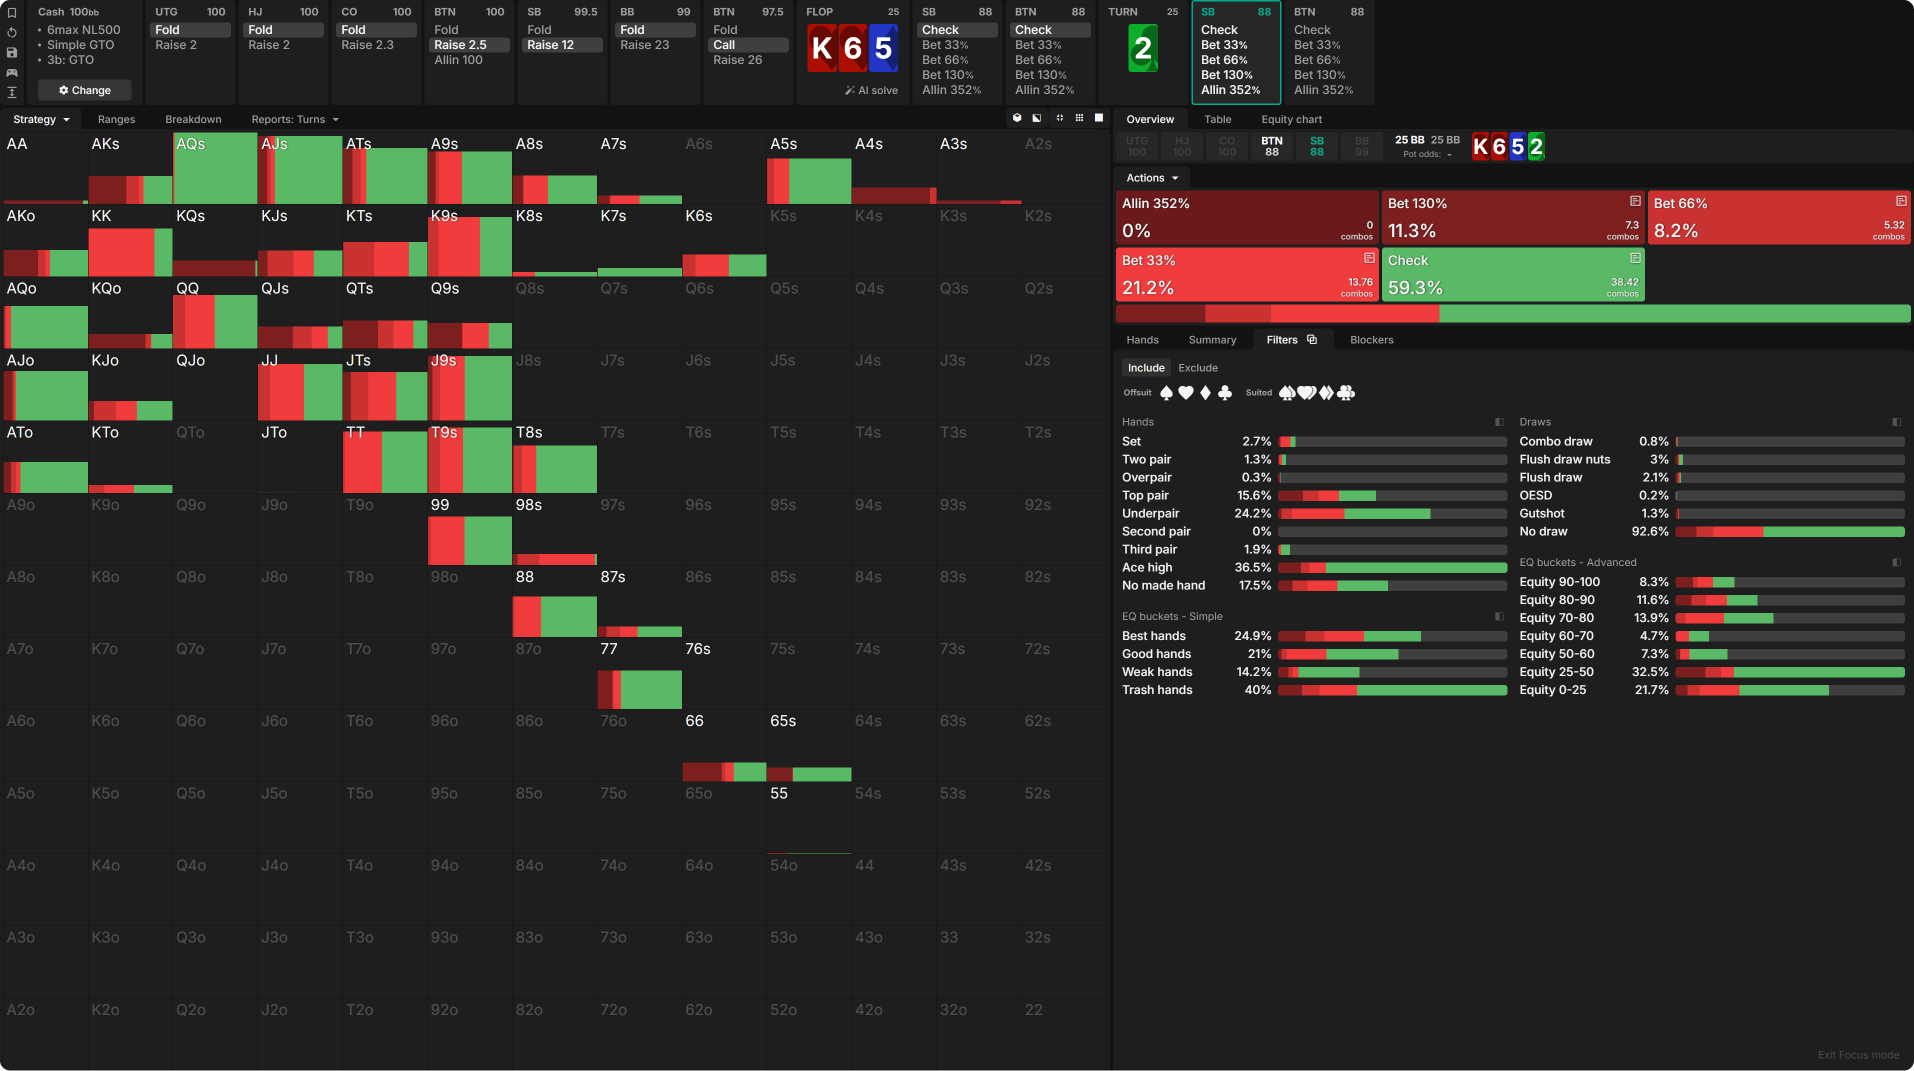
To find out why, let us inspect the “Ranges” tab.
As so often, the EQ buckets and chart will help us understand:
- The SB has a notable advantage in very strong hands above 80% EQ.
- The BTN, on the other hand, has a hefty advantage in good hands between 50–75% EQ.
- When we explore even more, we find out that 66/77 and all second pairs (8-x) make up not more than 8.5% of SB’s range. If we consider all pairs below top pair, we still only get to 14% of that range.
.
These are all indicators of a polarized strategy. The SB has an advantage in the best hands. The range part that would benefit from protection and requires a smaller sizing (66/77/8-x) is so tiny that we don’t bother building a strategy around it. Another reason is that we are heavily dominated in the buckets between 50% and 75%. Building a pot for that part of the range doesn’t benefit us.
These polarized turn spots after the flop was checked often occur on middling/low boards, where we are supposed to check a decent amount of our range on the flop due to poor board connectivity. The consequence is that we have to check a considerable amount of overpairs as well. SB’s range is mainly built around the Broadway region and good pairs, meaning no significant part of the range would require protection, such as lower pocket or third pairs. The natural result on any non-nut-changing turn is that we polarize our strategy to get all the chips in by the river. The most effective way is, again, a geometrical sizing. The simple solution offers 130% pot; the optimal sizing would be close to the pot to have roughly the same sizing behind to generate the widest overall minimum defense frequency (MDF) to get stacks in by the river.
2) Nuts Unchanged → Multiple Range Parts Bet
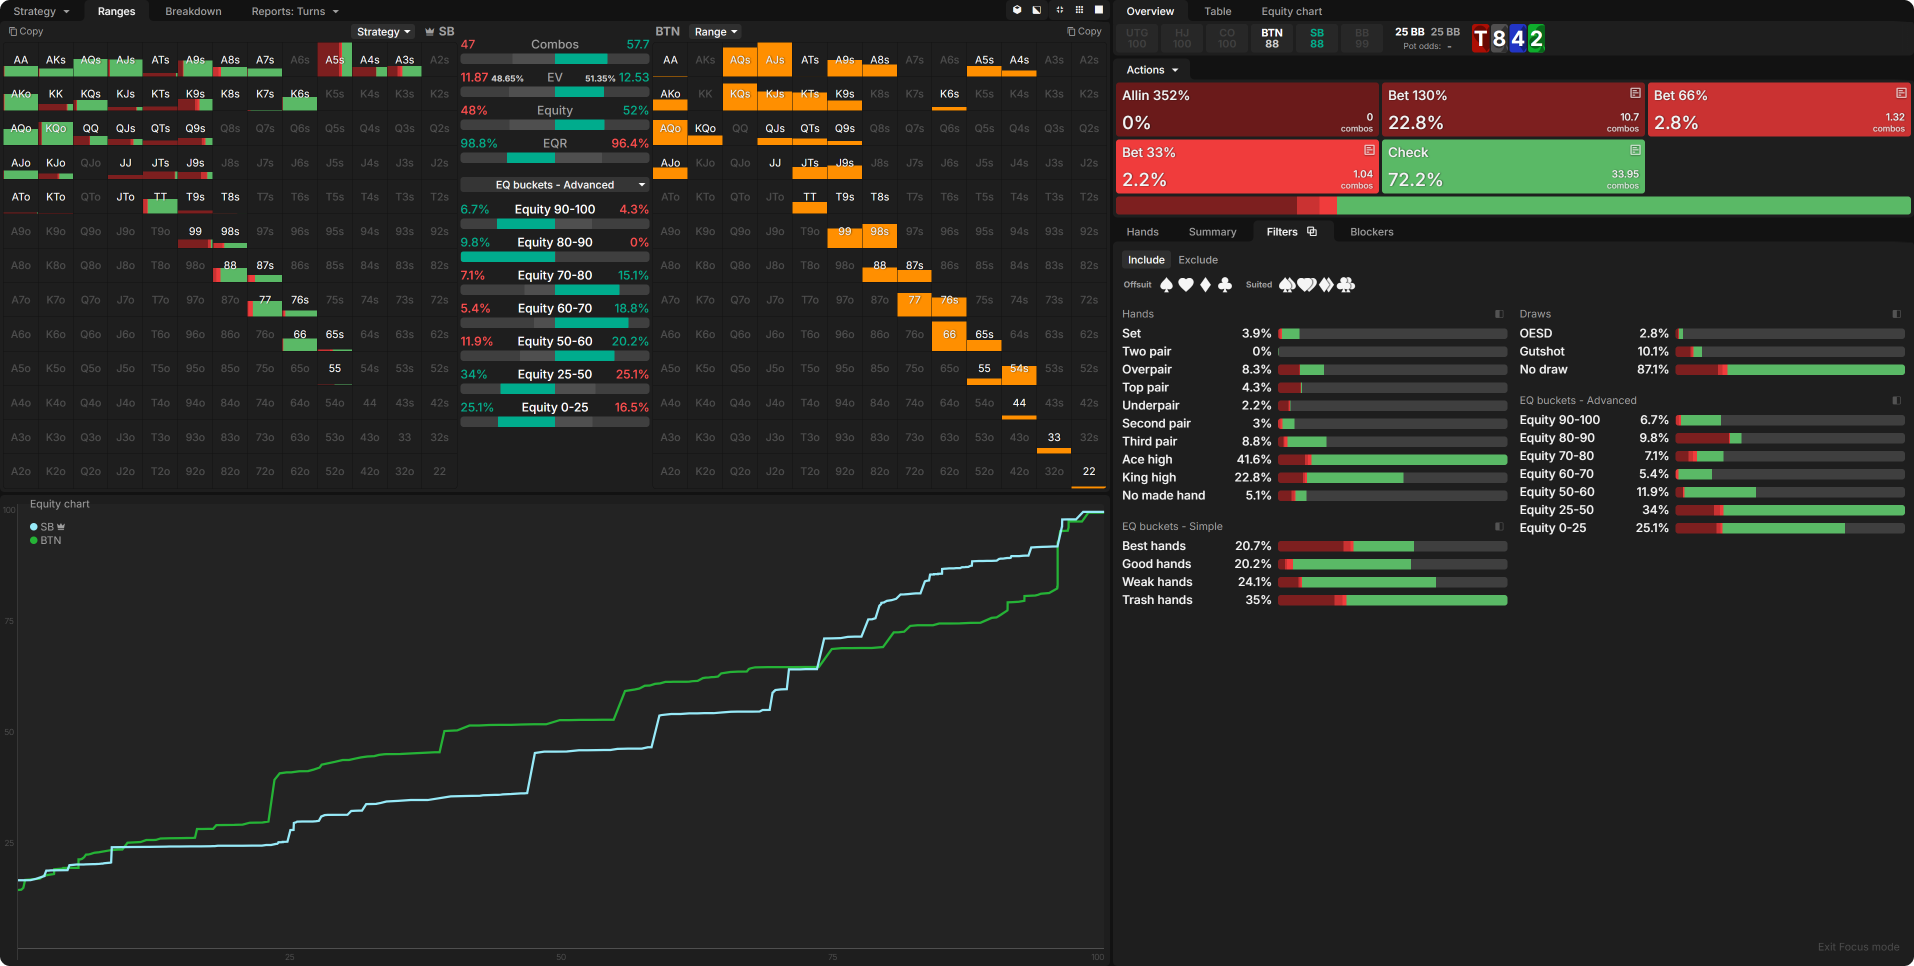
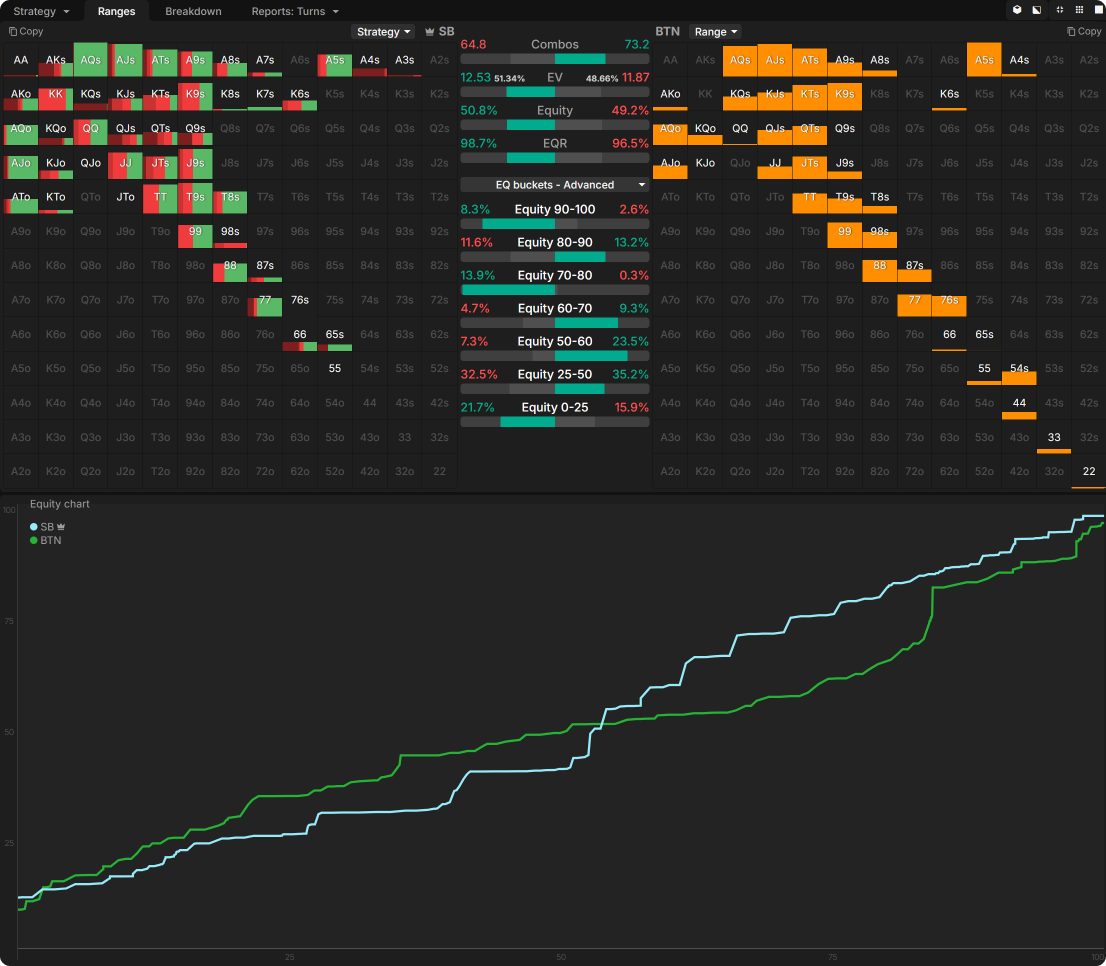
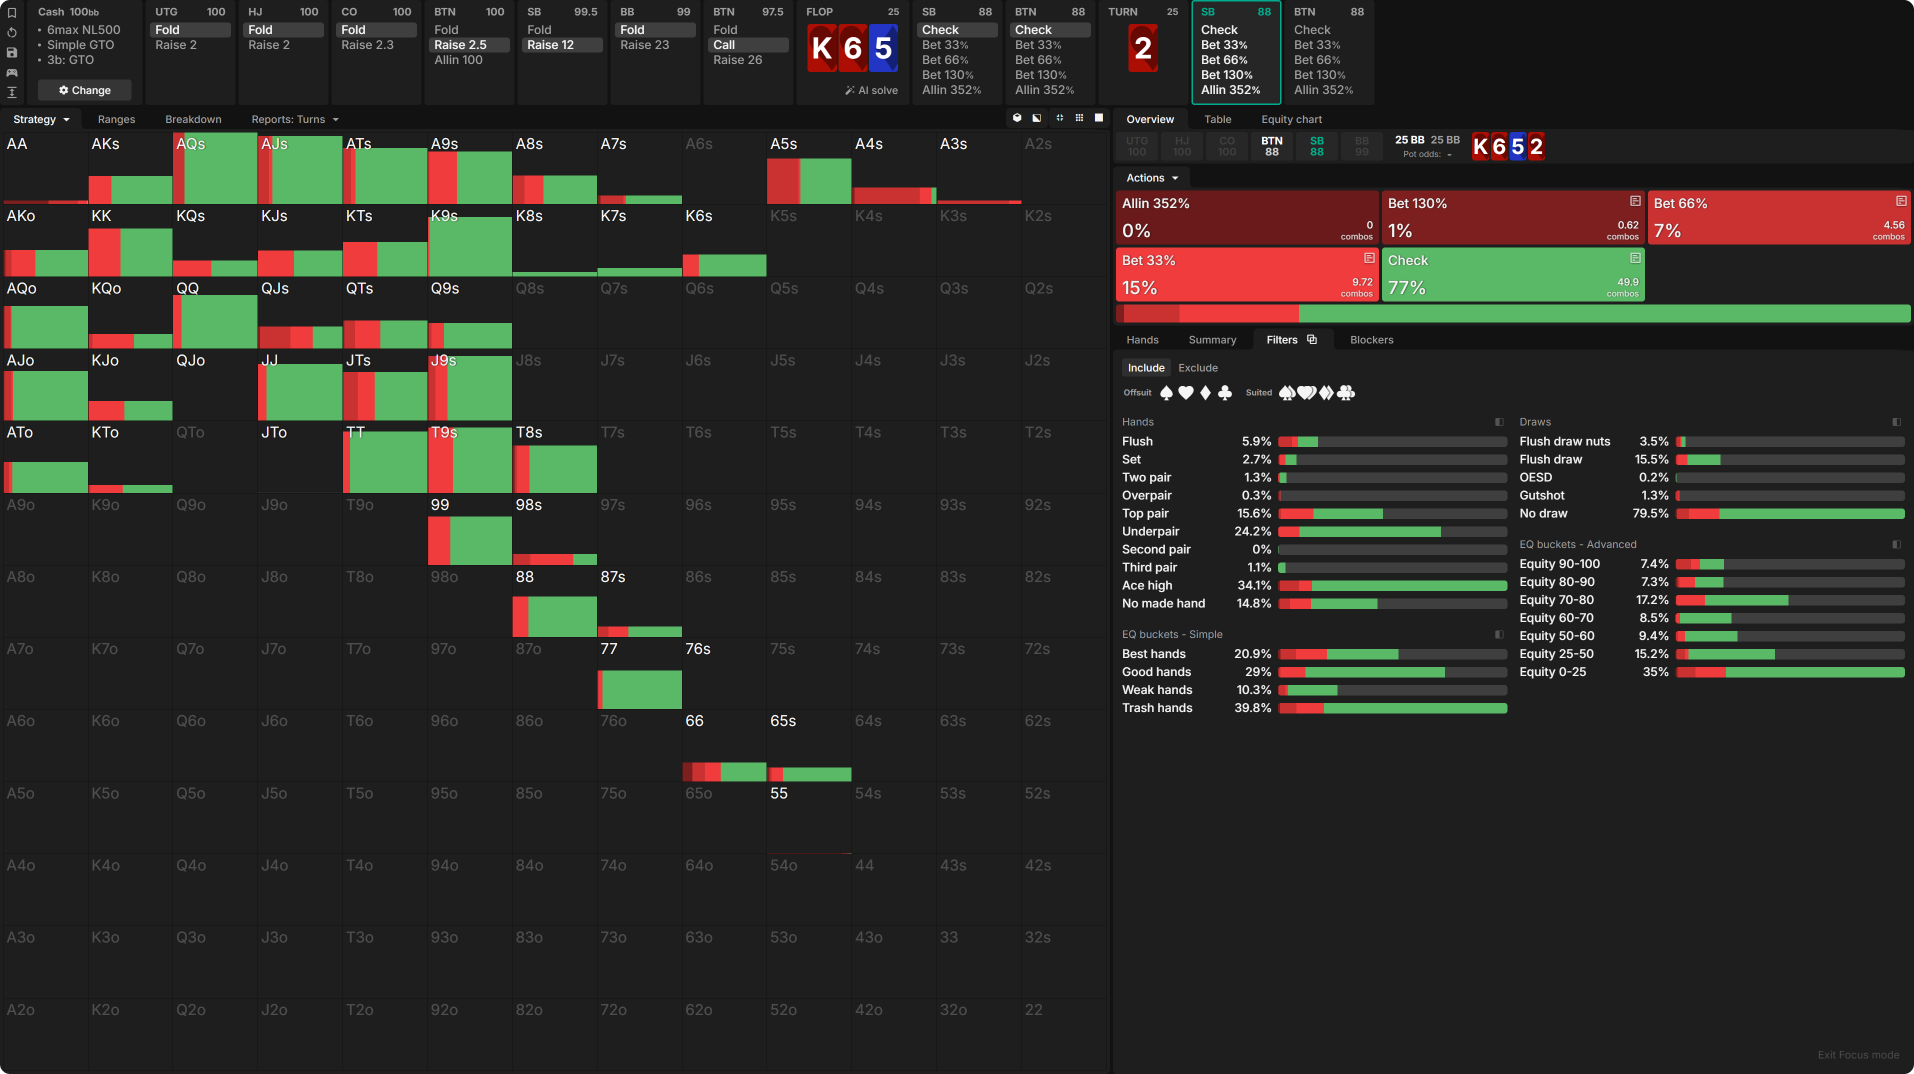
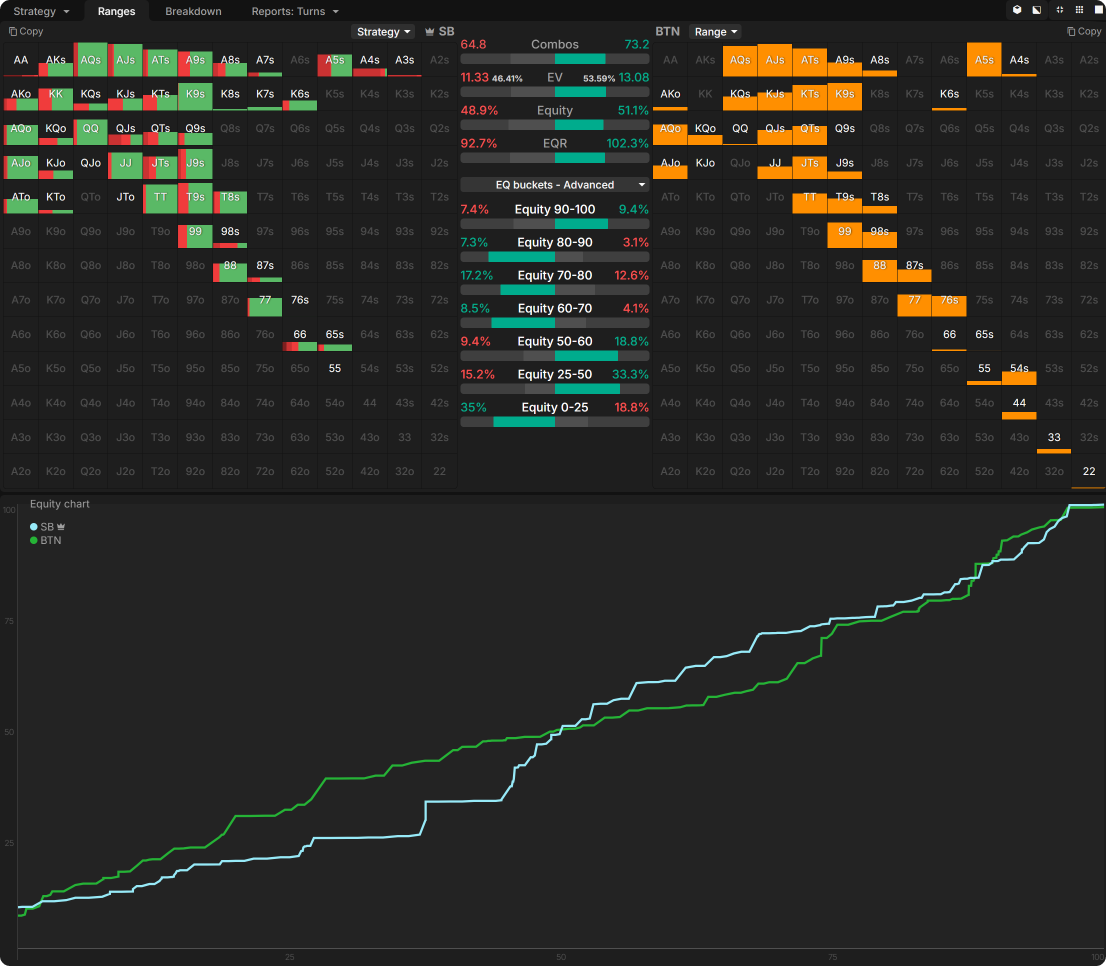
Our turn strategy after the flop went check-check is not always as straightforward as in the previous example. Let’s check out K♥6♥5♦ 2♣ to understand those spots better.
Unlike in our spot before, we heavily mix our strategy now:
- One of the range parts wants to polarize
- And the other wants to block
This one looks tricky, but don’t worry; we will better grasp the spot by inspecting the ranges tab.
Who the advantage has in which EQ bucket:
- SB has more “Best hands,” similar to the previous spot.
- SB also has more 70–80% EQ hands, unlike the previous spot.
- Taking a closer look at the hand filters on the right reveals that we have almost twice the number of underpairs, second and third pairs.
These all indicate that we want to bet different hand classes for various reasons.
- Large polarizing bets with strong top pairs and better, aiming to get all the money in by the river.
- The EQ chart shows significant domination in the middling to the upper EQ parts. All those hands (underpairs like 77–QQ) benefit greatly from protection and thin value.
Conclusion: Other than in the previous spot, we have an extensive range part that we want to bet for on the smaller side.
As we discussed before, we can stick to one-sizing the turn to ensure consistency in our strategy. Using custom solutions is an effective way to determine what sizing is preferred. When we clearly want to use multiple sizes, a proper simplification is picking a size you can bet your weakest value hand with.
3) Nuts Changed → Top Range Parts Become Symmetric
A significant change in nuts can greatly influence our strategy.
Looking at the picture, we can instantly see a big difference from the previous spot.
- We check considerably more, almost 80% of our range.
- We mainly use a sizing on the smaller side.
Examining the equity buckets reveals a symmetry in strong and nutted hands. The consequence is that the SB can’t polarize due to lacking a nut advantage, resulting in a significant increase in checking and only using a small sizing. The SB still wants to bet hands worse than flushes but not build the pot versus a range that has a high concentration in nutted hands. A great heuristic is to increase the checking frequency relative to the amount of nuts in our opponent’s range.
Conclusion
Playing the turn in 3-bet pots OOP as the aggressor can be challenging. Every challenge is a new opportunity to become more competent and robust. Following these principles for turn play OOP in 3-bet pots can set you on your path to mastery.
- Our flop strategy significantly impacts our turn approach. Grasping how the ranges look after arriving on the turn is crucial to understanding how to proceed on the turn.
- Building turn groups helps you gain traction on all the possible fourth street cards.
- Polarize your range while holding the nut advantage and use a geometrical size to get stacks in on the river.
- Be more cautious on nut-changing turns, especially when your opponent gets hold of the nut advantage.
- Splitting your range into multiple sizings is not necessary before the river.
- Polarize your range with a large size when you have an advantage in the nutted region while being behind in the mediocre region or simply not having a considerable number of them.
- Pick the size that fits your weakest value hand in spots where you want to use multiple sizes.
Repetition Is the Key to Success
As with anything involving a lot of information, it takes considerable practice to become comfortable processing it all. To get started, we have created two exercises designed to help you improve quickly and better understand different textures.
Practice on turn bricks after using a small flop size on Broadway-heavy boards: Check out this drill!
Did the flop get checked through? No Problem! Studying this drill will improve your delay lines skills!
Keep in mind that the GTO Wizard Solutions library is extensive and continually growing. It is a treasure trove of knowledge for those eager to explore. Dive into a variety of topics!
Author
Vanja
Vanja, a 24-year-old professional player from Germany, has built a strong reputation in the strategy game community. Beyond competing, Vanja is passionate about coaching and has contributed to GTO Wizard through insightful articles and active engagement in the Discord community.
They also played a key role in developing Pairrd Cashgame, showcasing their deep understanding of strategy and game theory.
Wizards, you don’t want to miss out on ‘Daily Dose of GTO,’ it’s the most valuable freeroll of the year!
We Are Hiring
We are looking for remarkable individuals to join us in our quest to build the next-generation poker training ecosystem. If you are passionate, dedicated, and driven to excel, we want to hear from you. Join us in redefining how poker is being studied.

