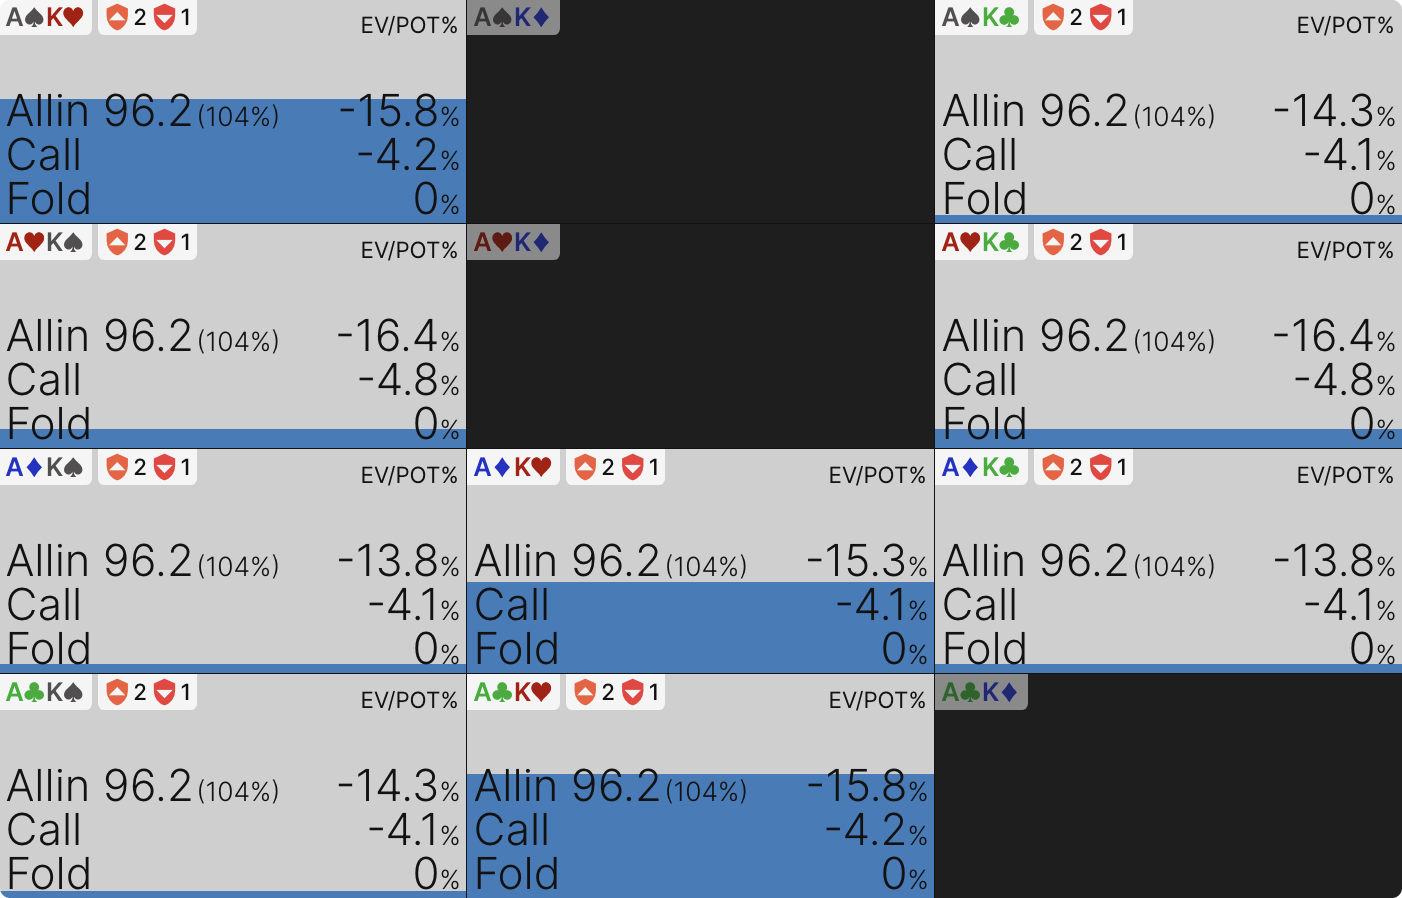
Turn Check-Raise Heuristics


Overview
Dealing with turn aggression is an area many players find difficult, which is an excellent reason to integrate it into your game. The decision whether to check-raise, check-call, or check-fold the turn can be the difference between playing a medium-sized pot and a very big pot, so it can make a substantial difference to our overall EV. But it can be tricky to figure out exactly which hands make the most sense to check-raise since we’re often dealing with some very specific considerations regarding card removal and board textures.
With these factors in mind, let’s build out a few general heuristics we can use to help construct our ranges for check-raising the turn. To make this process more manageable, we can break down turn check-raises into two very basic categories based on whether our raise size is all-in or not. Let’s start by looking at spots where we’re check-jamming our entire stack, which will mostly happen in spots where our IP opponent has bet both the flop and the turn.
Check-Raising All-in
Check-jamming the turn for all of it is something we will have to be willing to do from time to time, especially when playing 3-bet pots or shallow-stacked situations in tournaments. So, it’s quite important to understand how these situations function. However, we need to be aware of some basic realities about these spots before getting into the correct hand combo selection process for the deed.
The first caveat to acknowledge is that:
Even if we technically have a turn check-raise range, it could be small enough that it’s reasonable to eliminate it completely. The primary determining factor for not implementing turn check-raises will be that our opponent’s turn betting range is highly {{tooltip-title: polarized}}—the reason being that a polarized betting range will not have very many difficult decisions versus a jam. The bluffs will always fold, and the value will always call.
{{tooltip-content: polarized}}
Polarized
Describes a range that is mainly very strong made hands or bluffs, with very few middle-strength hands.
{{/tooltip-content}}
So, the first simplification we can implement is to effectively remove check-jamming in situations where we face very large turn bets. These situations are often marked by a brick on the turn, which allows our opponent to bet a highly polarized range. Here’s an example of what I mean:

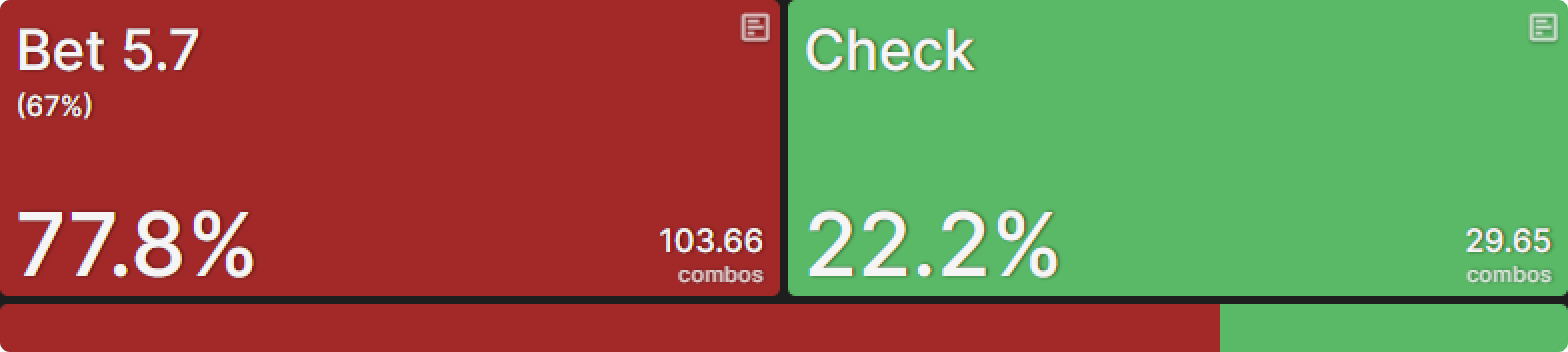
In this BTN vs BB single-raised pot (SRP) with 30bb stacks in an MTT, villain is betting quarter-pot on this K♦7♥5♥ flop at a high frequency, and we check-call. Then the turn is the 2♣, we check, and villain uses a pot-sized bet—which is actually slightly bigger than a geometric size for this spot, leaving only 71% pot behind on the river. Or, to look at it another way, only allowing us to check-jam for a 71% pot raise sizing.
Blank Turn When Shallow (30bb)
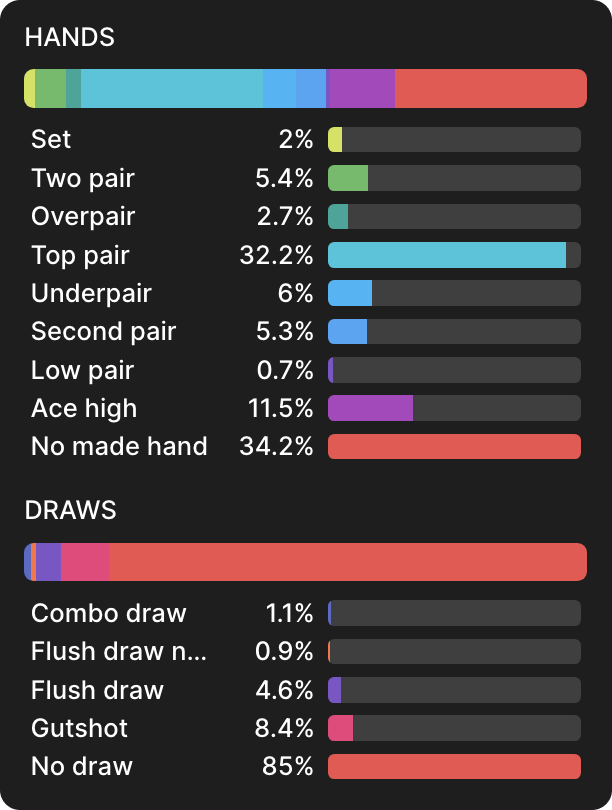
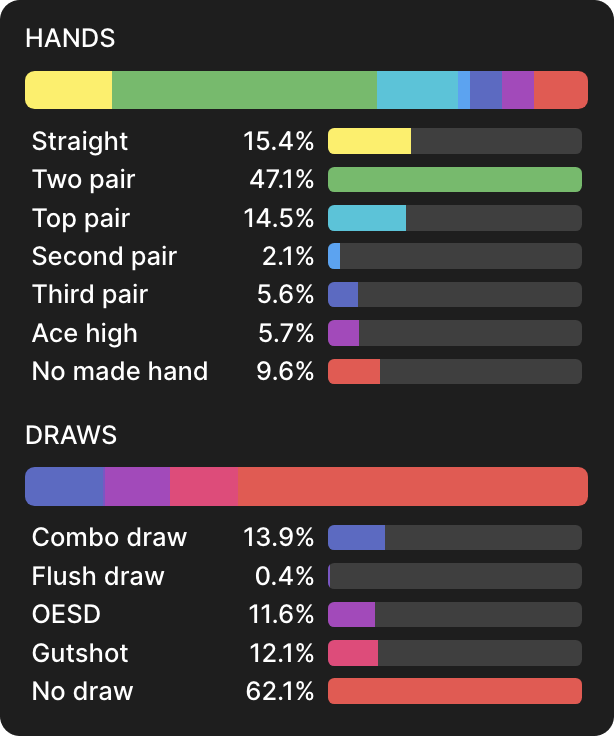
BTN’s turn barrel range is mostly top pair+ for value and a lot of weaker bluffs—they’re not betting a lot of their draws because those draws don’t like facing a check-jam, and a lot of the draws just became a lot weaker on this brick turn anyway. In fact, 85% of villain’s turn betting hands have no draw, meaning only 15% of them do have draws.
{{width: 40%}}
{{/width}}
The more polarized nature of villain’s betting range (in the sense of the bluffs having lower equity) means that there are very few value hands in our range that need any kind of protection—there aren’t many scary river cards for our strong hands here. As a result, our strategy versus this pot-sized bet contains only 2% check-raises (around 8.5 combos).
{{grid: 4fr 1fr}}

{{/grid}}
If we completely eliminate the check-jam option, it actually doesn’t cost us any EV at all because all the combos that are check-jamming are still doing fine by check-calling. However, one notable aspect of doing this is that it may cause us to have to consider donk-betting on certain turn cards, but thankfully this isn’t one of them.
Wet Turn When Shallow (30bb)
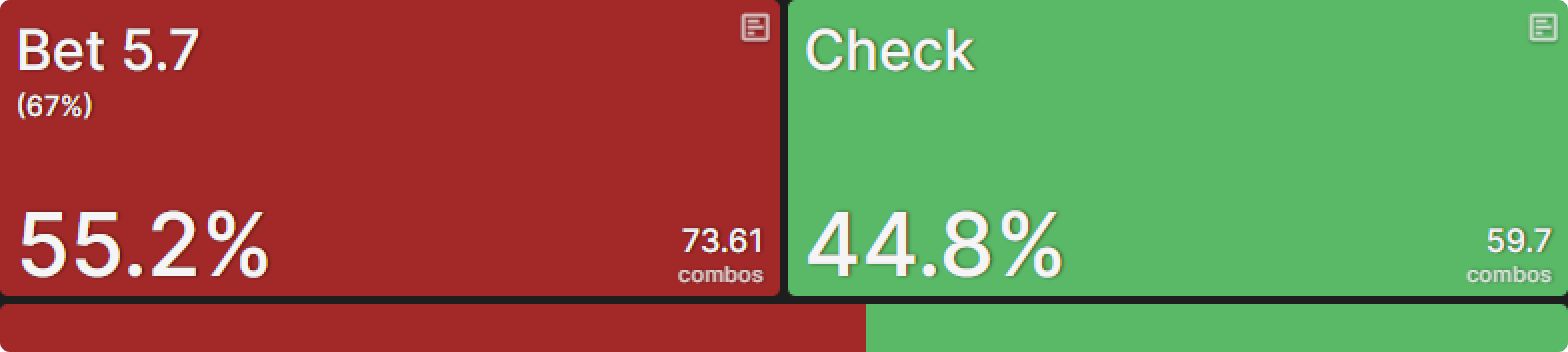
Now, let’s compare this spot to one where the turn card is very different. Instead of the 2♣, let’s make it the 8♦, putting two flush draws on the board and completing some straights. We do actually have some donk-bets here for ⅔ pot, with around 9% of our range. We won’t remove that, as it will alter villain’s betting range and our check-raising range as a result.
Once we do check, villain isn’t betting as big on the turn, going with only a ⅔ pot bet, due to the fact that the turn card is no longer a brick, and the BTN no longer has a significant nut advantage.
{{width: 75%}}
{{/width}}
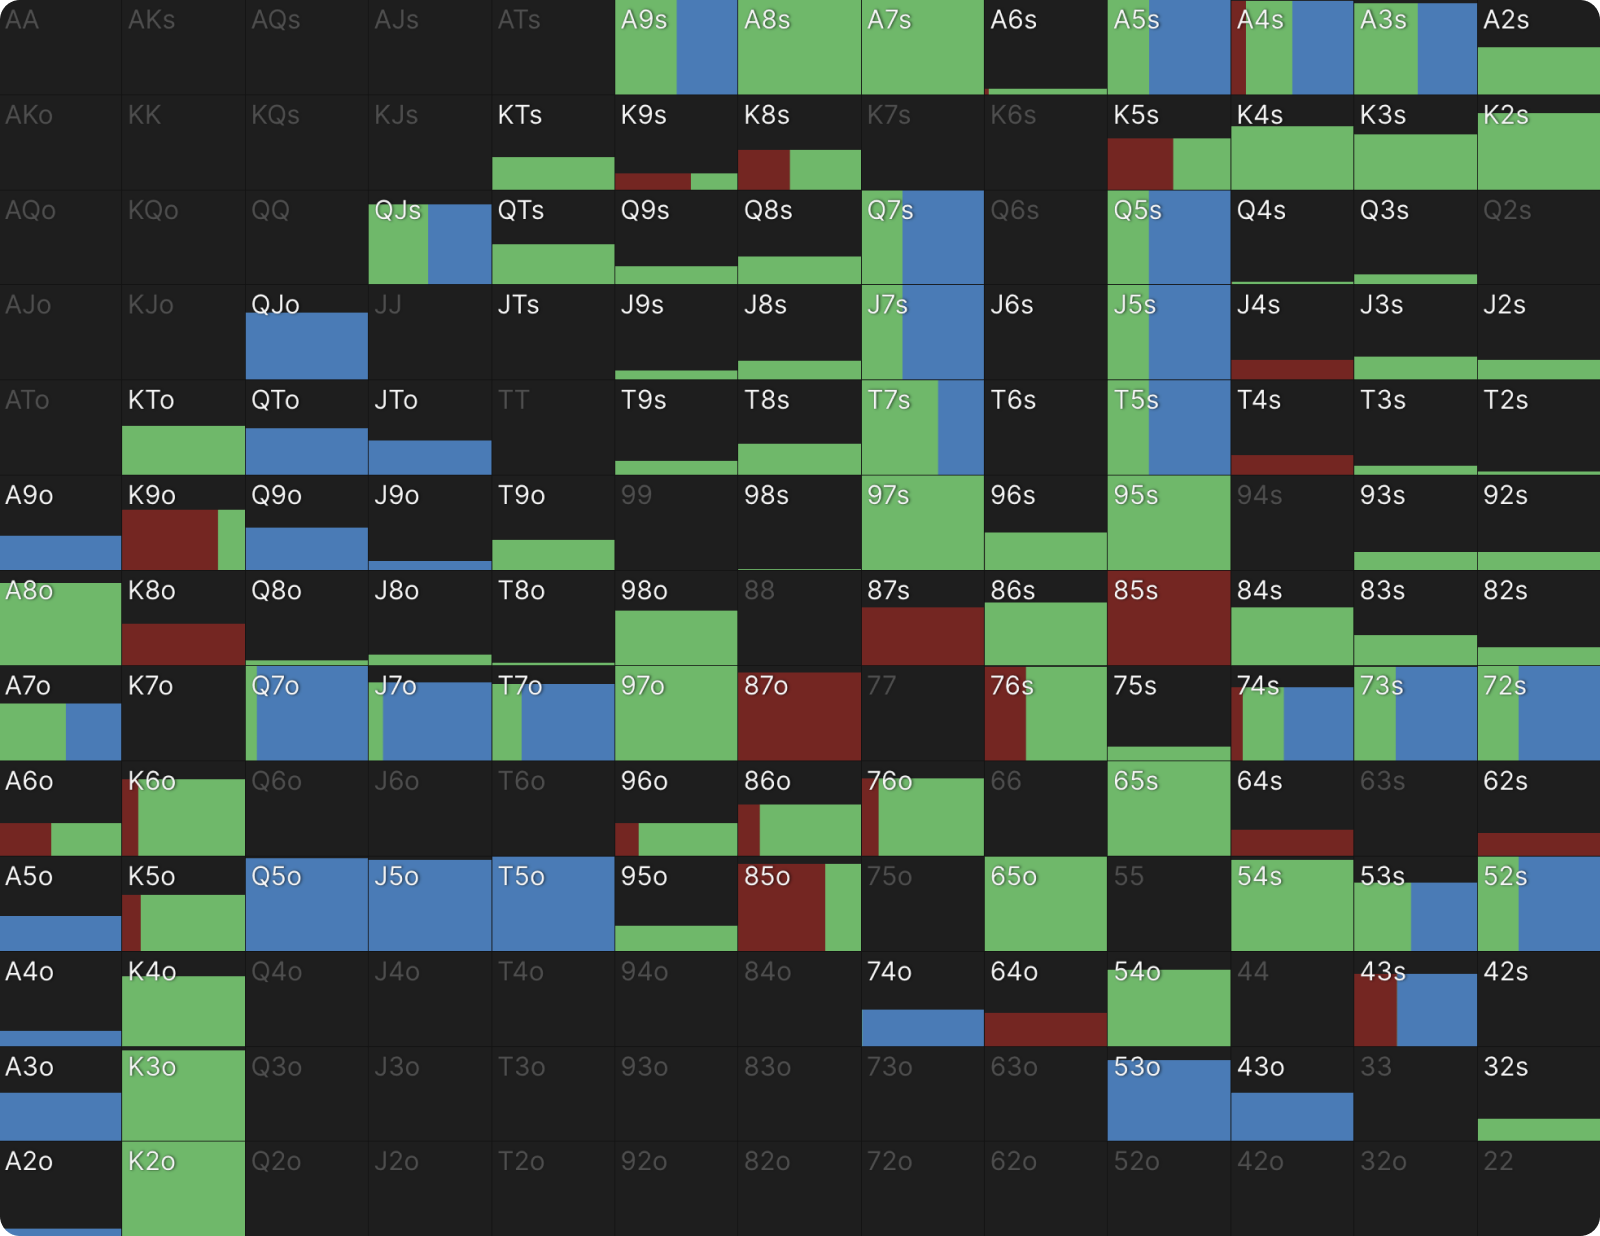
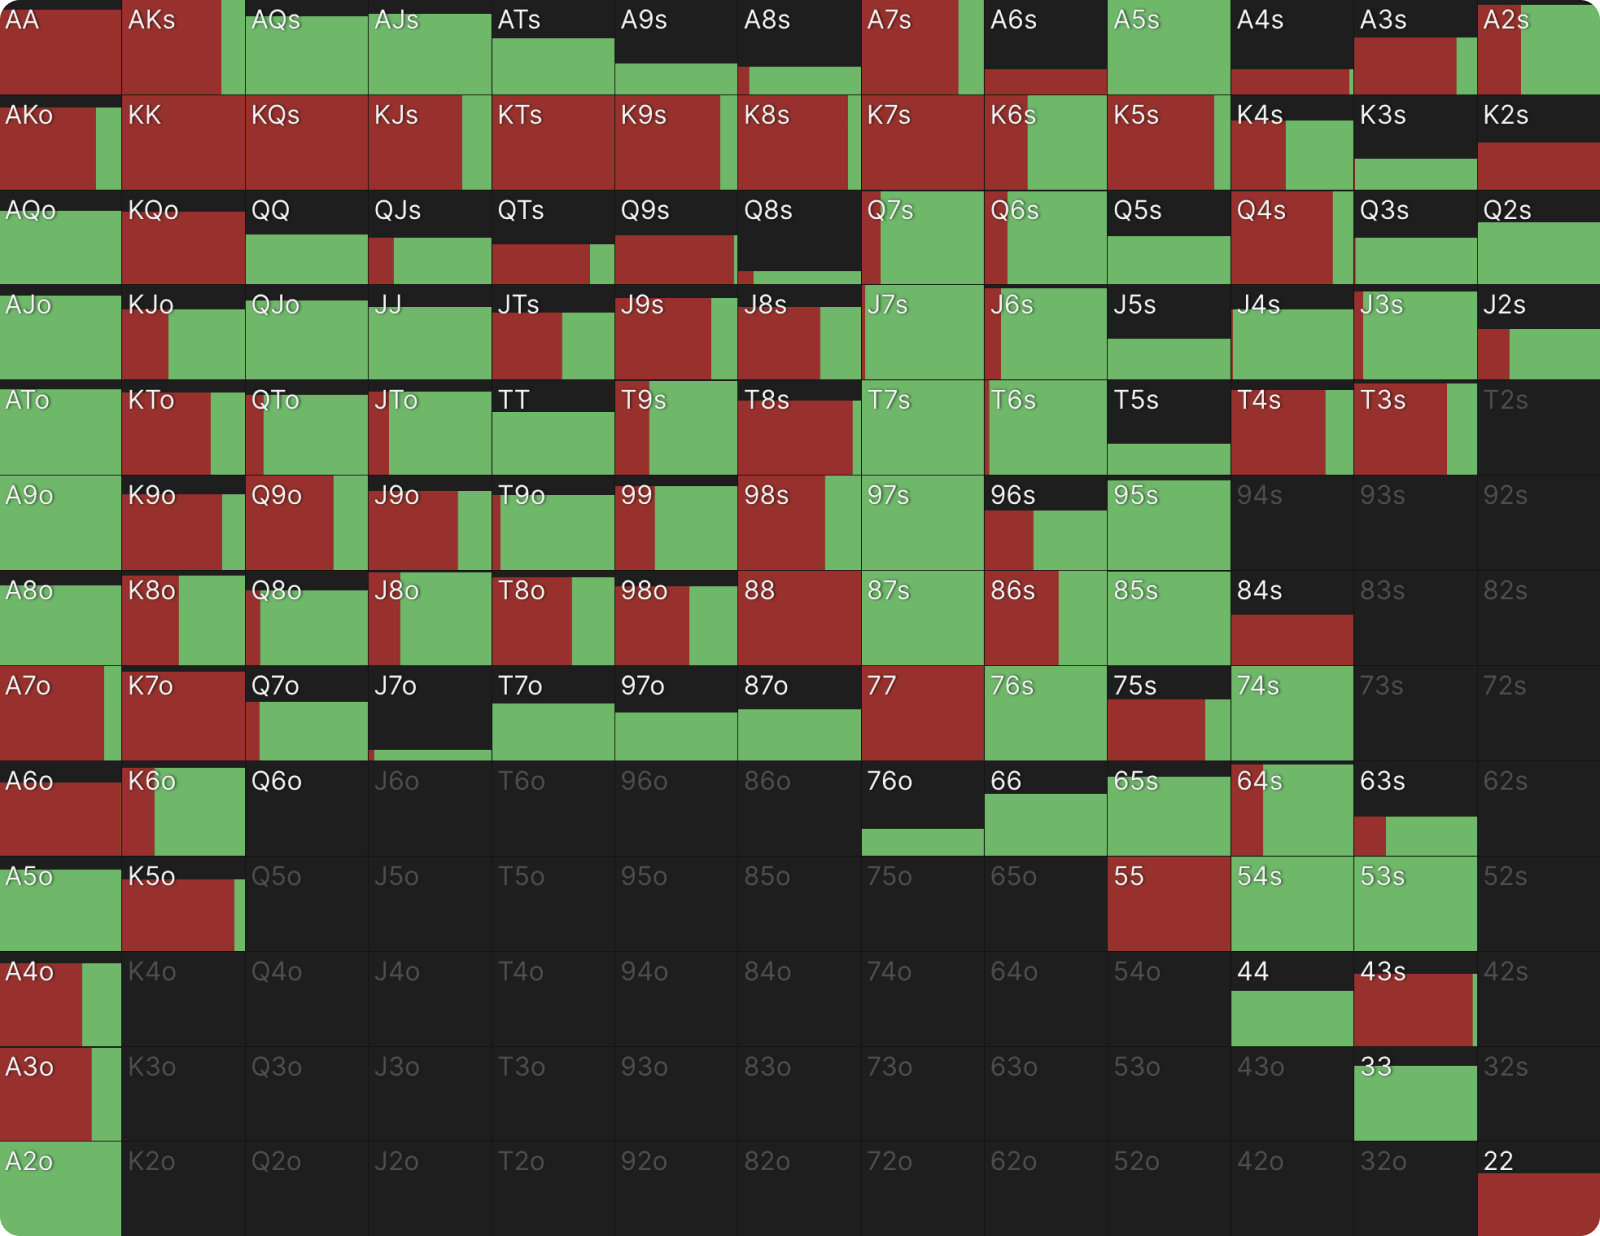
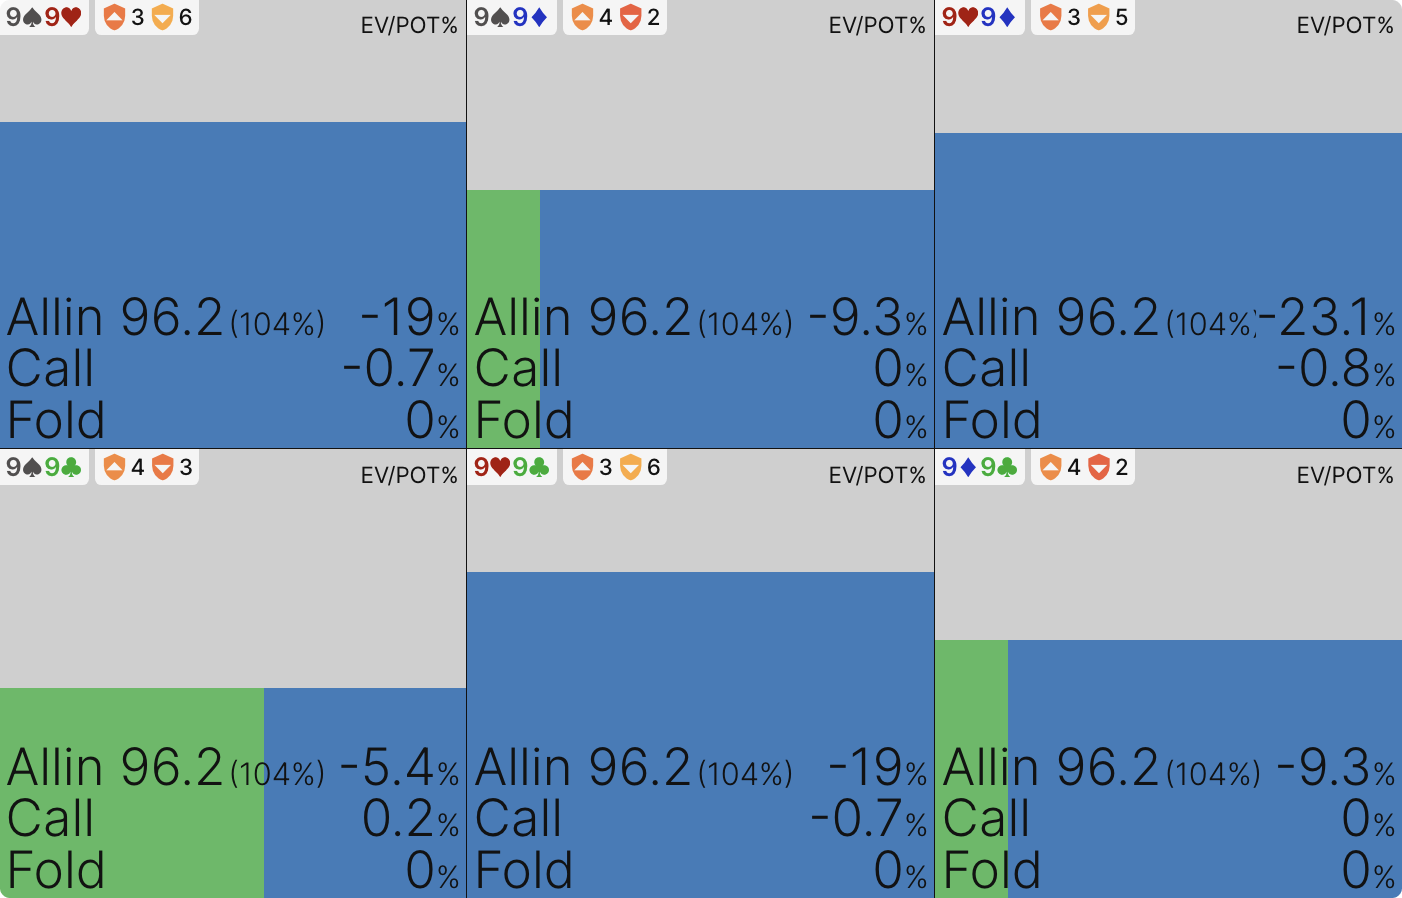
Facing a 67% pot bet, we now have a fairly substantial check-jamming range of 11% from the BB. Interestingly, we’re not really doing it as a bluff particularly often.
{{width: 75%}}
{{/width}}
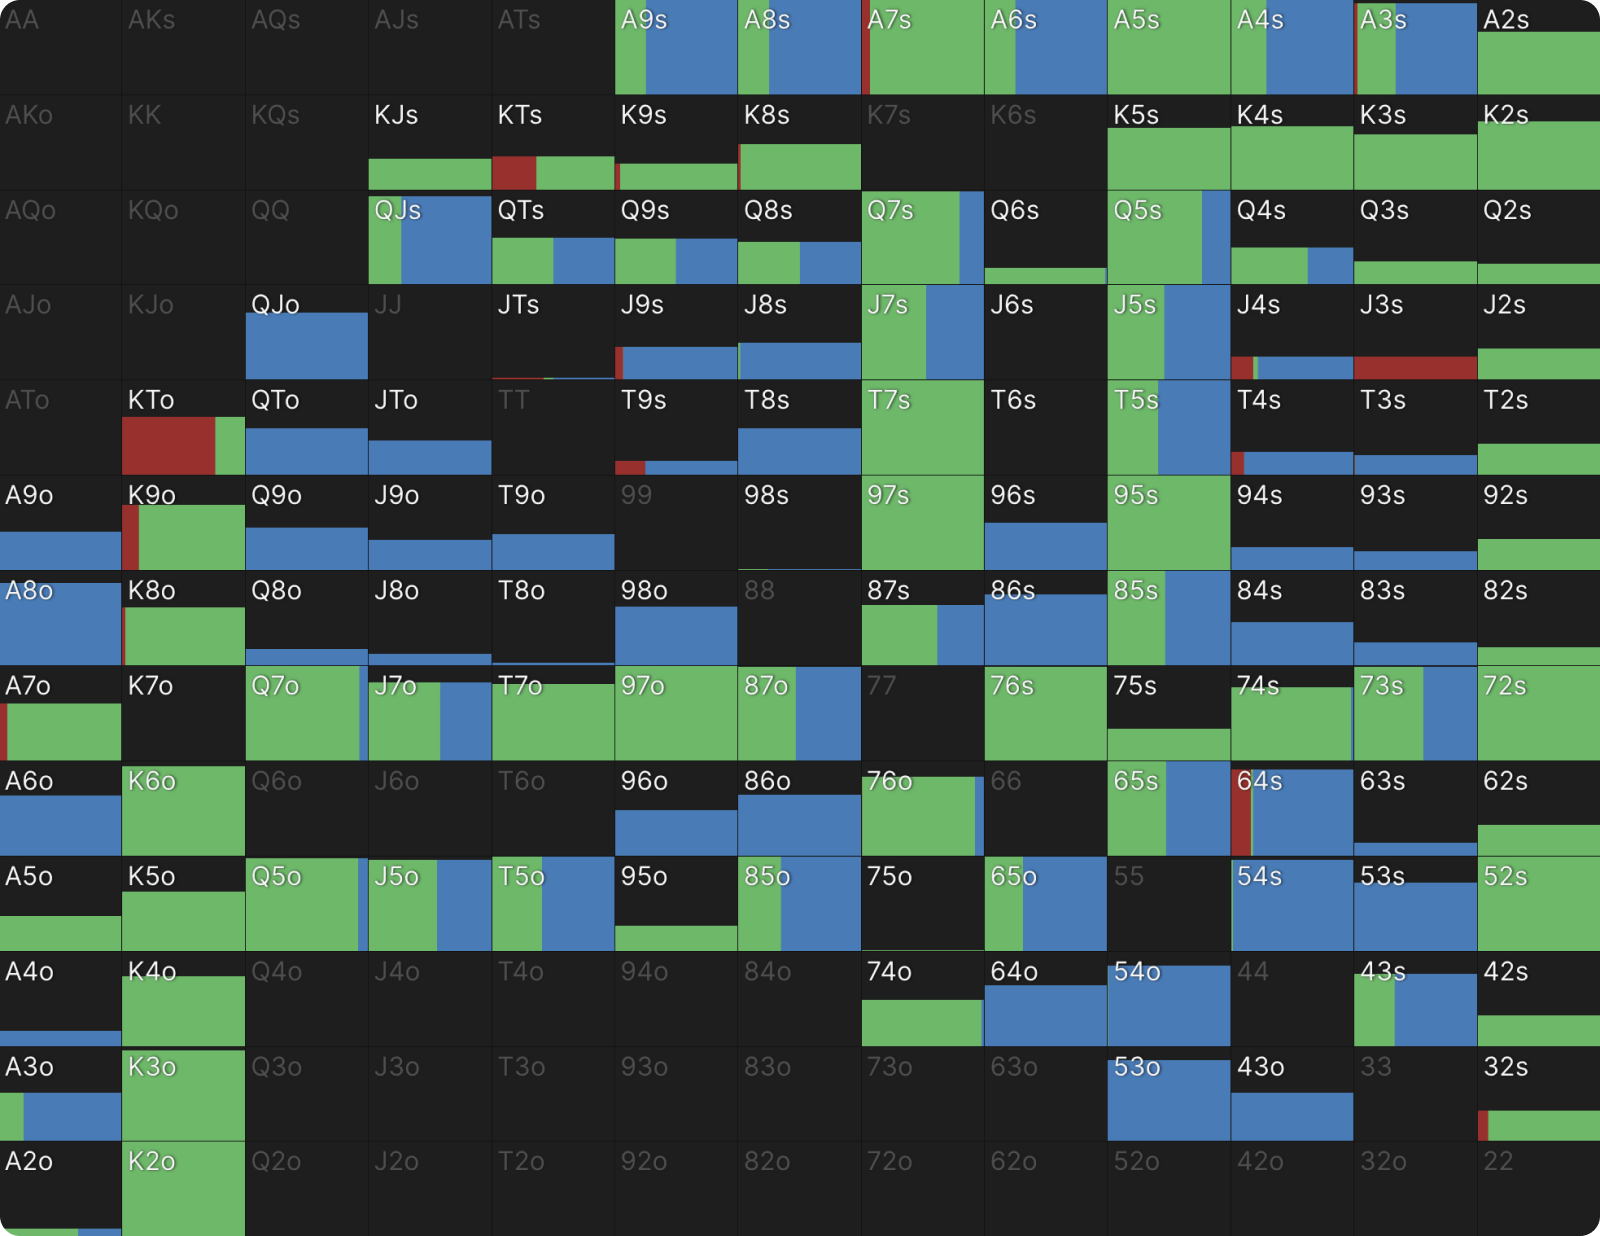
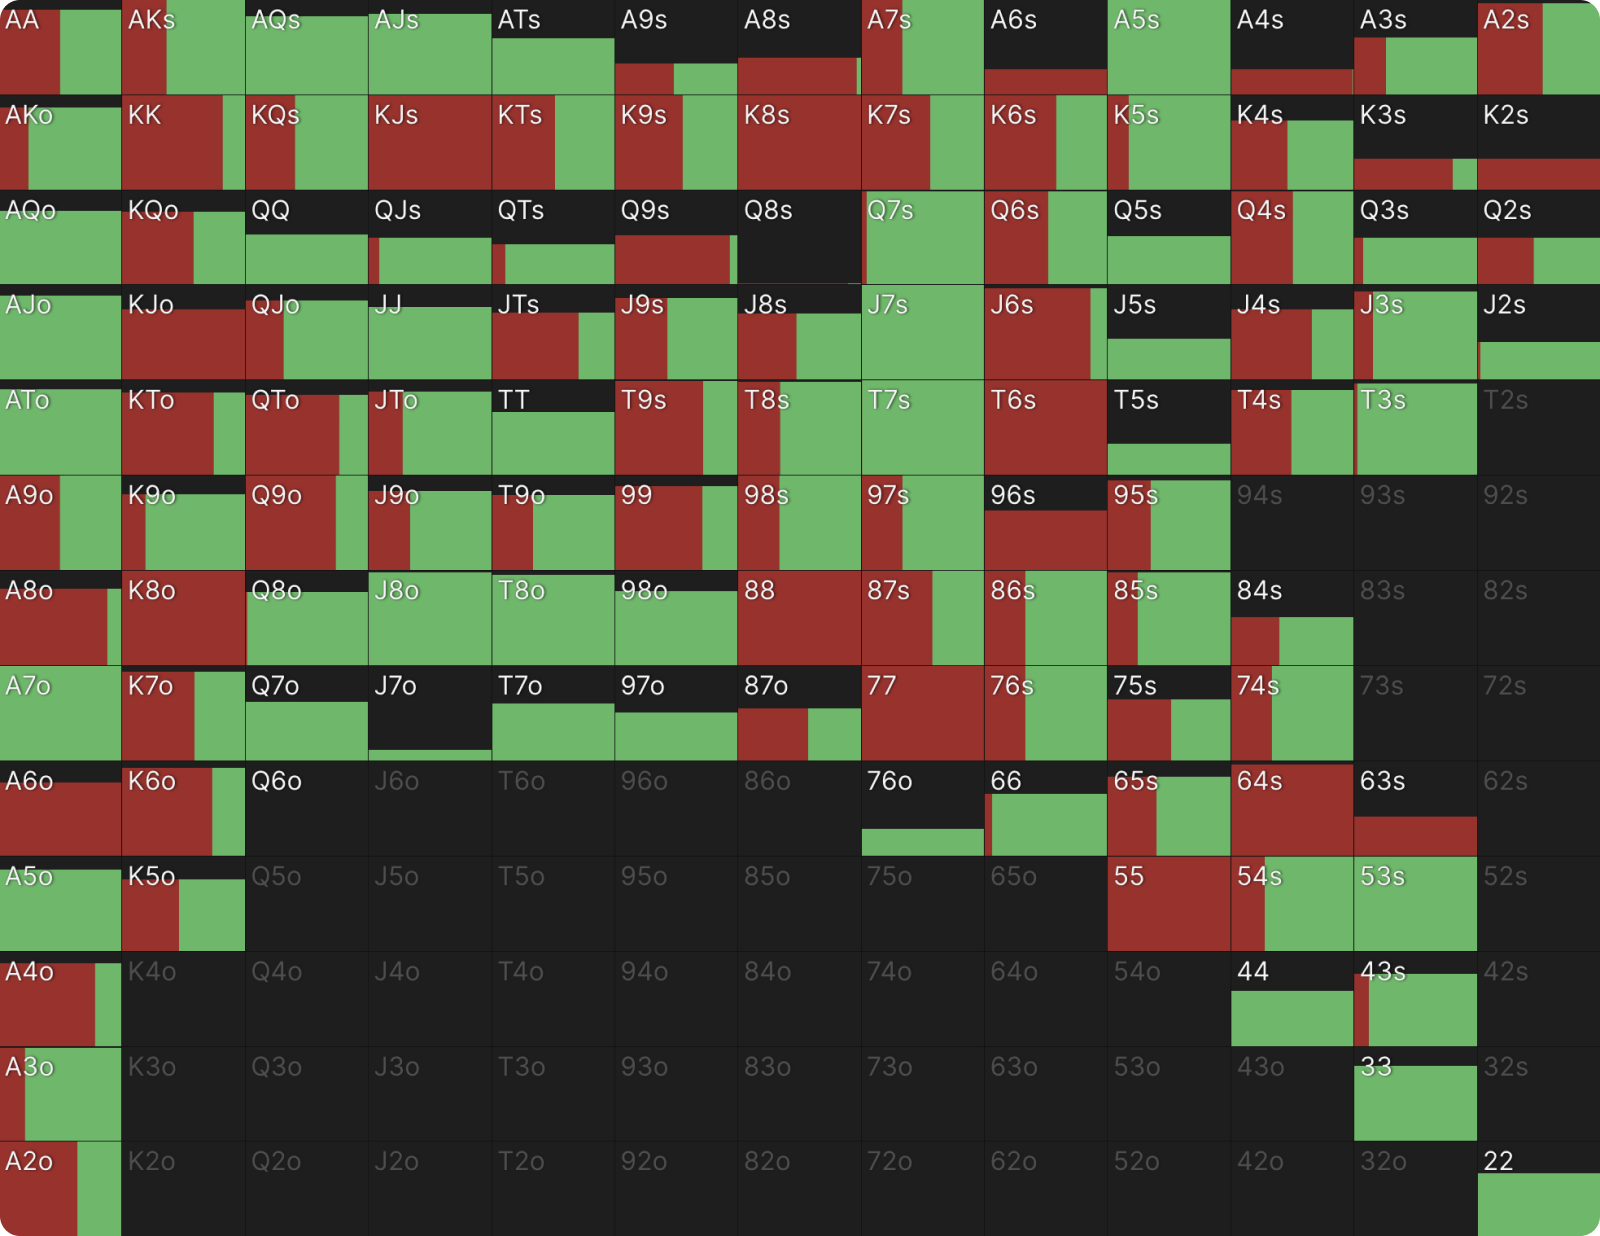
As you can see below, the bulk of our check-jamming combos (colored dark red on the Manhattan plot from the Breakdown tab) are actually on the higher-equity end of the spectrum, with only a few very specific lower-equity combos taking this line.

As you can tell from looking into our check-jamming range a little more closely with the range breakdown graphic below, by far the most common hand class to use in this range is two pair—in fact, almost half of our range here is composed of two pairs, which are vulnerable (such as K8, K5, 87 and 85). We’re also jamming our lower straights and calling our higher ones since the lower straight (64) is more vulnerable to bad river cards. To round out our range, we’re jamming a number of combo draws (T4s, 62s) and pair+draws (86o, 76o).
{{width: 40%}}
{{/width}}
It might seem counterintuitive that we’re doing this without really having many bluffs in our range, but there’s a very specific reason for it. It all comes down to what portion of our opponent’s range we’re actually targeting. In the previous spot on the 2♣ turn, our opponent’s betting range was very polarized, and therefore, we couldn’t put any portion of that range in an indifferent spot by jamming, but that’s not the case here.
{{width: 40%}}
{{/width}}
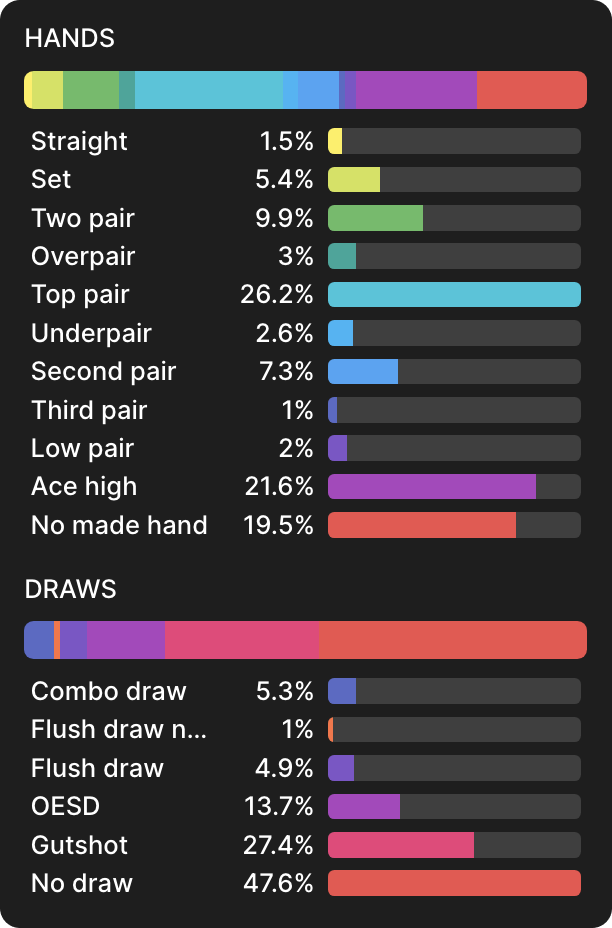
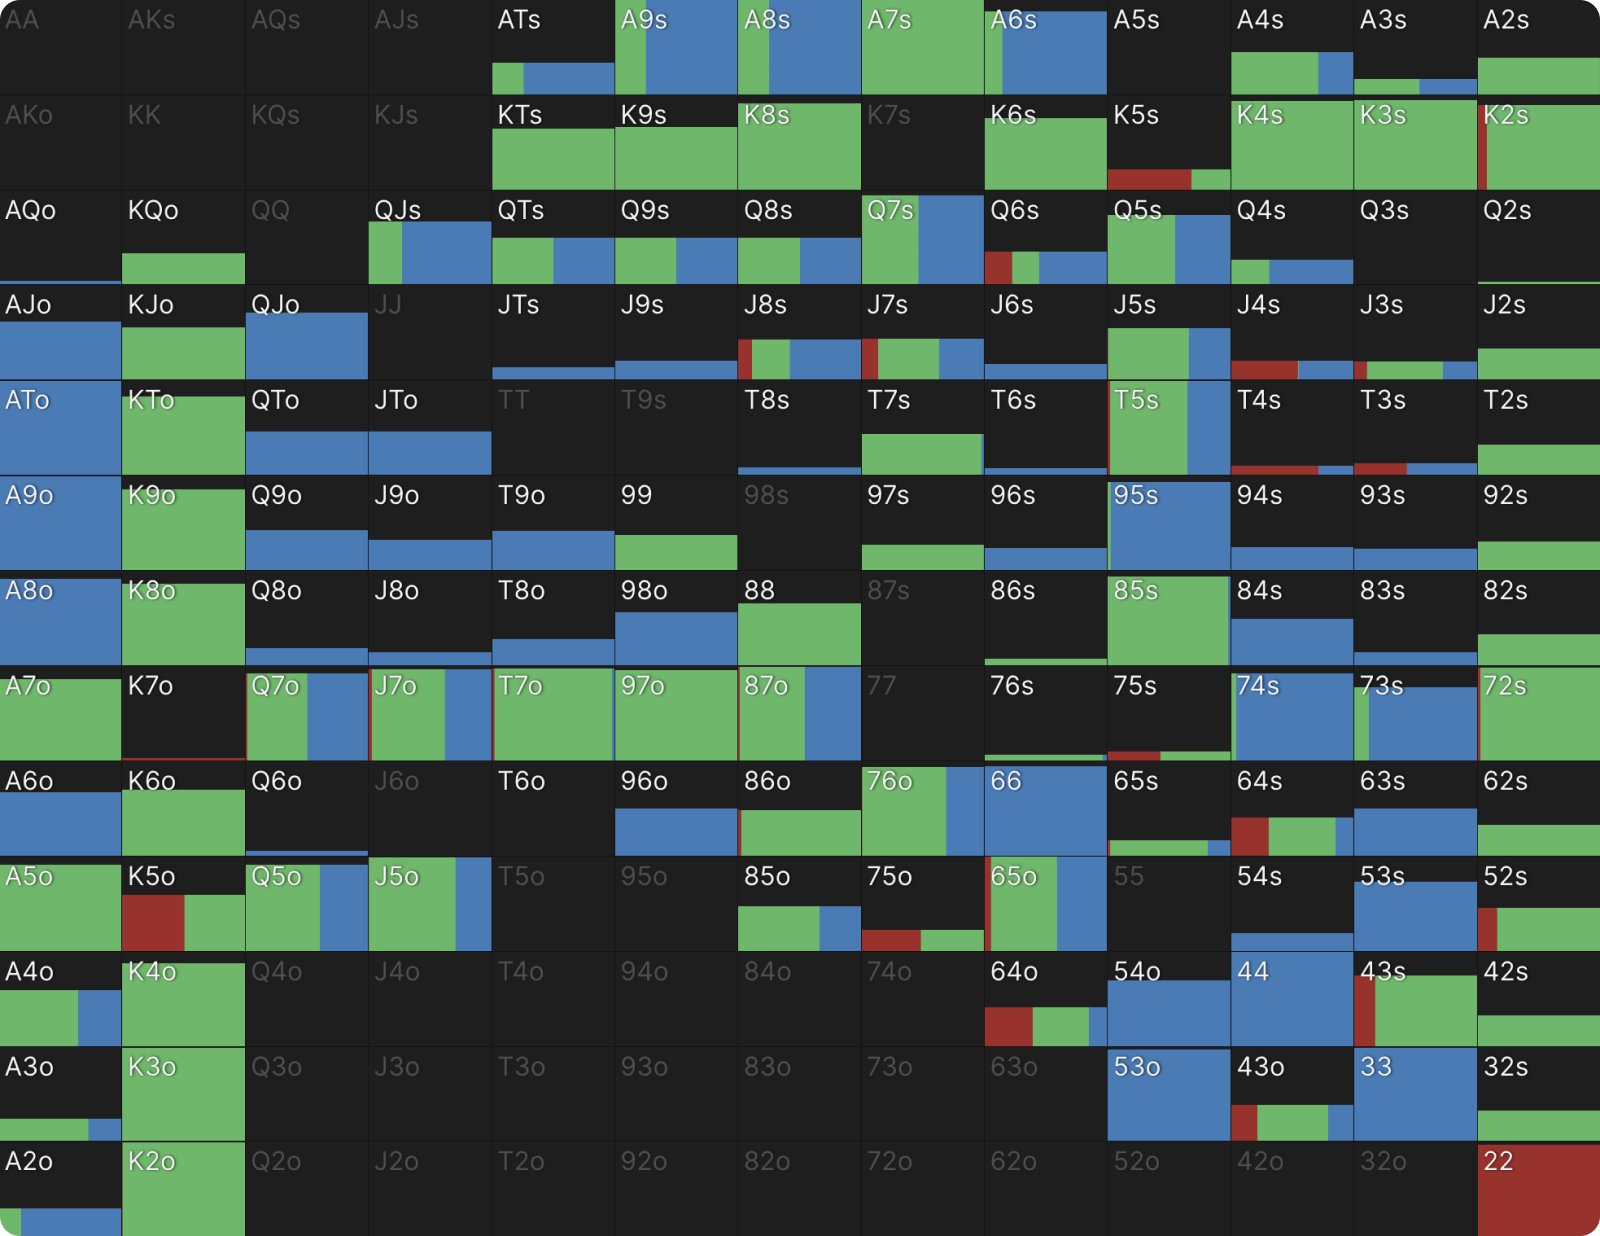
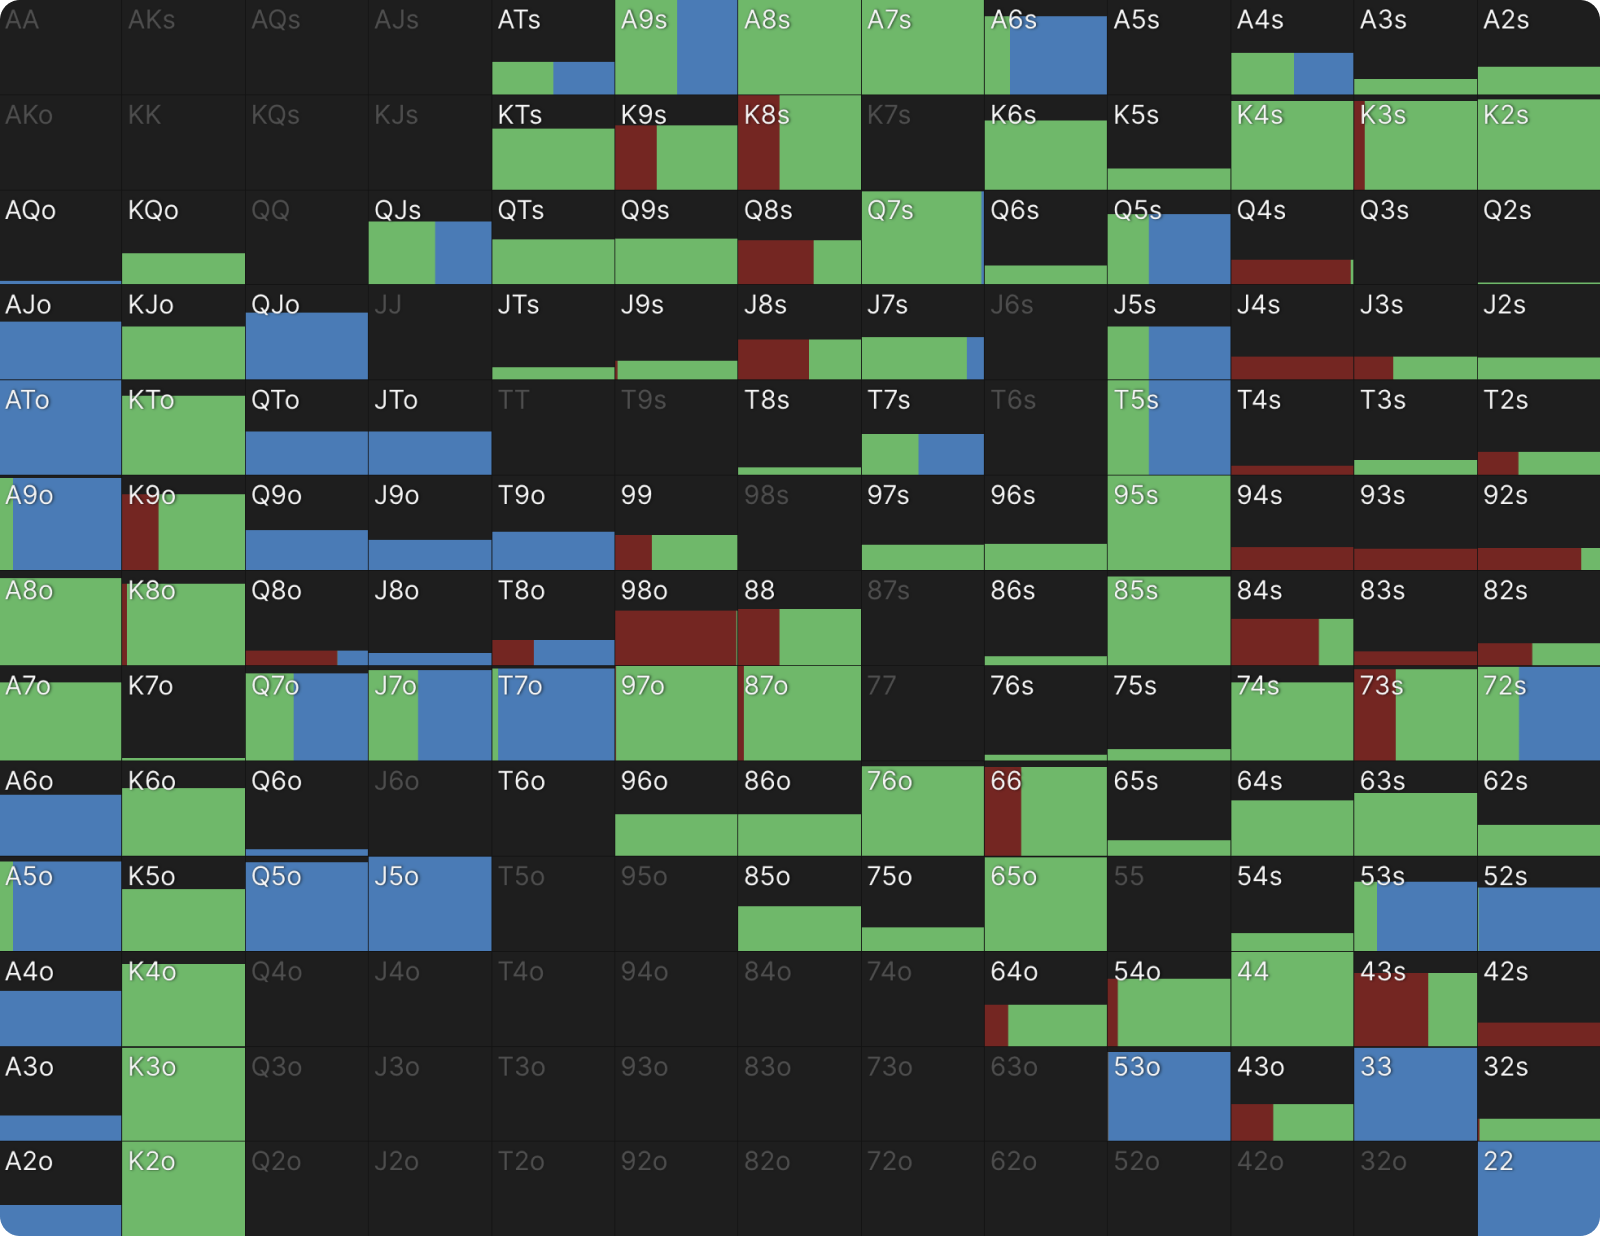
This graphic is a breakdown of BTN’s turn barrel range. We can immediately notice that it’s quite heavy on certain specific types of hands—there’s a lot of top pair in there, and since 48% of the range has no draw, that means 52% of the range does have a draw, so there are a lot of drawing hands which are betting this turn.
This has two specific consequences for our check-jams:
- There’s now an incentive to protect some of our strong but vulnerable hands against the possibility of a bad river card.
- We can put a lot of villain’s draws in a tough spot with a jam.
The best example of hands that are being targeted by our check-jams is AKs—as you can see here, A♠K♠ and A♣K♣ are both indifferent when facing a turn shove. We’re adding just enough weaker pair+draw hands to our check-jamming range that their top pair top kicker have some incentive to call, while making sure we have enough two pair or straights that they have some incentive to fold. A lot of villain’s top pair hands without a draw are in a tough spot when they bet and we shove here.
{{width: 60%}}

{{/width}}
However, our turn check-shove is actually accomplishing another purpose as well—the fact that we will be check-shoving the turn sometimes is actually deterring villain from betting certain hands on the turn because those hands will be in a tough spot if we jam. Here, I’ve highlighted the top pair, underpair, and second pair region of Villain’s turn range and the entire draw portion, respectively:
BTN Strategies
When BB Has Turn Check-Jams
{{grid: 2}}
{{/grid}}
As you can see, both of these portions of BTN’s range are able to bet just over half the time if BB has a turn check-jamming range—they are forced to be very specific in their combo selection for which they bet and which they check, for fear of being put in a tough spot by a raise. However, if we remove our option to check-jam, those two portions of villain’s strategy look like this:
When BB Has No Turn Check-Jams
{{grid: 2}}
{{/grid}}
Evidently, villain is able to play a lot more aggressively here when they don’t have to ever worry about us raising—they can value-bet more thinly, and they can bluff with a wider variety of drawing hands.
This is another major part of why it’s optimal to build a check-jamming range here. We want to prevent our opponent from being able to bet all their thin value hands and draws in the first place. In fact, we’re forcing BTN to add some element of polarization into their turn betting range—we’re forcing them to find bluffs with lower-equity hands, which is difficult to do in spots like this. We’re not going to be able to put a hand like an open-ended straight flush draw in a tough spot because those hands have too much equity, but we can force a lot of just flush draws and just straight draws to check more often if they have to fear a check-jam.
So, in the end, you could conclude that our turn check-jam strategy targets two specific regions of our opponent’s range:
- The middle of their value range (here: strong top pair hands without a draw)
- Their middling draws (here: stronger flush and straight draws)
In general, in the spots where villain’s turn betting range is more polarized to begin with, such as on the 2♣ turn we saw earlier, we’re not going to really have much of a turn check-raising range at all. So, it’s entirely reasonable then to eliminate that part of our strategy altogether. A more detailed exploration will be done in the deeper stacks section.
Now, let’s move on to looking at spots where we’re not check-raising all-in but for a smaller size. So, we still have to play the river if our turn check-raise gets called.
Check-Raising Non-All-in
We’re going to stick with the same spot here, the K75tt flop, and the same turn cards, the 2♣ and the 8♦. The difference here is that we’re now looking at 100bb stacks instead of 30bb, so the SPR on the turn is a lot higher.
Blank Turn When Deep (100bb)
Let’s start with the 2♣.
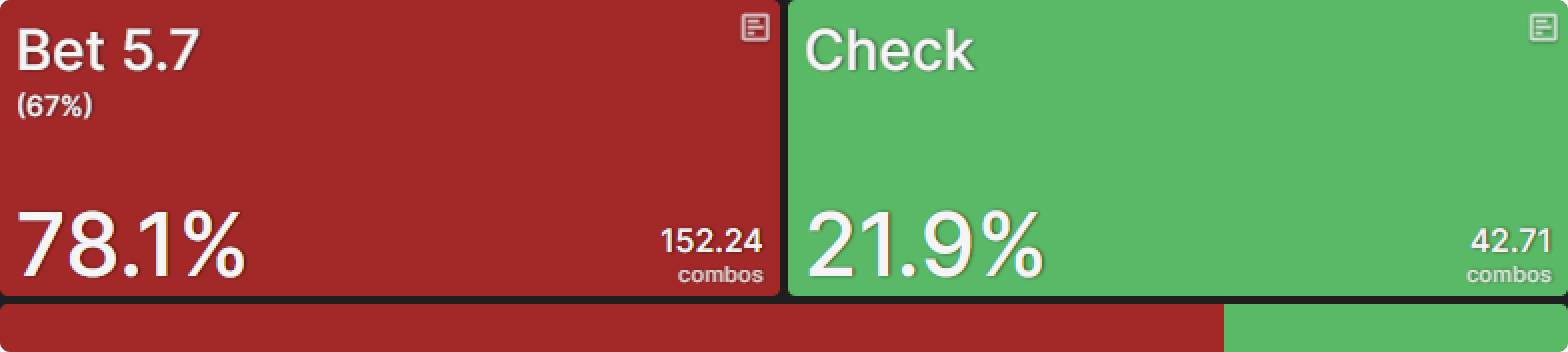
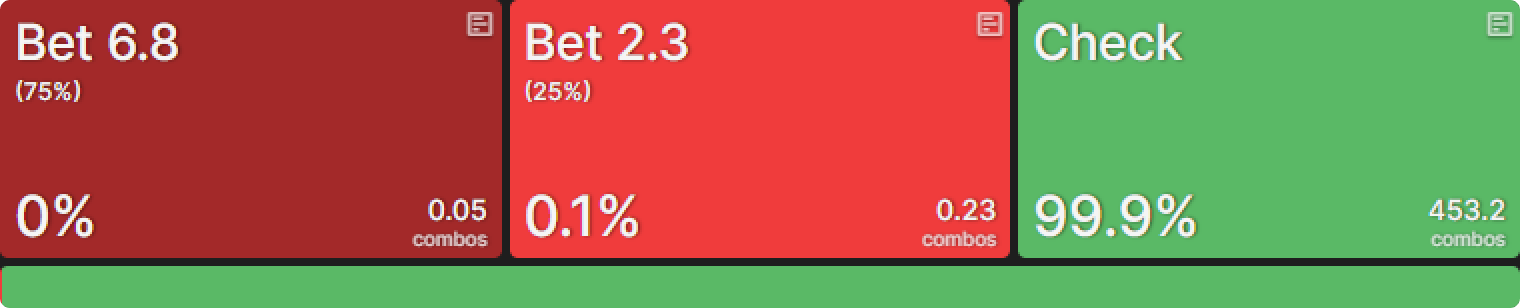
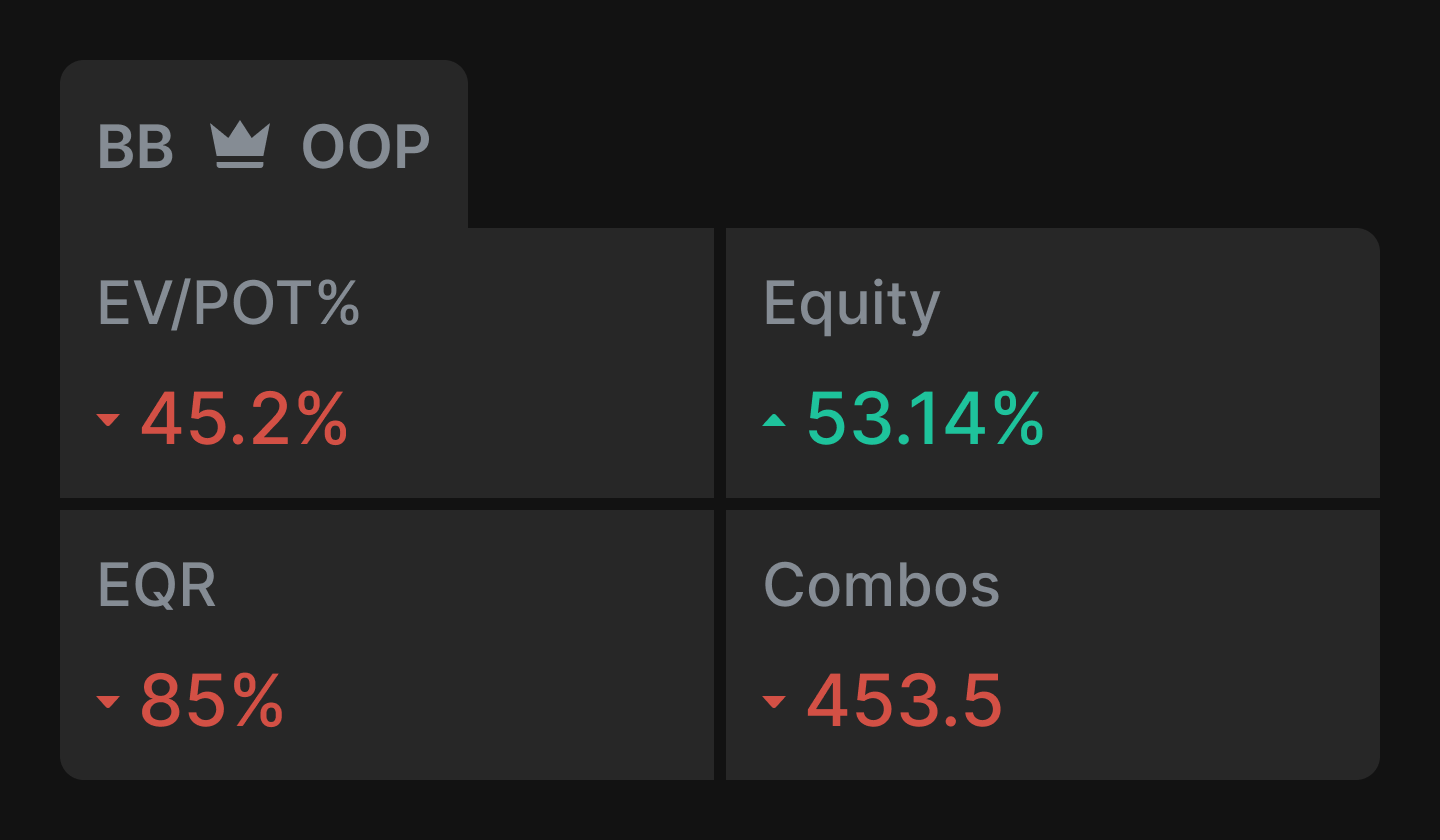
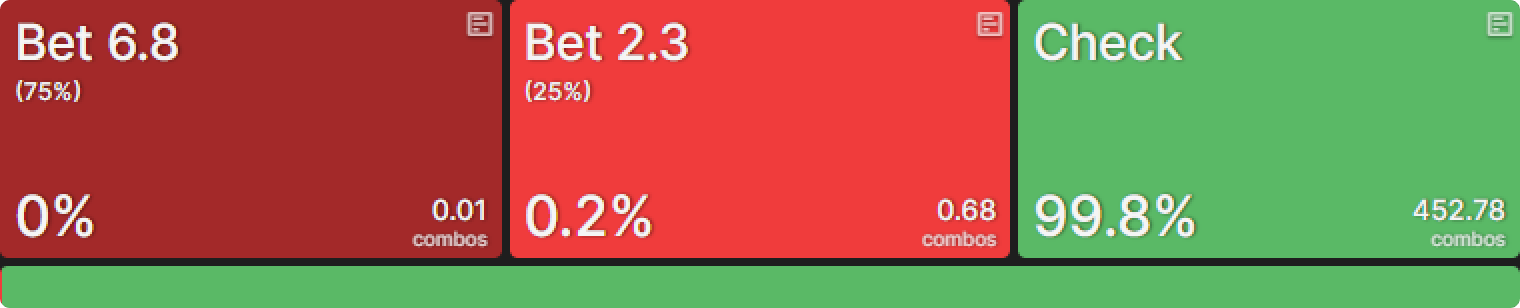
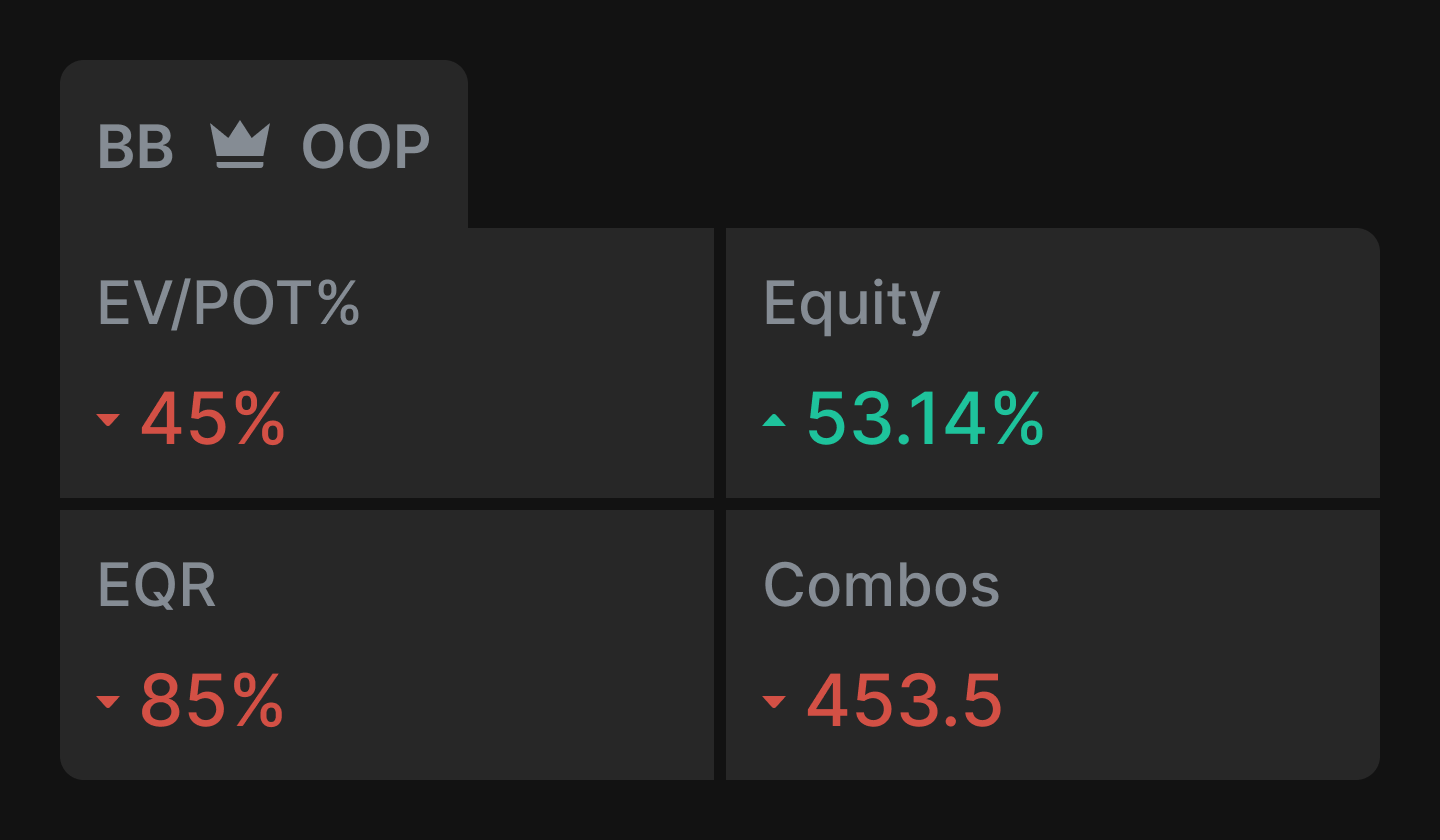
BTN goes with the full-pot strategy here again, even though the SPR is much higher than before. The main difference here is that we have the option for a pot-sized check-raise, which still leaves 73% of pot behind on the river, so we’re a long way away from simply check-jamming.
{{width: 75%}}
{{/width}}
BB’s response here involves slightly more check-raising than what we were doing against the full-pot bet with 30bb stacks, although it’s only about 14 combos instead of 8 previously.
{{width: 75%}}
{{/width}}
For this spot, I wanted to run a more thorough test to see if eliminating the check-raise option actually altered our EV substantially, given that we’re deeper stacked, and eliminating options from the tree can have a bigger impact when we’re deeper.
Instead of giving BTN only one option to bet 100% pot, I allowed five sizings of 50%, 100%, 150%, 200%, and 250%, with us having the ability to check-raise against any size and the check-raise sizing determined dynamically by the AI. I measured both our overall EV when arriving at the turn and our donk-betting frequency with sizings of 25% and 75% pot allowed. Then, I altered the tree to remove our option to check-raise against any bet size. The goal of this experiment is dual:
- Track how the decision to never check-raise on this turn card actually affects our EV.
- Whether or not it requires us to substantially alter our donk-betting strategy to compensate.
Here are the results, starting with our donk-betting strategies:
{{grid: 2fr 1fr}}
{{/grid}}
{{grid: 2fr 1fr}}
{{/grid}}
As you can see, things are pretty conclusive. Having no check-raising range against any bet size here didn’t affect our need for donk-betting in any meaningful way, and it only reduced our overall EV in the spot by 0.2% of the pot, which at this point equates to 0.0182 big blinds, or 1.82bb/100. This is a very acceptable sacrifice for the simplicity it offers:
- We no longer need to worry about check-raising anything at all in this spot.
- The homework of studying the turn check-raise node in this spot is replaced by updating our understanding of how to play the river when we now lack a turn check-raising range.
We have now established that we don’t need to have any check-raises at all on this turn brick.
Wet Turn When Deep (100bb)
What remains is to figure out what happens when the turn is not a brick and stacks are deeper. Let’s revisit that 8♦ turn card.
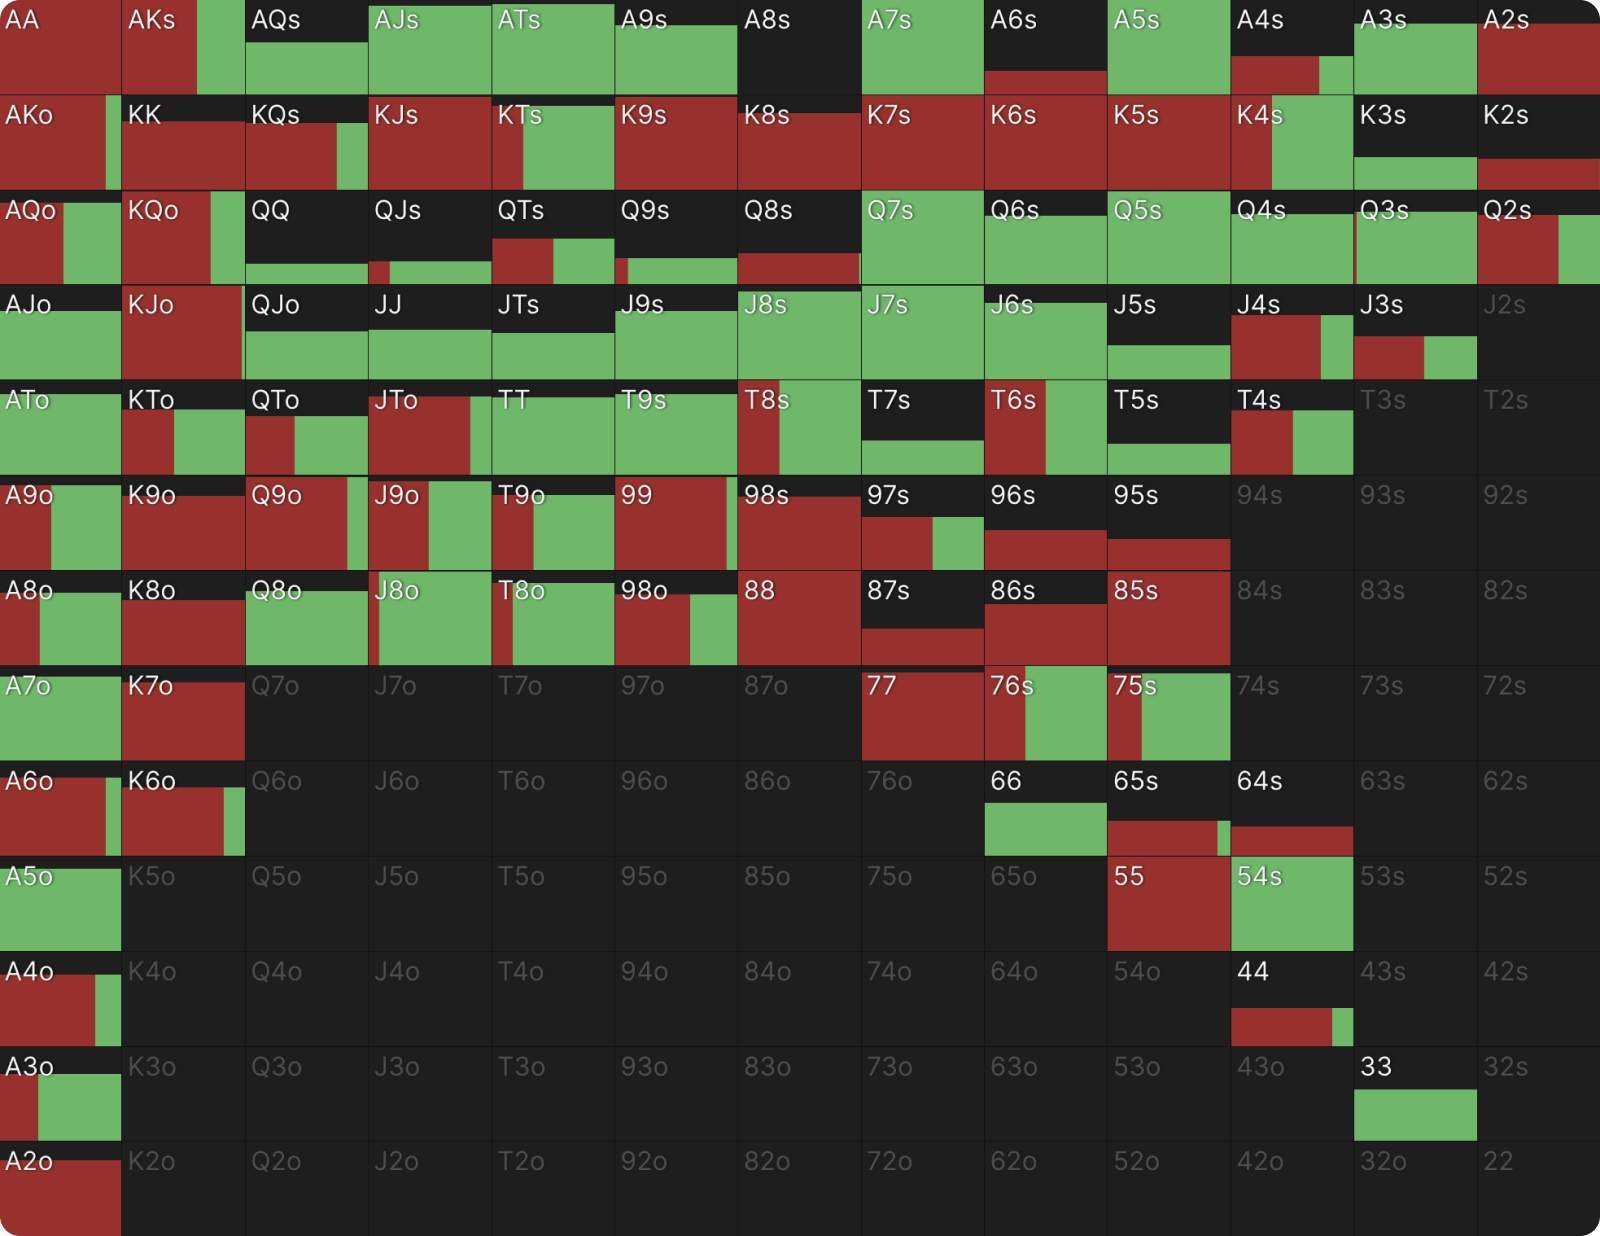
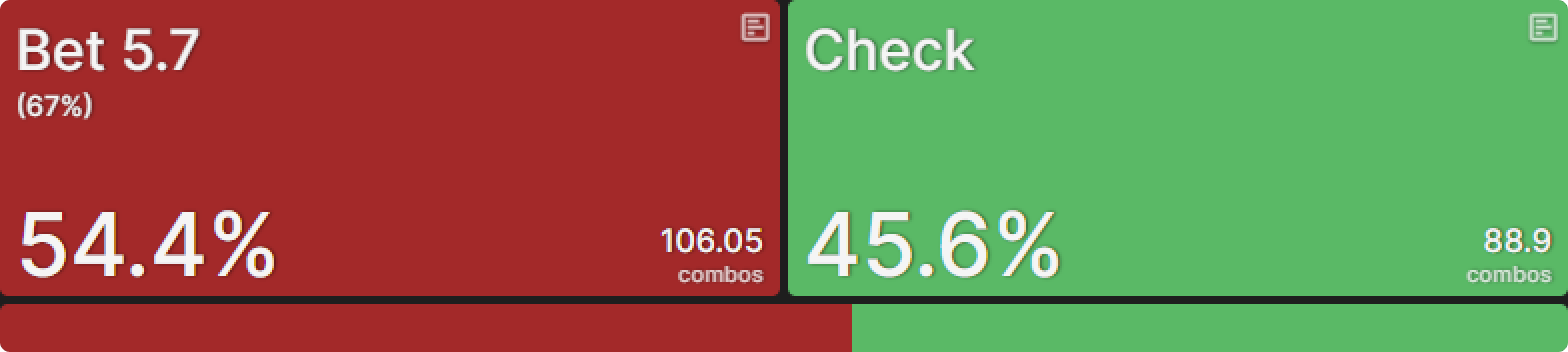
Once again, BTN’s strategy here uses a 67% pot sizing, this time at a lower betting frequency than when shallower of only 39% of their range—their capacity to bet here is slightly more limited when stacks are deeper because the downside of running into the top of our range is so much greater. It’s for this reason that hands like AK and AA are betting a lot less often, while TT–QQ are never betting.
{{width: 75%}}
{{/width}}
Interestingly, BB’s check-raising frequency is roughly the same, with the number of combos similar to playing with shallower stacks (around 42 compared to 40), but the range is constructed very differently.
{{width: 75%}}
{{/width}}
It might not seem dramatically different at first glance, but let’s put the Manhattan graphs from the ‘Breakdown’ tab next to each other to compare the two strategies. On top, we see the 30bb strategy that includes a check-jamming component, and below it, we have the 100bb strategy involving a check-raise with the non-all-in size.


There are a few differences we can discern from contrasting these two graphs. The most obvious one is at the very top of the range. At the shallower stack depth, we were happy to slow play the very top of our range, both to protect our overall range, and because we were never going to struggle to get stacks in on the river, given that the river SPR would be very low.
But with deeper stacks, we have a much greater desire to ensure we grow the pot with the top of our range—in this case, our straights—because if we don’t, then we’re not going to be able to stack our opponent anywhere near often enough to maximize our EV.
If we look at the other end of the graph, we can also see that the bluffs we’re picking at deeper stacks are lower-equity hands than when we’re check-jamming. This is for the simple reason that we’re not going to be all-in if we get called. We, therefore, don’t necessarily need to have as much equity against the calling range since we still have one more street on which we can potentially bluff and get a fold.
Another interesting trend we can note is that there’s more of a sprinkling of different hands throughout the range, with some middle-equity hands choosing to check-raise at some rate once we get deeper. In order to get a better sense of what’s contained within this range, let’s take a look at the ranges broken down by hand distribution.
Range Breakdowns: BB Turn Check-Raise
{{grid: 2}}

{{/grid}}
The main difference within BB’s value region is the fact that we’re now much more focused on the very top of our range, as we just saw before—our straights are the bulk of our value range here, with some top pair turning themselves into a bluff.
BB’s drawing region has a bigger emphasis on some of the combo draws and open-enders as opposed to weaker draws and gutshots, even though those hands don’t have quite as much equity against villain’s betting range at this depth, while basic flush draws are still a very small chunk of the range. One notable part of how we’re constructing this strategy is that while villain does technically have the option to just jam over our check-raise here, BTN does not have very much incentive to cut the game tree down by one street when they hold the positional advantage. Plus, their all-in shove is still a fairly large, pot-sized shove versus our own pot-sized raise, so they’re only doing it around 4% of the time (8 combos). As a result, we don’t have to be too concerned with protecting our check-raising range against being in an indifferent spot versus a shove.
Targeting BTN
The final part of our analysis here is to establish which part of our opponent’s bet-calling range we’re actually targeting on the turn. If you recall the shallower-stacked spot, we were mostly targeting a King without a draw, so given that those hands were betting this turn card less often, perhaps that will change in this spot?
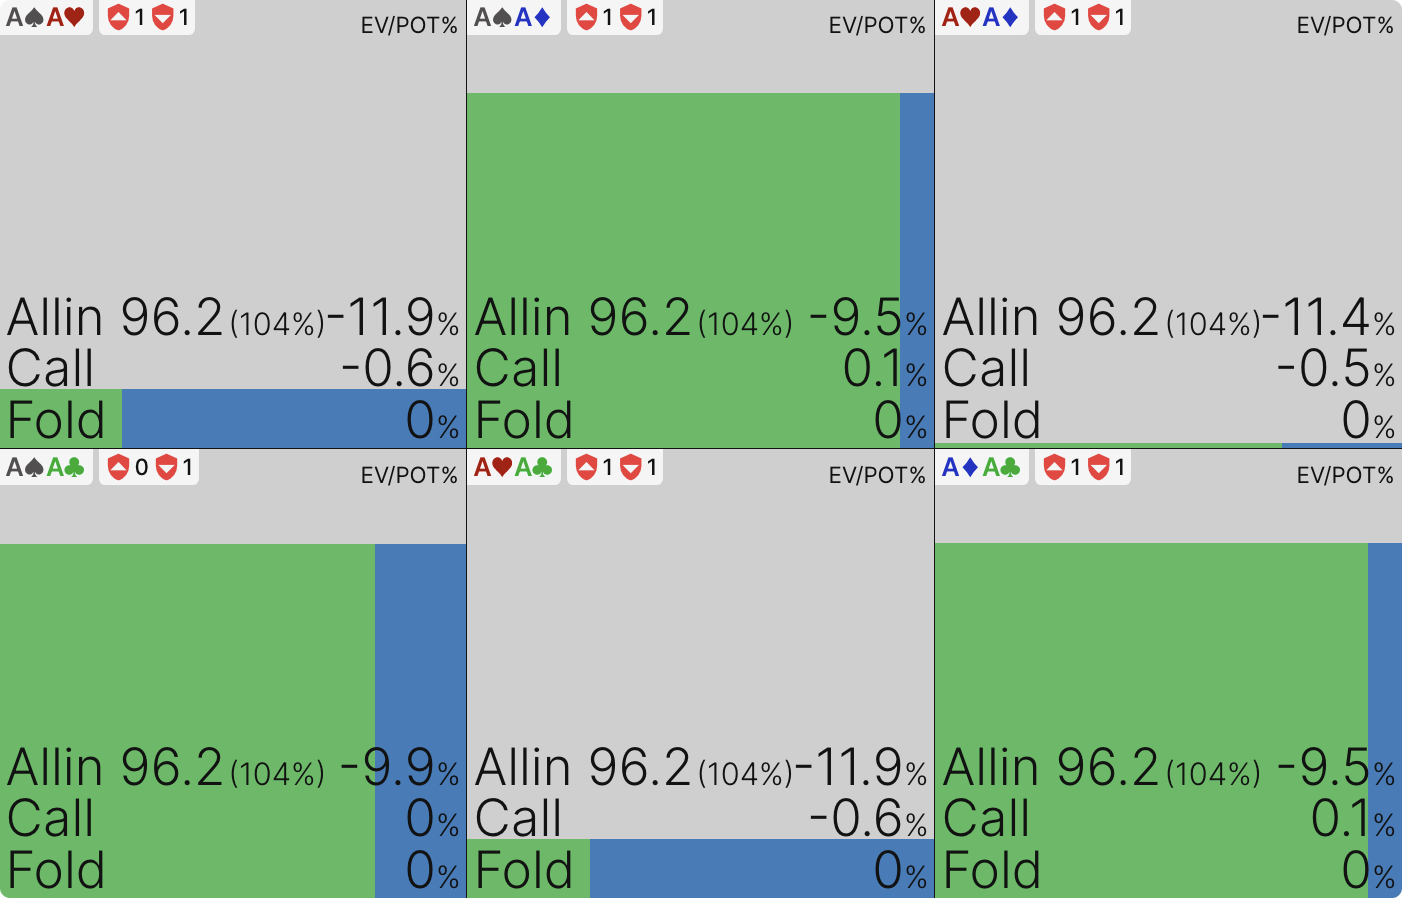
Well, as it happens, it does change to some degree, in that those top pair no draw hands are no longer indifferent. They’re actually pure folding to our raise. A hand like AKo, for example, isn’t even indifferent here; it’s a pure fold.
{{width: 75%}}
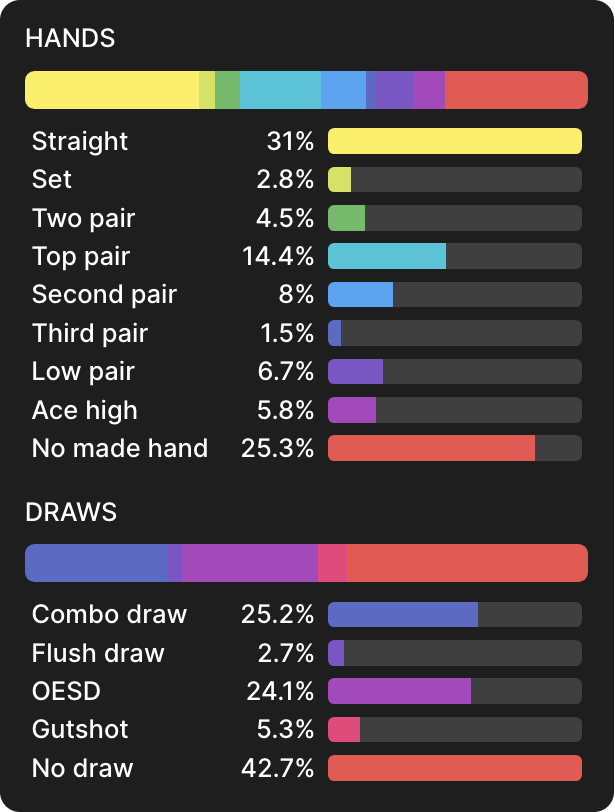
{{/width}}
As you can see from this graphic, calling the raise with AKo would lose around 4% of the pot—a fairly substantial loss of around 2bb, or 200bb/100 hands. By contrast, a great example of a hand that is very close to perfectly indifferent here is 99—depending on the exact combo, the EV of calling is somewhere between -0.8% of the pot and +0.2% of the pot:
{{width: 75%}}
{{/width}}
In what is a 43bb pot by this point, this is a pretty good outcome—it’s tough to get much closer to indifference than that. The same is true for AA:
{{width: 75%}}
{{/width}}
In fact, AA has an interesting distinction in this spot because it’s actually the only call with one pair no draw hand at any frequency at all. In the previous spot, we were targeting the one pair no draw hands for indifference, but now we’re mostly targeting them for folds. The hands that are indifferent are awkward draws like T9o or pair+gutshot like 99.
We’re also targeting some portion of the top of BTN’s range for indifference, but in a different way. Our opponent might want to be able to jam some two pairs or sets for protection, but there are enough straights in our check-raising range that they can’t benefit enough by doing that, so we’re keeping them indifferent between calling and jamming.
Conclusion
With all those ideas in mind, we’ve now reached a point where we can consolidate our conclusions into some general heuristics.
Harvesting Heuristics
Any time the turn is a pure brick and IP’s betting range is highly polarized.
- Simplify to never check-raising the turn, which comes with only a very minor loss of EV, regardless of stack depth.
At the start of this article, a distinction based on sizing was introduced, allowing us to divide check-raises into two categories. Here are some heuristics to keep in mind for each type.
At shallower stack depths, you’ll mostly want to size turn check-raises = all-in.
- Prioritize vulnerable value hands while slow-playing the very top of your range.
- Bluffs come primarily from weaker combo draws and pair+draw hands.
- We’re targeting one pair no draw hands for indifference
At deeper stack depths, you’ll start to find turn check-raises = non-all-in.
- Prioritize the very top of your value range, which needs to play for stacks.
- Bluff with a slightly more diverse range, from higher-equity draws to some pair+suit blocker hands.
- We expect almost all one pair no draw hands to fold. So, we mostly target awkward drawing hands for call-or-fold indifference and strong but non-nutted value for indifference between calling and jamming.
Hopefully, these heuristics will allow you to navigate these spots a little more easily in the future. They’ve certainly been of great help to me. This has been my first contribution in article form for GTO Wizard. I’m looking forward to digging into more of these spots to figure this game out, one article at a time. Happy to hear your feedback or ideas for future pieces.

Playing Under 10bb – Part 2: ICM
Studying shallow stack play when ICM is a factor is even more important than studying it in ChipEV Scenarios. This is because we are at the business end of the tournament, where every decision has significant real money implications.

Playing Under 10bb – Part 1: cEV
The solvers have shown us that short stack strategy can still be very nuanced, and as you will see today, most players are probably punting too much when they find themselves with a micro stack.

Register Late, Win More: The Math Behind Smarter Tournament Entry
The immediate positive impact on ROI of late registration can be quite significant. This article analyzes real-world tournament examples to study two variables related to late registration, with a focus on maximizing profitability: