Dominate the River in 3-Bet Pots OOP
Playing the river may seem scary. Pots, on average, have been swelling up big time at this point, and even small mistakes can mean a substantial loss of big blinds. But do not panic because after digesting this article, you will be ready to outplay your opponents and maneuver as the preflop aggressor (PFA) from out of position (OOP) through all kinds of challenging river spots in 3-bet pots. Let’s get our feet (and hands) wet by immersing ourselves in the world of rivers!
Impact of Earlier Streets
As discussed in the previous article “Mastering Turn Play in 3-Bet Pots OOP,” earlier streets have significant consequences for our game on later streets. How we construct our turn range will always affect how we play the river.
Let’s examine the following scenario more closely to understand how turn play impacts our river game plan.
After frequently betting for a small sizing on the flop, the SB arrives with an extensive range on the turn, and so does the BTN. Due to the excellent pot odds, IP has to defend very wide versus a 20% flop c-bet.
Hands like second pair (9-x) and underpairs (TT–QQ) are, therefore, still strong enough to bet again for a small sizing. They get called by worse pairs and benefit from protection by denying a decent amount of EQ. On the other hand, the SB still has a notable number of hands that want to build even larger pots, such as strong King-x, two pairs, and sets. These hand classes would prefer a bigger turn sizing.
We can now use different turn strategies. Let us determine how splitting the betting between a small (20% pot) and big (75% pot) turn sizing will impact how we play the river on a board-pairing nine.
River After Small Turn Barrel
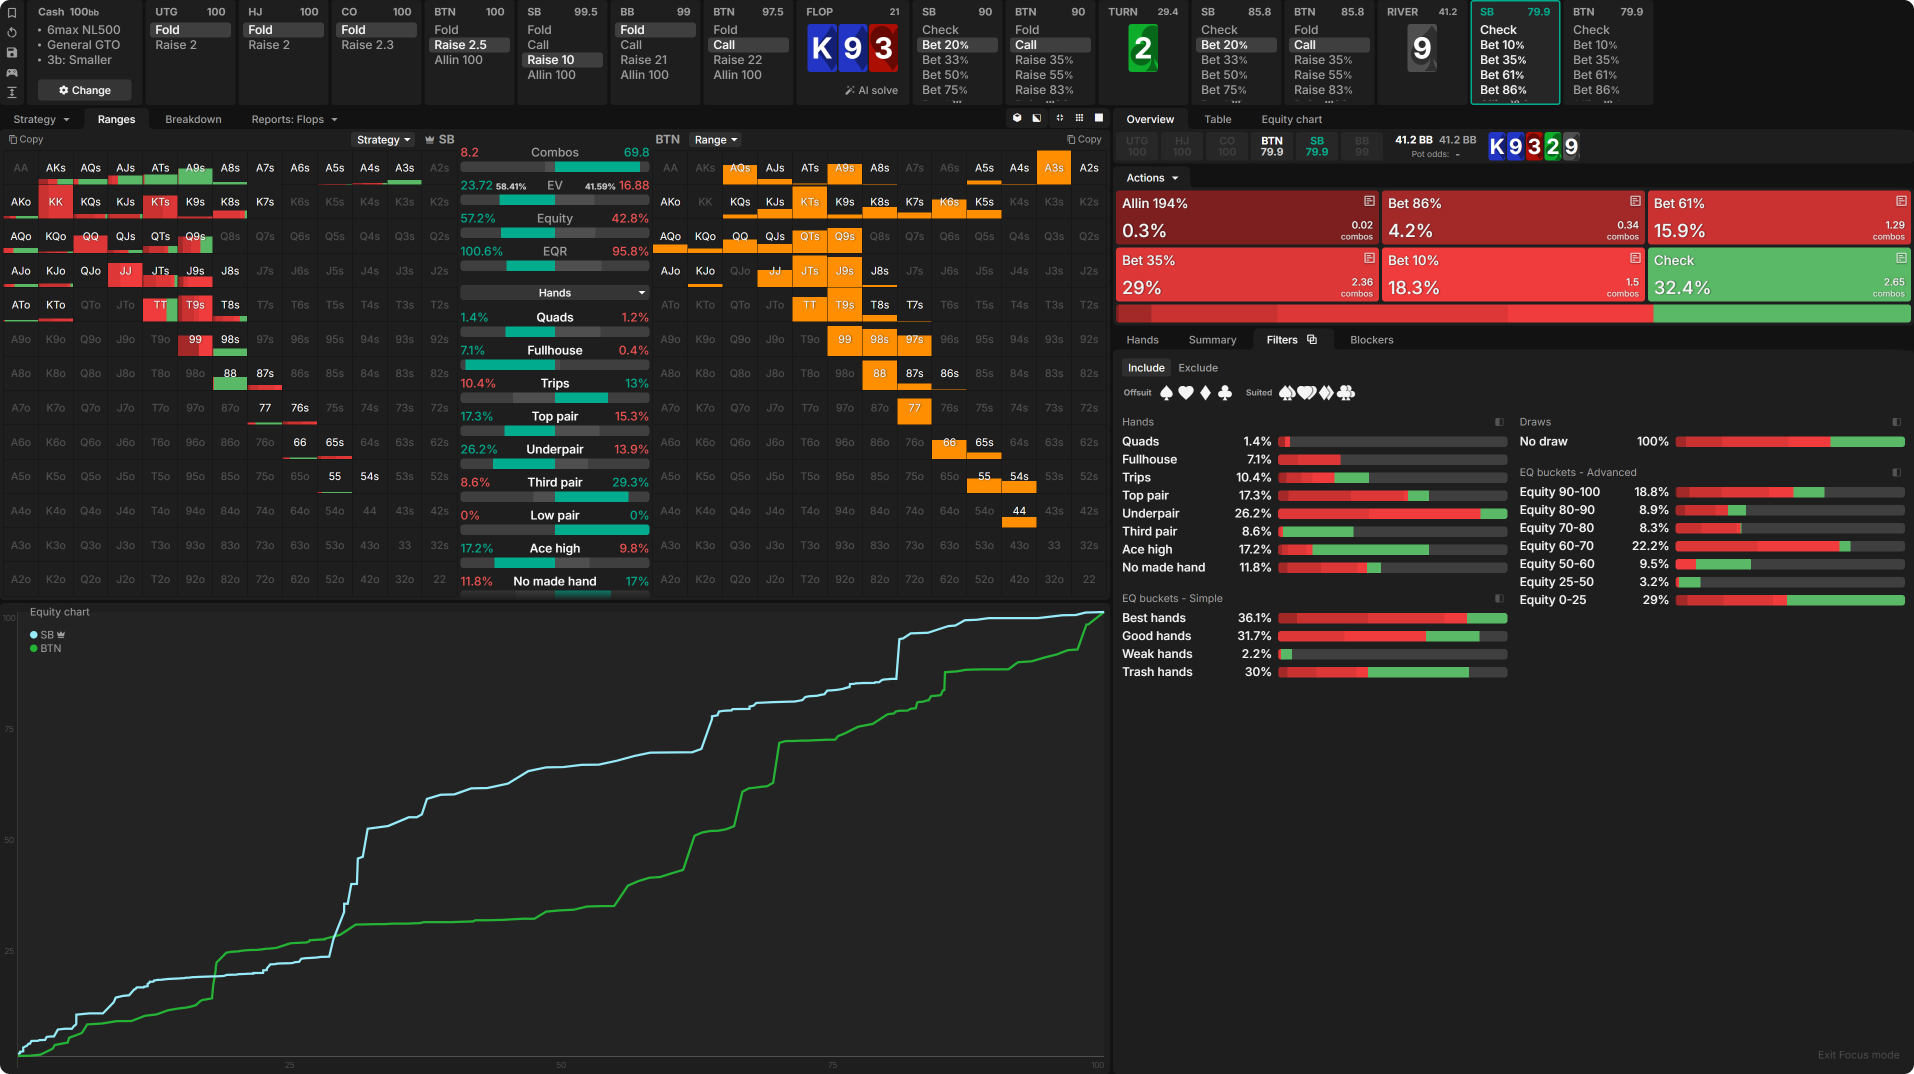
First, let us explore the river after betting small on the turn. When we take a look at the “Ranges” tab and the “Equity chart,” a couple of things stand out immediately:
- The SB shows up with a considerable advantage on the river! Betting 20% on the turn allows OOP to include a good chunk of 9-x, which means OOP rivers some amount of trips, even relatively close to the amount of the IP player.
- OOP arrives with more full houses on the river. IP raises their sets and K9 very aggressively on earlier streets versus the small sizes, while we put hands like KK into our small-betting range since they block much of the hands that call bigger bets.
- OOP has a significant advantage in TT–QQ (underpairs), while IP has way more third pairs. The SB is small-betting the turn a lot with those TT–QQ, while the BTN is forced to continue with a notable amount (over 80% of the time) of third pairs versus a 20% bet. This means those underpairs are still worth a small bet on the river in SB’s shoes because IP has so many weaker pairs.
- TLDR: The SB’s range, in general, dominates IP’s range. Due to the nature of both ranges—with the BTN being forced to continue with an extensive range on the turn (almost 85% of the time) and the SB already having an advantage on flop and turn—the SB gets to bet river very frequently with a merged range for various sizes.
River After Large Turn Barrel
To further drive home the point of the impact of turn play, let us now take a glance at our river strategy after using a bigger (75% pot) turn bet:
We will, once again, consult the same tools—the ”Ranges” tab and “Equity chart”— to understand what’s happening. What differences do we notice?
- What stands out the most is that the SB now finds themselves at a disadvantage in most of the different range parts. OOP doesn’t double barrel any 9-x for a large sizing, while IP still defends all 9-x. The BTN also gets to continue significantly less versus the 75% pot bet sizing, which heavily filters IP’s range and makes it much tighter. IP arrives on the river with almost 3 times fewer underpairs, way fewer bricked draws, and practically no single Ace-high. IP’s range is much stronger and more concentrated around top pairs and trips.
- OOP, conversely, arrives with much more air and even significantly fewer nutted hands on the river. The result is that the SB now has to check a lot and can not use large sizes due to the nut disadvantage that they find themselves in.
The drastic differences in OOP’s river strategy showcased how important it is to understand how our ranges look on previous streets.
Building an unbreakable river strategy to bridge across requires understanding the foundations laid in the earlier streets because you will be building on top of them.
If this clicks with you and you want to learn more about how to master flop and turn in 3-bet pots OOP, these previous articles provide a good pathway into just that:
Why Using Multiple Sizes on the River Is Essential
We generally split our range into multiple sizes because there are various hand classes that explicitly want to bet different amounts to achieve different things. As we examined in the previous articles about playing 3-bet pots OOP, using multiple sizes on earlier streets is not mandatory.
The EV difference between having a more complex strategy with multiple sizes and a simple one with just one size is often very close. The issue is that the difficulty of executing a multi-size strategy will increase drastically compared to the simplified single-size strategy. Splitting our range as early as the flop and/or turn implies a larger game tree with many more nodes and branches that have to be considered and studied. In theory, all these different lines have to be balanced with the right amount of strong hands and bluffs. The following graphic displays the exponential nature of game complexity when using various flop and turn sizes:
- On the left, a simpler game tree with one bet size on flop and turn, to only split on the river into two bet sizes.
- On the right, a more complex game tree that already splits from the flop onward into two bet sizes.
(Keep in mind that there’s always the check option as well.)
We are not robots. Going with a relatively simple strategy that you’re able to play on a high level will consistently outperform a more complex one where we make way more mistakes and theoretically only gain a minimal amount of EV.
However, there are situations where we certainly want to mix multiple sizes on earlier streets for exploitative reasons, such as spots where our opponents are too passive and do not raise enough versus the small sizing. All our nutted hands would now heavily miss out on value when not enough money goes into the pot. This means we need to take matters into our own hands and use a big sizing for our strongest hands and a smaller one for our marginal hand classes. We don’t need to concern ourselves with balancing both of our lines as we are purely focusing on what each hand in our range wants. This will always be our highest EV choice versus weak opponents who are unable to counter effectively.
We aren’t there yet, though; there is one last street to traverse. Once we’re on the river, splitting our range into multiple sizings becomes indispensable; if you bet small on the flop with a hand that wants to build a large pot, you can still use huge sizes on the river to put in as much money as you wish. After the river, though, the hand ends. We need to find a size now that fits our hand’s value. When we arrive on the river with distinct hand classes who explicitly want to put in different amounts of money, we must build our strategy around two sizings. Since the hand ends on the river, there is also no future street complexity to worry about.
If you feel like digging deeper into the topic of whether multiple sizes actually matter, jump in here 🕳️🐇
Now we have learned why splitting the river is mandatory, we are mentally prepared to dive into that strategic complexity. 3, 2, 1, …
Diving Into the River
Although it might sound counterintuitive, the river is the easiest street to play on. There are no future streets to worry about, and ranges are often more defined and filtered.
However, playing the river is still no child’s play. Due to all the different rivers, finding a way to get a grip on a strong river strategy can feel elusive. We need to simplify our approach to rivers so we can smoothly navigate through all of them.
Grouping rivers will help us to find patterns and design heuristics effectively.
To get a better understanding of river play, we are going to explore two different groups:
- Brick river
- Nut-changing river
Dry, Brick Rivers
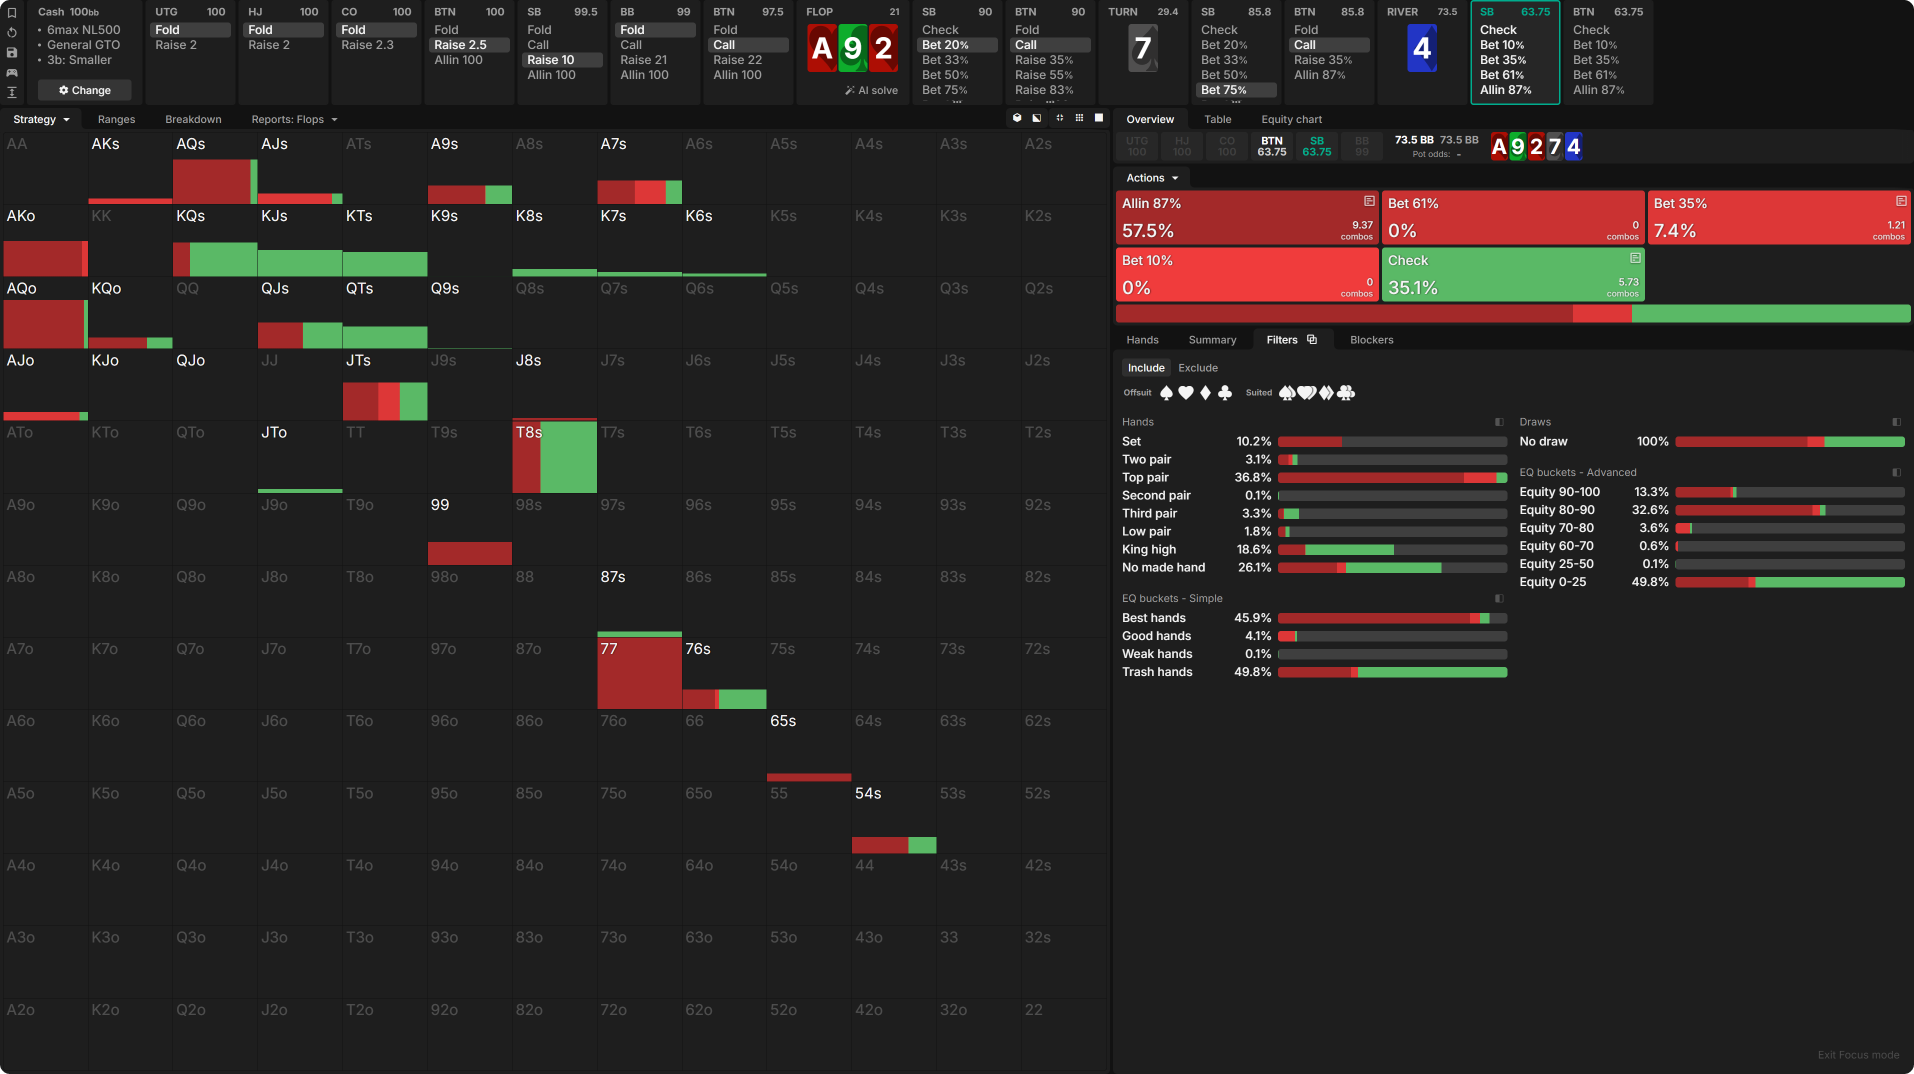
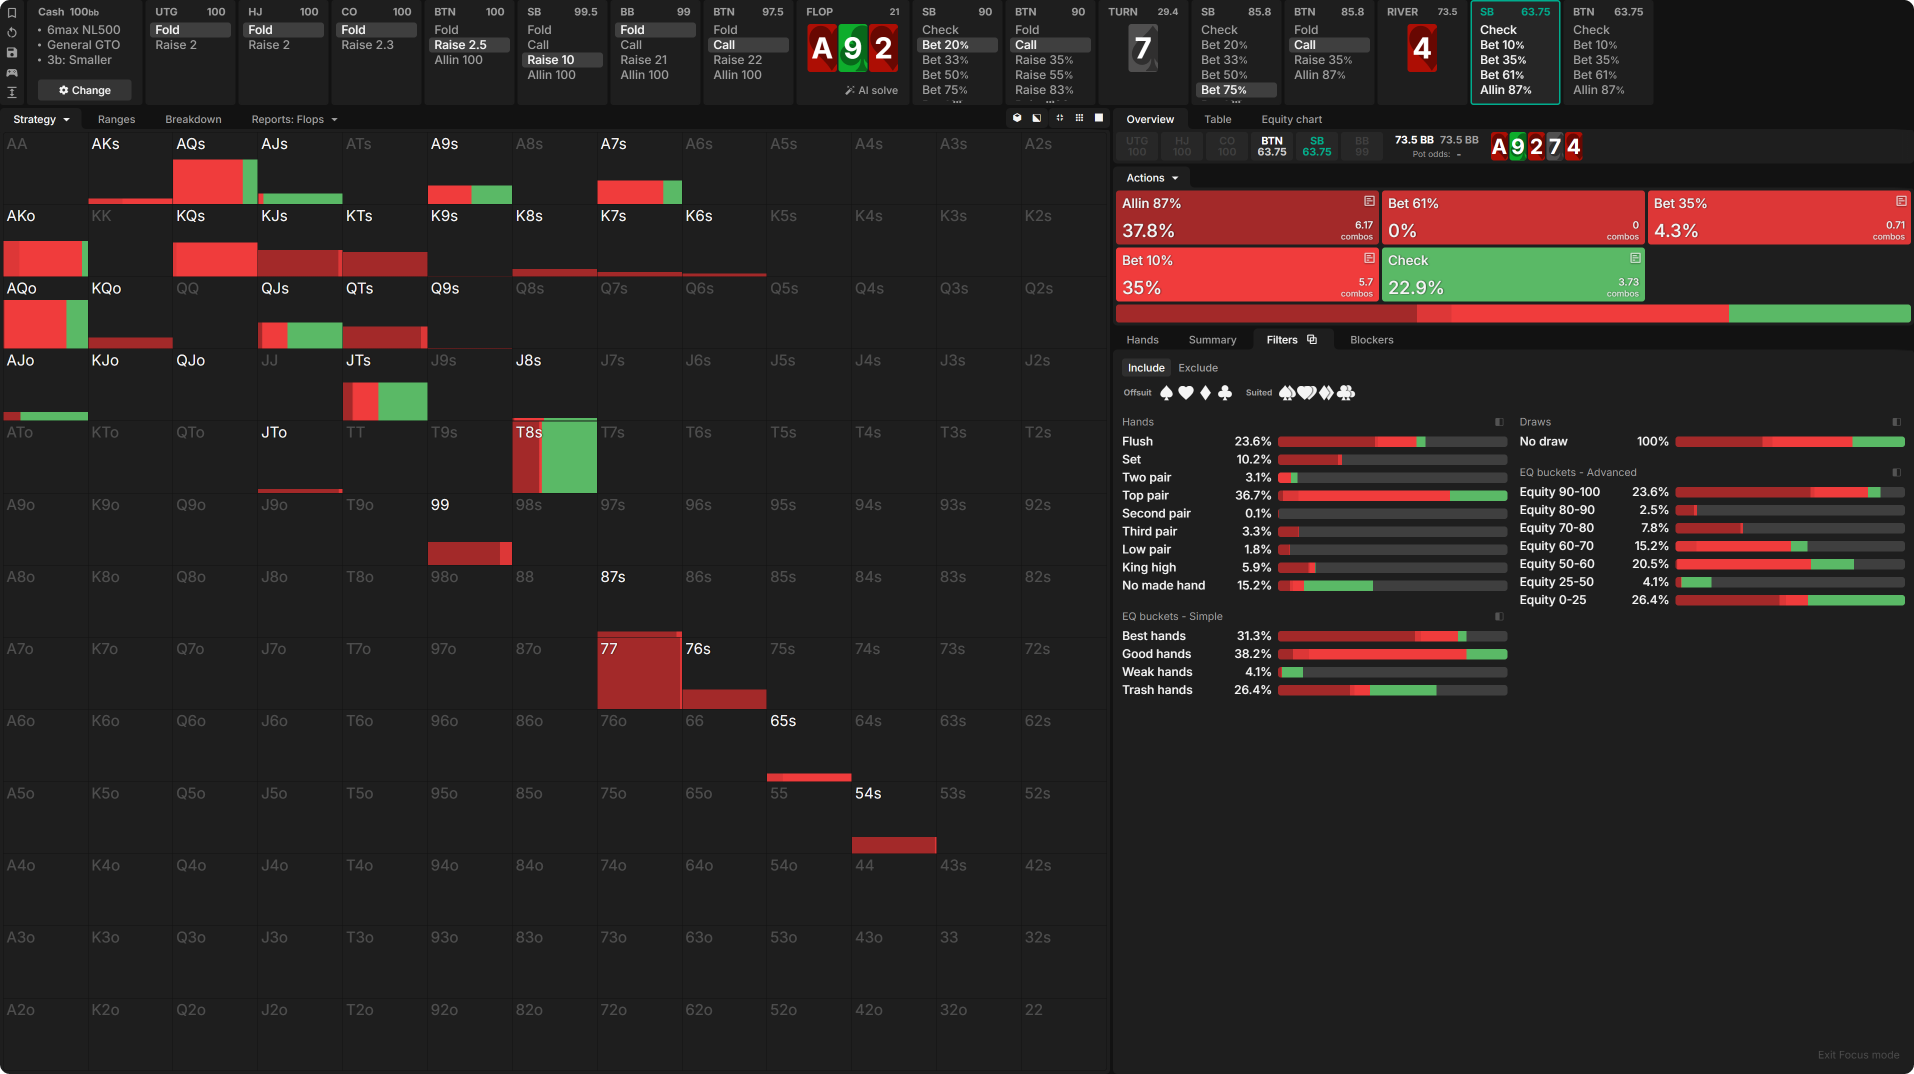
To portray how to play on cards that don’t shuffle up the equity distribution of the ranges after the turn action has concluded, we will examine A♠9♣2♥ 7♠ 4♦.
When reviewing the river strategy, one thing should immediately catch your eye!
- The SB mainly has one large (all-in) sizing. The only hand that wants to use a smaller sizing is AJ. AJ only makes up roughly 3.6% of our entire range. When certain hands wanting to use a specific size are very scarce, we don’t need to bother building a strategy around that.
The question is, why do we just use one large sizing here?
The question is, why do we just use one large sizing here?
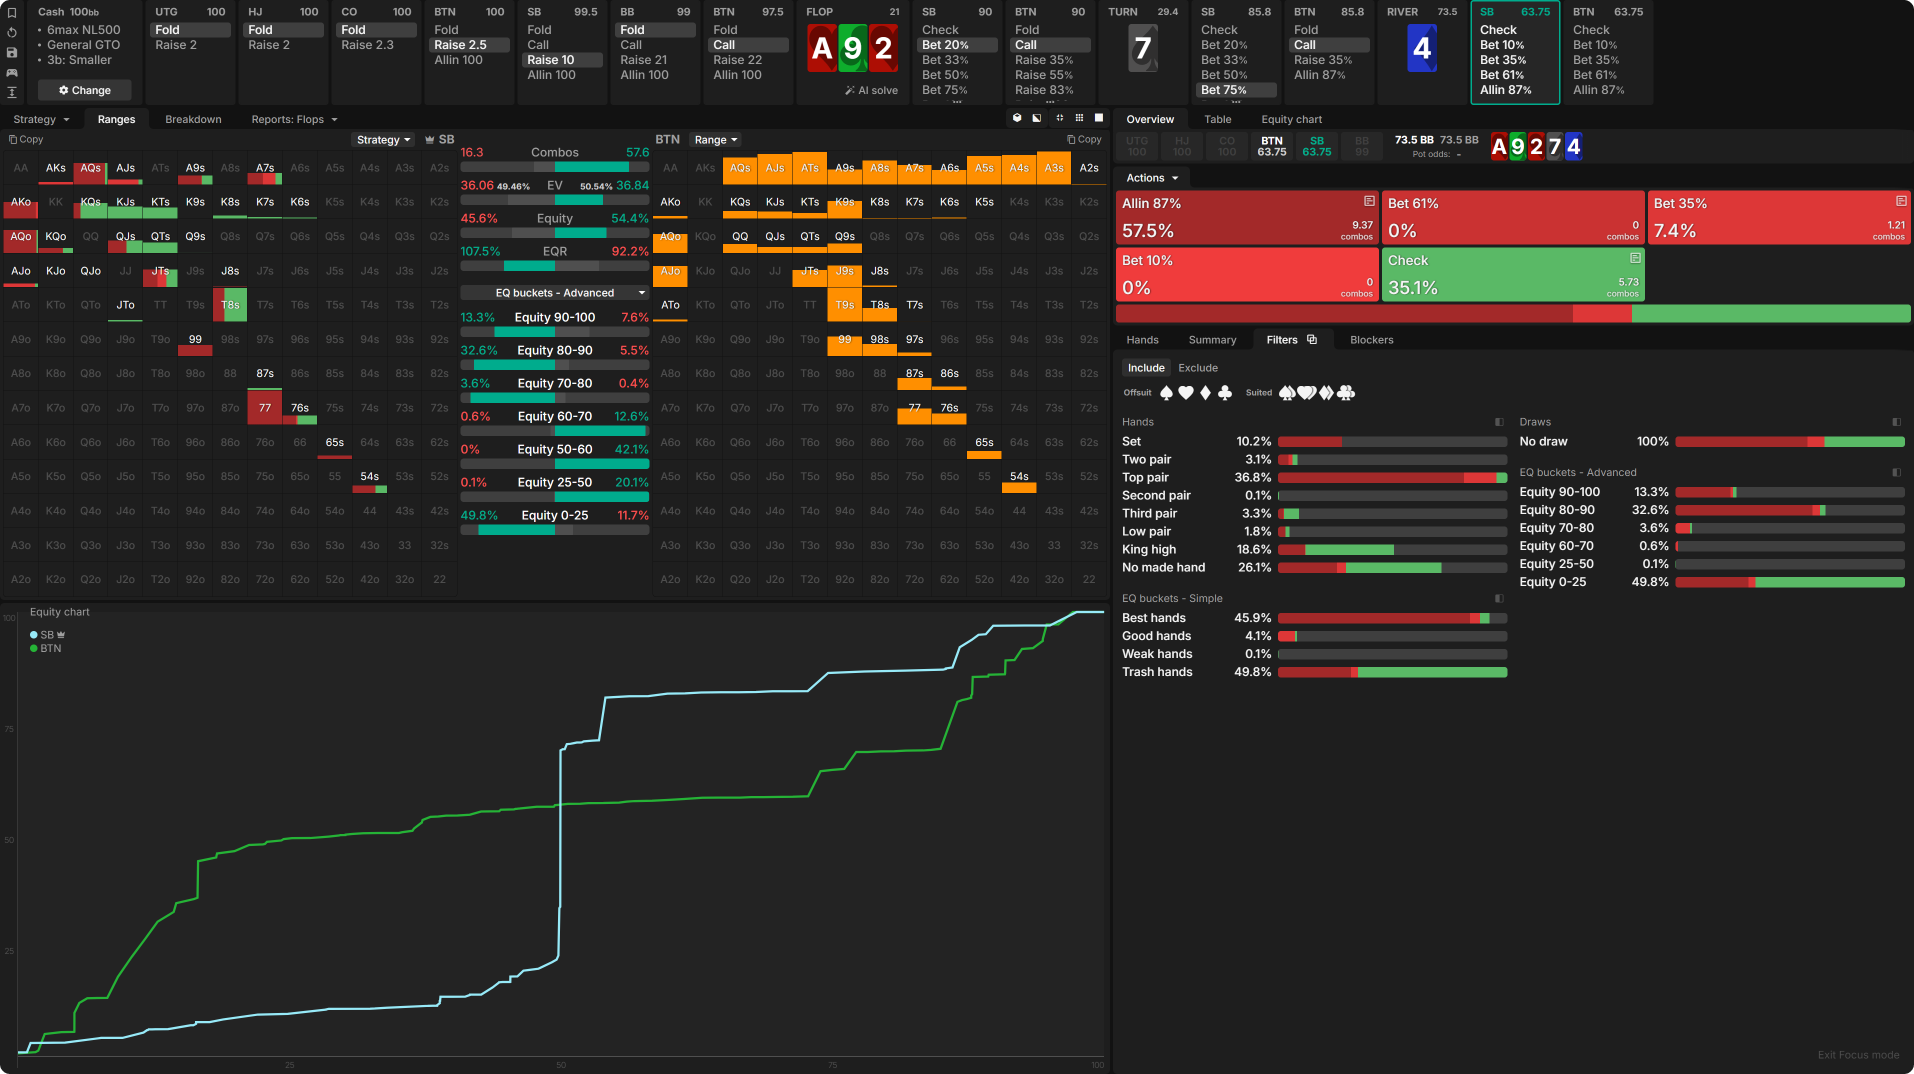
Let us find out together with the help of the EQ buckets and chart!
What do you notice here? There are two interesting things to find that explain why the SB only wants to go all-in (87% pot):
- The EQ buckets and chart from the SB clearly indicate a highly polarized range. The SB has considerably more nutted and strong hands with 80–100% EQ but also way more very low equity hands (air) below 25% EQ.
- The BTN’s range, however, is dense in bluff-catchers with between 25–70% EQ. All hands with more than 80% EQ (i.e., AQ and better) are strong enough to go all-in, given that the SPR < 1.
This undoubtedly shows us that due to SB’s polar nature and the relatively low SPR, they have little—remember AJ—to no interest in using a smaller size. This is usually the case on brick river runouts after having polarized previous streets being 100bb deep. We can often simplify to checking or going all-in.
It is important to note that SPR plays an important role here, though!
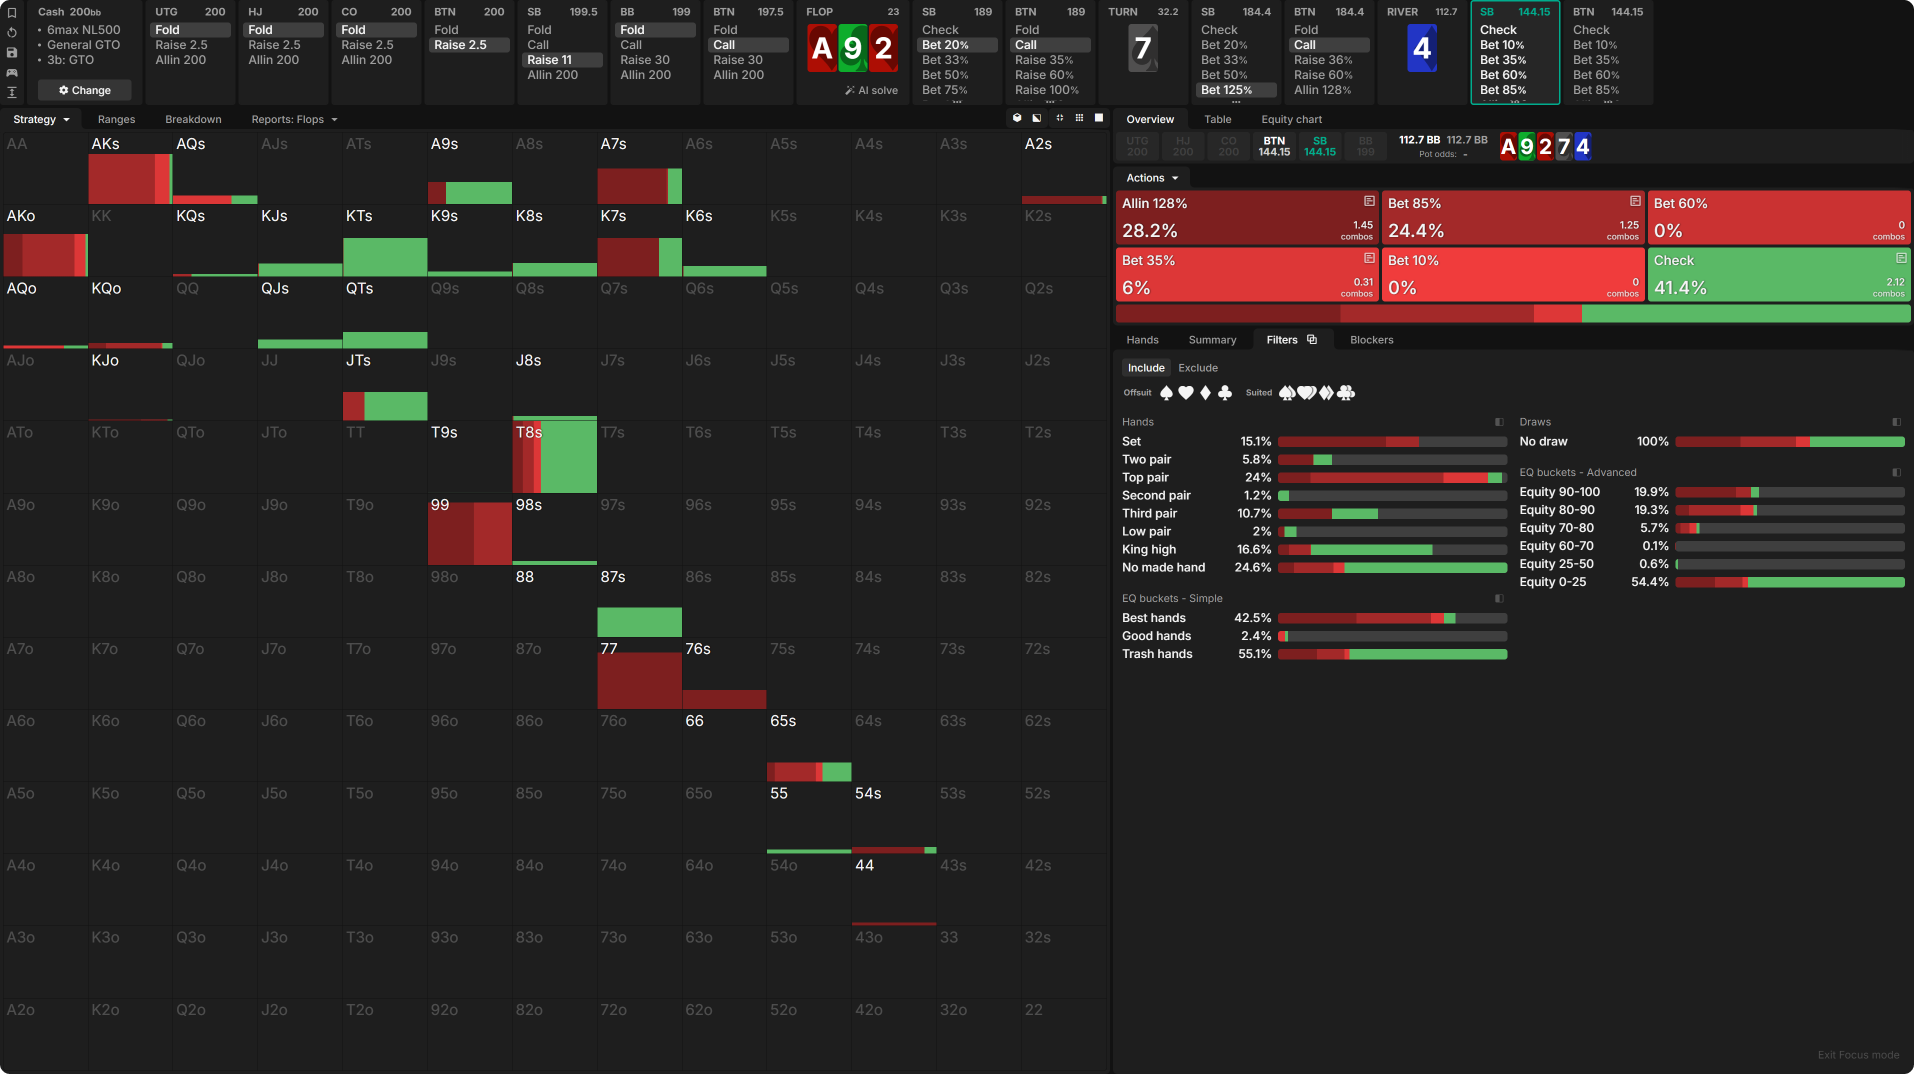
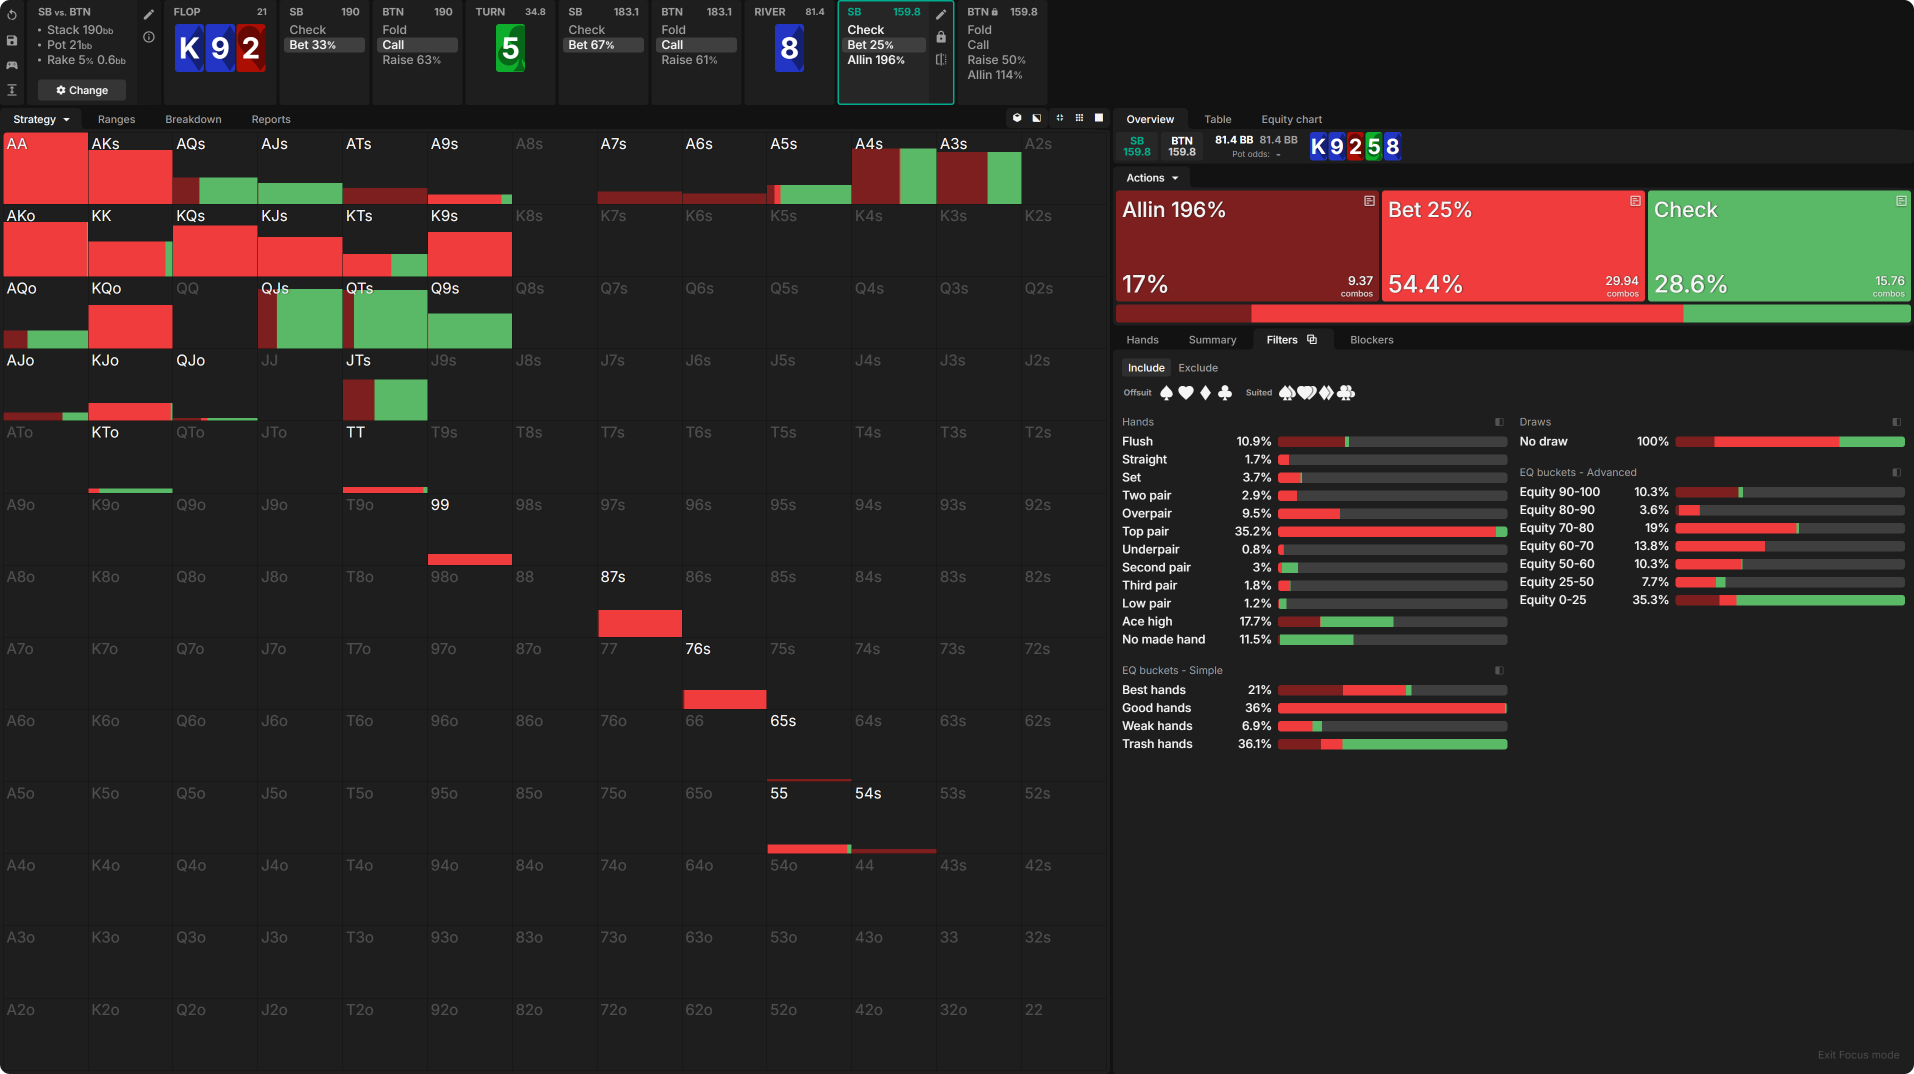
Deeper Rivers
When we explore the same spot, but being 200bb deep, we can see that the SB now clearly wants to use non-all-in sizes too. Hands like AK/AQ that were previously strong enough to go all-in, don’t get called enough by worse when they jam with an SPR of ~1.28 (instead of ~0.86). In this case, it’s worth building a smaller size around a hand like AK since this hand alone makes up almost 20% of OOP’s river range in this spot!
Wet, Nut-Changing Rivers
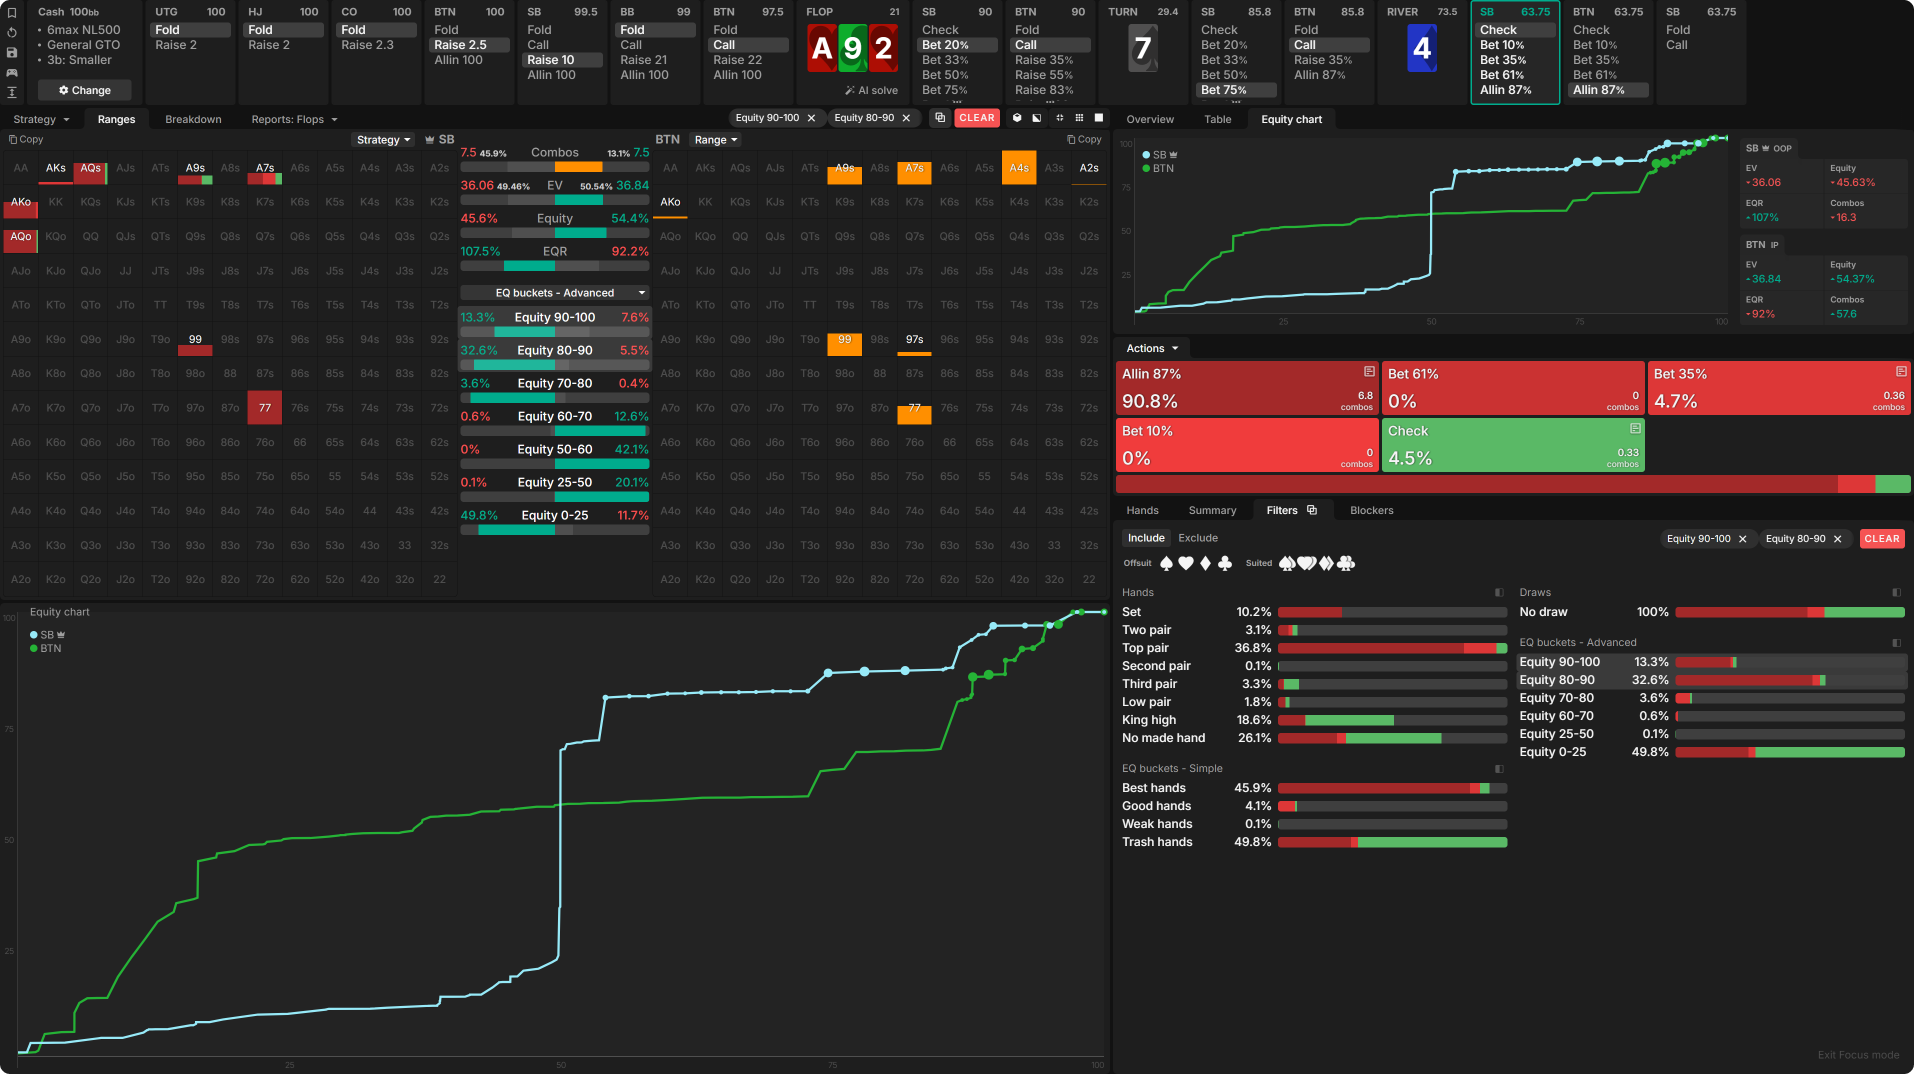
To contrast, we can compare the same spot up to the point where the river card now changes the nuts: a flush-completing 4♥.
Comparing the river strategy on the flush-completing 4 demonstrates one thing:
- OOP now clearly wants to use one small and one large size. All of SB’s strong turn hands, such as two pairs or the best top pairs, got devalued on this nut-changing river. They are now only strong enough to bet for a small size. Blocking the river often outperforms checking in nut-changing spots, because we prevent the opponent from checking back all worse hands or re-opening the action for a larger size.
Let’s switch tabs—from “Strategy” to “Ranges”—to examine the reasons for this strategic shift a bit more closely.
The EQ buckets and chart are now slightly different. The BTN gains a significant amount of nutted hands, which severely reduces the SB’s nut advantage. Due to the nut change, all of SB’s turn nuts, and very strong hands such as AK or two pairs are now downgraded in the hierarchy of EQ buckets. For that reason, OOP now dominates the buckets between 25 and 80%; it also perfectly illustrates why OOP wants to have a small-betting range: OOP has a lot of medium-strength hands now that still can go for thin value but are too weak to jam.
The slightly more tricky part is now to figure out which size each hand prefers.
- Value – We need to define a value threshold to determine which hand classes go for what size. Looking at the river strategy, we want to jam with all our sets and better. Our two pairs, AK and AQ, go into our small sizing. A cool heuristic here is that the weakest hand that could have gone all-in on a brick river also fits the threshold for blocking on a nut-changing river. We put some of our flushes into our small size to prevent our small-betting range from becoming too weak. Usually, flushes that heavily block the calling range, like K♥Q♥.
- Bluffs – Finding the right bluffs for each sizing can be more challenging. But don’t worry, we got you! Generally, on the river, it comes down to blocking effects:
• Using bluffs with good blocking effects for our big sizes.
• And bluffs with poor blocking qualities use the small sizes or just give up.
This begs the question: “What are good and bad blocking effects?”
The answer is: “It depends… on what your hand wants to accomplish.”
When it comes to bluffing hands, look for these effects:
Block calls
Block folds
Block calls
Unblock folds
Block folds
Unblock calls
Unblock folds
Unblock calls
Let’s apply this to our river spot:
- Good bluffs are hands like KQo with one ♥; these are fantastic combos for the big size, blocking strong flushes and calls like AK/AQ one ♥.
- Poor bluffs are hands like 65 that don’t block the folding range, which is decent, but don’t block any strong hands. They can go into our small-betting range. They also benefit more from folding out better air, such as T8. So we don’t need to get many folds to be profitable. Pretty bad bluffs would be hands like JTs, not really blocking calls and mainly blocking villain’s folds such as AT/AJ.
Note that it isn’t always possible to be so picky. Sometimes, it’s also a question of whether you run out of (pretty) bluffs. The fewer bluffs you have to choose from, the less picky you can be.
Curious for more info on this topic, chase the rabbit here 🕳️🐇
When Being Allowed to Over-Fold the River
You might have heard about MDF (Minimum Defense Frequency). It describes the minimum amount of hands within your range that you need to defend to remain unexploitable. While this often applies, there are spots where we are allowed to over-fold relative to MDF.
Let’s look at a practical hand example to see this concept in action. We can use the same spot as before, which has the additional benefit of keeping us in familiar waters.
After facing a BTN all-in for 87% pot, MDF suggests that OOP must roughly defend 53.5% of their range. As we can see, though, the SB massively over-folds here by only defending 10.8% of range.
- As we already determined, OOP’s range is highly polarized, and IP’s range mainly consists of bluff-catchers. OOP doesn’t gain anything from checking strong hands on the river because IP has no incentive to re-open marginal hands into a polarized range built around nuts or air.
By examining OOP’s best hands with more than 80% EQ, we can confirm that the SB basically never checks their strongest hands.
The BTN is now able to bluff all their air without getting punished. To be clear, the SB is not getting exploited here. They already gained their EV by polarizing on earlier streets and having no incentive to check the river with strong hands due to the polar vs condensed range dynamics. The BTN doesn’t get to float all their air on the turn, and then on the river, they just get to hammer into OOP once they check. The SB will often just bet themselves, so IP doesn’t get much opportunity to bluff. These spots where OOP over-folds the river usually occur when OOP has bet flop and turn with a highly polarized range.
Fascinating to explore because we get to see counterintuitive concepts manifest due to the nature of both ranges.
One Important River Exploit
Exploring theoretical concepts can be very helpful in grasping the complexity of particular spots. It even becomes mandatory to study theory to understand what mistakes our opponents are making and how we can capitalize on them. In practice, we always want to deviate as much as possible to capture the highest EV.
There is one spot in particular where many players leave a lot of money on the table. Instead of simply explaining the exploit, let’s do a little experiment with our nodelocking tool using custom solutions. Let’s get in the lab!
OOP’s strategy on the nut-changing 8♦ dictates a lot of blocking. IP arrives with slightly more flushes and sets on the river. Overall, it’s a pretty decent card for the BTN.
Let’s assume we face an overly passive player who is not raising enough versus the block-bet. IP has to raise over 20% facing the small size!
Now, when we nodelock villain to raise only half of the time, by taking out especially the thin value-raises such as specific two pairs or sets. The result is an eye-opener:
We are now checking approximately 25% less and using the 2x pot all-in size 4 times as often. Pretty cool, right?
- We check significantly less because IP is not raising enough. This means our block sizing realizes more EQ, and we are pushed less often off our hand.
- We also use the all-in sizing considerably more because villain is not raising thin enough. Our nutted hands severely bleed EV when they are not getting raised enough. A decent heuristic is that in spots where we know villain is not raising enough, especially with thin value, we don’t want to put our strong hands into the small size.
Remember that most players in lower- and even mid-stakes games are often too passive, so this exploit will help you outplay many opponents!
Conclusion
Playing the river in 3-bet pots OOP can be tricky. This should not discourage us from seeking new knowledge to fortify our game or pursuing new abilities. The following concepts will help you in your journey to 3-bet pot river excellence as the OOP player!
- How we constructed our ranges and influenced our opponent’s on previous streets is the foundation that a sound river approach is built upon. To avoid slipping up on how to play the river, recall the previous streets’ actions and how that shaped the ranges.
- Using multiple sizes on earlier streets is not mandatory. The EV difference is often minimal and doesn’t make up for the increase in complexity of the game tree, which can cause EV loss itself. River splitting becomes essential in spots with different hand classes to bet. The fact that the hand ends on the river means this is our last opportunity to build a pot of a certain size, and at the same time, we do not need to worry about future complexity.
- When we polarized on previous streets, and the river card doesn’t change the equity distributions, we can often simplify to jamming and checking at 100bb deep. The deeper we are, the more we establish multiple sizings, even on bricks.
- We must implement one small sizing for our medium-strength hands on nut-changing runouts.
- OOP is often allowed to over-fold in highly polarized river spots after betting flop and turn to then check the river due to the nature of both ranges.
- In spots where we know villain is not raising enough versus our small river size, we need to take matters into our own hands. This means putting our strongest hands into our big-betting range to avoid leaving a lot of value on the table.
The More You Practice, the Better You Get!
Repetition and hard work are inevitable if you want to improve. Check out the following drills to become an OOP river master in 3-bet pots. We take the spot we discussed to keep things familiar as a starter.
Don’t worry when you feel a little lost in certain spots. As long as you keep studying, you will gradually improve.
Author
Vanja
Vanja, a 24-year-old professional player from Germany, has built a strong reputation in the strategy game community. Beyond competing, Vanja is passionate about coaching and has contributed to GTO Wizard through insightful articles and active engagement in the Discord community.
They also played a key role in developing Pairrd Cashgame, showcasing their deep understanding of strategy and game theory.
Wizards, you don’t want to miss out on ‘Daily Dose of GTO,’ it’s the most valuable freeroll of the year!
We Are Hiring
We are looking for remarkable individuals to join us in our quest to build the next-generation poker training ecosystem. If you are passionate, dedicated, and driven to excel, we want to hear from you. Join us in redefining how poker is being studied.


